基于python的海康摄像头二次开发

本篇文章介绍基于python的海康SDK二次开发,基于海康SDK可以完成摄像头的云台控制,包括抓图、PTZ参数获取、基于PTZ摄像头控制、预置点切换等功能,而这些功能整体流程都是一样的(都需要先登录),因此以类的形式对这些常用可能进行了整合,在类初始化的时候进行摄像头登录,使整个控制流程变得更加清晰。由于公司要求,部分核心代码进行了加密处理,交流讨论联系qq:1048782143。

目录结构

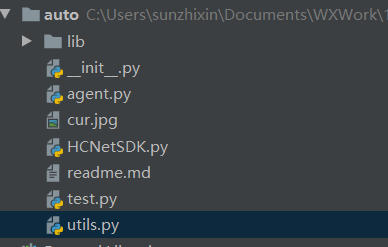
目录结构如图所示

主要包括一个摄像头控制模块类agent,工具模块util,海康SDK配置模块HCNetSDK

pipeline

通过初始化一个类,返回摄像头的登录handle,部分代码如下:

1
2
3
4
5
6
7
8
9
10
11
12
13
14
15
16
17
18
19
20
21
22
23
24
25
26
27
28
29
30
31
32
33
34
35
36
37
38
39
40
41
42
43
44
45
46
class Agent(object):
def __init__(self, ip, port, username, password):
self.ip = ip
self.port = port
self.username = username
self.password = password

# 加载库,先加载依赖库
if WINDOWS_FLAG:
# print(sys.path)
os.chdir(r'../auto/lib/win')
self.Objdll = ctypes.CDLL(r'./HCNetSDK.dll') # 加载网络库
self.Playctrldll = ctypes.CDLL(r'./PlayCtrl.dll') # 加载播放库
else:
os.chdir(r'./lib/linux')
self.Objdll = cdll.LoadLibrary(r'./libhcnetsdk.so')
self.Playctrldll = cdll.LoadLibrary(r'./libPlayCtrl.so')

SetSDKInitCfg(self.Objdll) # 设置组件库和SSL库加载路径
# 初始化DLL
self.Objdll.NET_DVR_Init()
# 启用SDK写日志
self.Objdll.NET_DVR_SetLogToFile(3, bytes('./SdkLog_Python/', encoding="utf-8"), False)

# 登录设备
(self.lUserId, self.device_info) = self.loginDev()

if self.lUserId < 0:
err = self.Objdll.NET_DVR_GetLastError()
print('Login device fail, error code is: %d' % self.Objdll.NET_DVR_GetLastError())
# 释放资源
self.Objdll.NET_DVR_Cleanup()
exit()
# 切换回原来的工作目录
os.chdir(retval)

def loginDev(self):
DEV_IP = create_string_buffer(self.ip.encode("utf-8"))
DEV_PORT = self.port
DEV_USER_NAME = create_string_buffer(self.username.encode("utf-8"))
DEV_PASSWORD = create_string_buffer(self.password.encode("utf-8"))

# 登录注册设备
device_info = NET_DVR_DEVICEINFO_V30()
lUserId = self.Objdll.NET_DVR_Login_V30(DEV_IP, DEV_PORT, DEV_USER_NAME, DEV_PASSWORD, byref(device_info))
return (lUserId, device_info)

设备登录后就可以调用一些云台控制功能,比如PTZ控制,抓图等,值得注意的是其结构体的定义:

1
2
3
4
5
6
class NET_DVR_PTZPOS(Structure):
_fields_ = [
("wAction", ctypes.c_uint16),
("wPanPos", ctypes.c_uint16),
("wTiltPos", ctypes.c_uint16),
("wZoomPos", ctypes.c_uint16)]

另外关于海康SDK的知识是其角度存储的值有一个10进制-16进制转换关系,具体而言:存的值是10进制,而具体的读数就是这个10进制的值先转换为16进制然后除以10。实际显示的PTZ值是获取到的十六进制值的十分之一,如获取的水平参数P的值是0x1750,实际显示的P值为175度;获取到的垂直参数T的值是0x0789,实际显示的T值为78.9度;获取到的变倍参数Z的值是0x1100,实际显示的Z值为110倍。所以有如下转换关系:

1
2
3
4
5
6
7
8
9
10
def HexToDecMa(x):
# 十进制转换为十六进制
x = int(hex(x)[2:].upper()) / 10
return x


def DEC2HEX_doc(x):
# 十六进制转化为十进制
x = int(str(int(x * 10)), 16)
return x

另外抓图功能也比较重要,在此记录一下:

1
2
3
4
5
6
7
8
9
10
11
12
def getPic(self):
lChannel = 1
lpJpegPara = NET_DVR_JPEGPARA()
lpJpegPara.wPicSize = 0
lpJpegPara.wPicQuality = 0
sJpegPicFileName = bytes("cur.jpg", "ascii")
res = self.Objdll.NET_DVR_CaptureJPEGPicture(self.lUserId, lChannel, ctypes.byref(lpJpegPara), sJpegPicFileName)
if res:
print("抓图成果")
else:
error_info = callCpp("NET_DVR_GetLastError")
print("抓图失败:" + str(error_info))

其中NET_DVR_JPEGPARA定义如下

1
2
3
4
5
6
class NET_DVR_JPEGPARA(Structure):
pass
NET_DVR_JPEGPARA._fields_ = [
('wPicSize', c_ushort),
('wPicQuality', c_ushort),
]

另外有时候可能是抓图生成视频,不需要写先到图像中,可以直接保存在内存里:

1
2
3
4
5
6
7
8
9
10
11
12
13
14
15
16
17
18
19
20
def Get_JPEGpicture_New2():
print("摄像机开始抓图...")
jpegpara = NET_DVR_JPEGPARA()
jpegpara.wPicSize = 5
jpegpara.wPicQuality = 0
addr_jpg = byref(jpegpara)

pbuff = create_string_buffer(1440 * 2560)
# point_sJpegPicBuffer = POINTER(sJpegPicBuffer)
if callCpp("NET_DVR_CaptureJPEGPicture_NEW", lUserID, c_long(1), addr_jpg, pbuff, 1440 * 2560, 0):
print("cap success")
# print("pbuff: ",pbuff, pbuff.value)
nparr = np.fromstring(pbuff.raw, np.uint8)
img_decode = cv2.imdecode(nparr, 1)
print("img_decode: ", img_decode)
return img_decode
# return 0, pbuff
else:
print("cap error {}".format(callCpp("NET_DVR_GetLastError")))
# return HKAdapter.hksdk.NET_DVR_GetLastError(), None

参考资料:https://blog.csdn.net/byna11sina11/article/details/110823256

基于python及c++的海康摄像头二次开发

在工程应用中特别是图像处理领域数据的来源就是摄像头,为了更好地利用这个摄像头资源可能需要调用摄像头的SDK对摄像头的行为进行控制,以下针对海康摄像头,从python和c++两种语言讲解海康摄像头SDK的调用方法。

环境部署及资源下载(c++)

基于python的海康摄像头SDK开发

  • 深度学习一般使用的python框架进行开发,因此还需要考虑对c++与python的交互
  • 海康SDK提供了python的demo代码,原理也是用的ctypes,参考:https://www.ryannn.com/archives/hikvision/comment-page-4
  • 利用ctypes包实现python调用c++代码,大致原理就是将所有的dll文件添加到一个list中,然后一个个遍历调用指定的函数
    1
    2
    3
    4
    5
    6
    7
    8
    9
    10
    11
    12
    13
    14
    15
    16
    17
    18
    19
    20
    21
    22
    23
    24
    25
    26
    27
    28
    29
    30
    31
    32
    33
    34
    35
    36
    37
    38
    import os, ctypes
    import cv2

    # 遍历动态链接库目录
    def add_dll(path, dll_list):
    files = os.listdir(path)
    for file in files:
    if not os.path.isdir(path + file):
    if file.endswith(".dll"):
    dll_list.append(path + file)
    else:
    add_dll(path + file + "/", dll_list)

    # 载入动态链接库
    def callCpp(func_name, *args):
    for so_lib in so_list:
    try:
    lib = ctypes.cdll.LoadLibrary(so_lib)
    try:
    value = eval("lib.%s" % func_name)(*args)
    # print("调用的库:" + so_lib)
    # print("执行成功,返回值:" + str(value))
    return value
    except:
    continue
    except:
    print("库文件载入失败:" + so_lib)
    continue
    print("没有找到接口!")
    return False

    # 云台控制操作
    def NET_DVR_PTZControl_Other(lUserID, lChannel, dwPTZCommand, dwStop):
    res = callCpp("NET_DVR_PTZControl_Other", lUserID, lChannel, dwPTZCommand, dwStop)
    if res:
    print("控制成功")
    else:
    print("控制失败: " + str(callCpp("NET_DVR_GetLastError")))
  • 如果SDK中的函数输入是结构体,则在python中需要进行如下构造:
    1
    2
    3
    4
    5
    6
    7
    8
    9
    10
    11
    12
    13
    14
    15
    16
    17
    18
    19
    # 抓图数据结构体
    class NET_DVR_JPEGPARA(ctypes.Structure):
    _fields_ = [
    ("wPicSize", ctypes.c_ushort), # WORD
    ("wPicQuality", ctypes.c_ushort)] # WORD

    # jpeg 抓图
    # hPlayWnd 显示窗口可以为 none;存在缺点采集图片速度慢
    def NET_DVR_CaptureJPEGPicture():
    sJpegPicFileName = bytes("pytest.jpg", "ascii")
    lpJpegPara = NET_DVR_JPEGPARA()
    lpJpegPara.wPicSize = 2
    lpJpegPara.wPicQuality = 1
    res = callCpp("NET_DVR_CaptureJPEGPicture", lUserID, lChannel, ctypes.byref(lpJpegPara), sJpegPicFileName)
    if res == False:
    error_info = callCpp("NET_DVR_GetLastError")
    print("抓图失败:" + str(error_info))
    else:
    print("抓图成功")
  • 设计到结构体时可能python的类型和c++的类型不知道怎么设置,可以参考:https://www.codenong.com/jsc3c4bf3d1ef8/

基于python的循环队列

有时可能需要一个循环队列实时保存数据,比如使用循环队列实时保存一段视频数据。

1
2
3
4
5
6
7
8
9
10
11
12
13
14
15
16
17
18
19
20
21
22
23
24
25
26
27
28
29
30
31
32
33
34
35
36
37
38
39
40
41
42
43
44
45
46
47
48
49
50
51
52
53
54
55
56
57
58
59
60
61
62
63
64
65
66
67
68
69
70
71
72
73
74
75
76
77
78
79
80
81
82
83
84
85
86
87
88
89
90
91
92
93
94
95
96
97
98
99
100
101
102
103
104
105
106
107
108
109
110
111
112
113
114
115
116
117
118
119
120
121
122
123
124
125
126
127
128
129
130
131
132
133
134
135
136
137
138
139
140
141
142
143
144
145
146
147
148
149
150
151
152
153
154
155
156
157
158
159
160
161
162
163
164
165
166
167
168
169
170
171
172
173
174
175
176
177
178
179
180
181
182
183
184
185
186
187
188
189
190
191
192
193
#coding=utf-8
import cv2
import datetime
import os
import time
import sqlite3
import threading
import pytz
import json
import logging


class CircleQueue(object):
"""环形队列"""

def __init__(self, size=90):
self.queue = [0 for i in range(size)]
self.size = size
self.rear = 0 # 队尾指针
self.front = 0 # 队首指针
self.lock = False
self.boat_in_write = None
self.boat_in = False

def enqueue(self, item):
"""进队"""
if not self.lock:
if not self.is_full():
self.rear = (self.rear + 1) % self.size # 队尾指针前移
self.queue[self.rear] = item
# print("inset item: ", self.queue)
else:
# 队列已满,前面入队的出队
self.front = (self.front + 1) % self.size # 队首指针前移
self.rear = (self.rear + 1) % self.size # 队尾指针前移
self.queue[self.rear] = item
if self.boat_in:
print("save boat in")
self.save_queue(self.boat_in_write)
self.boat_in = False

def dequeue(self):
"""出队"""
if not self.is_empty():
self.front = (self.front + 1) % self.size # 队首指针前移
return self.queue[self.front]
else:
print("队列为空")

def is_empty(self):
"""判断环形队列是否为空"""
return self.front == self.rear

def is_full(self):
"""判断环形队列是否已满"""
return (self.rear + 1) % self.size == self.front


def save_queue(self, out_write=None):
print("开始保存视频")
if not self.is_empty():
print("数组非空")
self.lock = True
if out_write is not None:
print("write is not none")
temp_front = self.front
while temp_front != self.rear:
out_write.write(self.queue[temp_front])
temp_front = (temp_front + 1) % self.size # 前移
out_write.release()
self.lock = False

def save_queue_wait(self, out_write=None):
# 清空数组
self.front = self.rear
self.boat_in = True
self.boat_in_write = out_write
# while True:
# # 如果已经跑了一圈
# if self.is_full:
# self.save_queue(out_write)
# break

def get_mean(self):
return round(sum(self.queue) / self.size)

def test_queue(self):
print(self.queue)


record = CircleQueue(600)
cam = cv2.VideoCapture('rtsp://')
fps = cam.get(cv2.CAP_PROP_FPS)
size = (int(cam.get(cv2.CAP_PROP_FRAME_WIDTH)), int(cam.get(cv2.CAP_PROP_FRAME_HEIGHT)))
size2 = (640, 320)
fourcc = cv2.VideoWriter_fourcc(*'mp4v')
dir_save_path = "./video_out/"


def add_record():
i = 0
while True:
ret, frame = cam.read()
if i % 5 == 0 and ret:
frame = cv2.resize(frame, size2)
record.enqueue(frame)
i = i + 1


def boat(ai_name='yolov3_darknet_boat', cam_name='乌弄龙坝上放流'):
# 连接配置表查询摄像头id及算法id
try:
cur_iec = sqlite3.connect(r"easyedge-iec.db")
ai_cur = cur_iec.execute("SELECT uuid FROM aiservice where name='{}'".format(ai_name))
ai_id = ai_cur.fetchall()[0][0]
cam_cur = cur_iec.execute("SELECT uuid FROM camera where name='{}'".format(cam_name))
cam_id = cam_cur.fetchall()[0][0]
ai_cur.close()
cam_cur.close()
cur_iec.close()
print(ai_id, cam_id, type(cam_id), str(ai_id))
except:
time.sleep(40)
boat(ai_name=ai_name, cam_name=cam_name)

last_date = datetime.datetime.now()
print("now time type:", last_date, type(last_date))
time.sleep(30)
# 根据算法id和摄像头id及时间查询数据
cur_event = sqlite3.connect(r"easyedge-event.db")
last_boat_num = None
while True:
cur_time = datetime.datetime.now()
boat_cur = cur_event.execute("SELECT eventtime, result FROM event_record where serviceUUID='{}' and cameraUUID='{}' and eventTime>'{}'".format(ai_id, cam_id, last_date))
boat_result = boat_cur.fetchall()
# print("boat_result: {}".format(boat_result))

if len(boat_result) > 0:
fps_ai = 1
# 计算帧数
frame_num = (cur_time - last_date).seconds * fps_ai
print("总帧数", frame_num)
# 统计这段时间内船舶数量的平均数
boat_num_sum = 0
for i in range(len(boat_result)):
_, bbox = boat_result[i]
bbox = bbox.decode('utf-8')
bbox = json.loads(bbox)

cur_boat_num = len(bbox)
boat_num_sum += cur_boat_num
print("boat_num_sum: ", boat_num_sum)
boat_num_mean = round(boat_num_sum / frame_num)
print("船舶平均数", boat_num_mean)


else:
boat_num_mean = 0
last_date = cur_time

# 初始化
if last_boat_num is None:
print("设置初始boat数量")
# last_boat_num = boat_num_mean
# 出港
elif last_boat_num > boat_num_mean:
output_path = os.path.join(dir_save_path, datetime.datetime.strftime(datetime.datetime.now(), '%Y_%m_%d_%H_%M_%S') + "out.mp4")
out = cv2.VideoWriter(output_path, fourcc, fps, size2)
record.save_queue(out)
print("有出港事件发生")
# 进港
elif last_boat_num < boat_num_mean:
output_path = os.path.join(dir_save_path, datetime.datetime.strftime(datetime.datetime.now(),'%Y_%m_%d_%H_%M_%S') + "in.mp4")
out = cv2.VideoWriter(output_path, fourcc, fps, size2)
record.save_queue_wait(out)
print("有进港事件发生")
else:
print("无进出港口事件发生,当前船数量:", boat_num_mean)

# 设置间隔时间
last_boat_num = boat_num_mean
time.sleep(30)


if __name__ == '__main__':
eventprocess = threading.Thread(target=boat)
videoprocess = threading.Thread(target=add_record)
eventprocess.start()
videoprocess.start()

m3u8视频下载

本文介绍如何HLS协议相关知识。

HLS协议

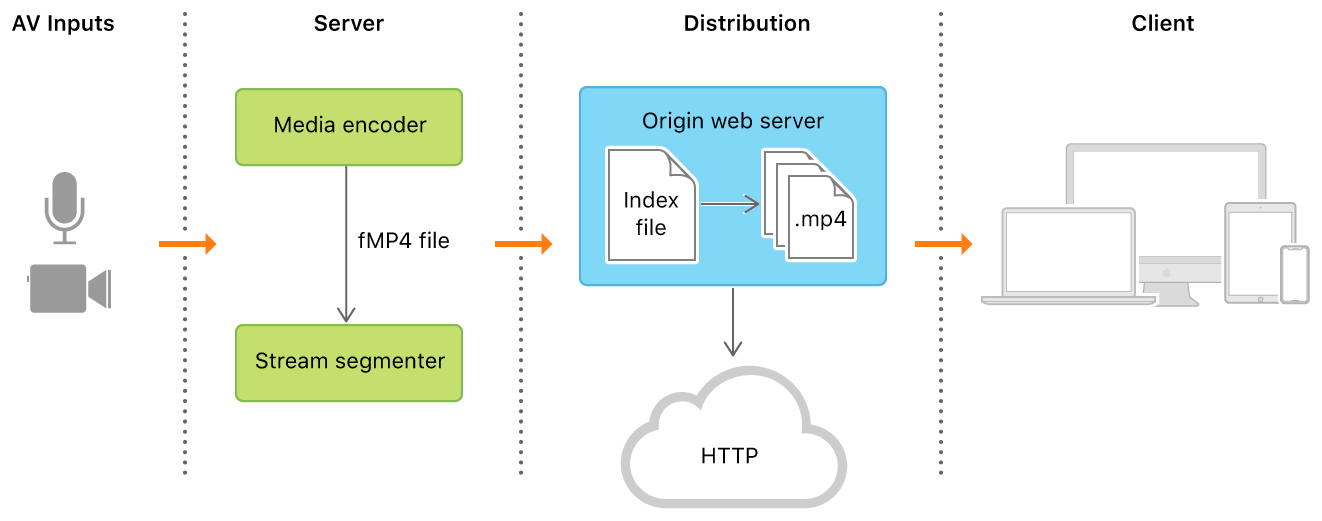
HLS(HTTP Live Streaming)是一种基于http协议的流媒体网络传输协议,很多视频都是通过该协议传输,主要原理就是将视频切分为很多片段,通过一个索引文件m3u8对切分后的视频ts片段进行检索。

关于m3u8中字段的意义如下:

#EXTM3U 指明这是一个m3u8文件
#EXT-X-TARGETDURATION:10 指明每个片段最多10s

#EXTINF:9.009,
http://media.example.com/first.ts 指明片段地址以及片段时长
#EXTINF:9.009,
http://media.example.com/second.ts
#EXTINF:3.003,
http://media.example.com/third.ts

以下为更详细的字段

#EXTM3U:每个M3U文件第一行必须是这个tag标识。(简单了解)

#EXT-X-VERSION:版本,此属性可用可不用。(简单了解)

#EXT-X-TARGETDURATION:目标持续时间,是用来定义每个TS的【最大】duration(持续时间)。(简单了解)

#EXT-X-ALLOW-CACHE是否允许允许高速缓存。(简单了解)

#EXT-X-MEDIA-SEQUENCE定义当前M3U8文件中第一个文件的序列号,每个ts文件在M3U8文件中都有固定唯一的序列号。(简单了解)

#EXT-X-DISCONTINUITY:播放器重新初始化(简单了解)

#EXT-X-KEY定义加密方式,用来加密的密钥文件key的URL,加密方法(例如AES-128),以及IV加密向量。(记住)

#EXTINF:指定每个媒体段(ts文件)的持续时间,这个仅对其后面的TS链接有效,每两个媒体段(ts文件)间被这个tag分隔开。(简单了解)

#EXT-X-ENDLIST表明M3U8文件的结束。(简单了解)

python实现基于HLS的流媒体文件获取

由HLS协议的原理可知,解析HLS文件先要找到m3u8索引文件,然后获取视频片段进行拼接。
解析m3u8文件可以根据一些开源库或开源代码,这里贴一些在网上找的代码,仅作参考。

示例一

1
2
3
4
5
6
7
8
9
10
11
12
13
14
15
16
17
18
19
20
21
22
23
24
25
26
27
28
29
30
31
32
33
34
35
36
37
38
39
40
41
42
43
44
45
46
47
48
49
50
51
52
53
54
55
56
57
58
59
60
61
62
63
64
65
66
67
68
69
70
71
72
73
74
75
76
77
78
79
80
81
82
83
84
85
86
87
88
89
90
91
92
93
94
95
import requests
from urllib.parse import urljoin
import re
import os
import asyncio
import aiohttp

# 使用Crypto 包 中的AES 对加密的ts片段进行解密,通过 pycryptodome 库安装Crypto包,如果安装后还是报找不到该包,找到安装包的位置将小写的cryto改成Crypto
# pip install pycryptodome
from Crypto.Cipher import AES
dirName = 'tsLib'
if not os.path.exists(dirName):
os.mkdir(dirName)

headers = {
'user-agent': 'Mozilla/5.0 (Windows NT 10.0; WOW64) AppleWebKit/537.36 (KHTML, like Gecko) Chrome/72.0.3626.121 Safari/537.36'
}

# 一级m3u8地址
m1_url = 'https://v4.cdtlas.com/20220311/xEaAxRVd/index.m3u8'
# 由于HLS 是基于 HTTP的,所以直接requests.get
m1_page_text = requests.get(url=m1_url,headers=headers).text

# print(m1_page_text)

# 从一级m3u8文件中解析出二级m3u8地址
m1_page_text = m1_page_text.strip() #取出收尾的回车
# 二级m3u8地址
m2_url = ''
for line in m1_page_text.split('\n'):
if not line.startswith('#'):

m2_url = line
# 将m1_url 和m2_url不同之处补充到m2_url中
m2_url = urljoin(m1_url,m2_url)
# 至此就获取到了完整的二级文件地址
# 请求链接地址
# print(m2_url)
# 请求二级文件地址内容
m2_page_text = requests.get(url=m2_url,headers=headers).text
m2_page_text = m2_page_text.strip()
# print(m2_page_text) # 打印输出整个.ts文件

# 解析出解密秘钥key的地址
key_url = re.findall('URI="(.*?)"',m2_page_text,re.S)[0]
key_url =urljoin(m1_url,key_url)
# print(key_url) # 打印请求链接地址 https://iqiyi.shanshanku.com/20211104/6AoEDjLD/1200kb/hls/key.key
# 请求key的地址,获取知秘钥
# 注意: key和iv需要为bytes类型
key = requests.get(url=key_url,headers=headers).content
iv = b'0000000000000000'
# print(key) # 得到解密密钥
# 解析出每一个ts切片的地址
ts_url_list = []
for line in m2_page_text.split('\n'):
if not line.startswith("#"):
ts_url = line
ts_url = urljoin(m1_url,ts_url)
ts_url_list.append(ts_url)


# print(ts_url_list) # 列表组成的逗号分隔的.ts文件

# 异步请求到每一个ts切片的数据
async def get_ts(url):
async with aiohttp.ClientSession() as sess:
async with await sess.get(url=url,headers=headers) as response:
ts_data = await response.read() # 获取byte形式的响应数据
# 需要对ts片段数据进行解密(需要用到key和iv)
aes = AES.new(key=key, mode=AES.MODE_CBC, iv=iv)
desc_data = aes.decrypt(ts_data) # 获取了解密后的数据

return [desc_data,url]


def download(t):
r_list = t.result()
data =r_list[0]
url = r_list[1] # ts文件的地址
ts_name = url.split('/')[-1]
ts_path = dirName + '/' + ts_name
with open(ts_path, 'wb') as fp:
# 需要将解密后的数据写入文件进行保存
fp.write(data)
print(ts_name, '下载保存成功!')

tasks = []
for url in ts_url_list:
c = get_ts(url)
task = asyncio.ensure_future(c)
task.add_done_callback(download)
tasks.append(task)
loop = asyncio.get_event_loop()
loop.run_until_complete(asyncio.wait(tasks))

示例二

1
2
3
4
5
6
7
8
9
10
11
12
13
14
15
16
17
18
19
20
21
22
23
24
25
26
27
28
29
30
31
32
33
34
35
36
37
38
39
40
41
42
43
44
45
46
47
48
49
50
51
52
53
54
55
56
57
58
59
60
61
62
63
64
65
66
67
68
69
70
71
72
73
74
75
import requests
import os
from Crypto.Cipher import AES
import time

headers = {
"User-Agent": "Mozilla/5.0 (Windows NT 10.0; Win64; x64) AppleWebKit/537.36 (KHTML, like Gecko) Chrome/86.0.4240.111 Safari/537.36 Edg/86.0.622.56",
"Connection": "close"
}
def m3u8(url,movie_name):
base_url = url[:url.rfind('/')+1]#用于拼接url
rs = requests.get(url,headers=headers).text
list_content = rs.split('\n')
player_list = []
#创建文件夹,用于存放ts文件
if not os.path.exists('{}'.format(movie_name)):
#os.system('mkdir merge')
os.mkdir('{}'.format(movie_name))
key = ''
for index,line in enumerate(list_content):
# 判断视频是否经过AES-128加密
if "#EXT-X-KEY" in line:
method_pos = line.find("METHOD")
comma_pos = line.find(",")
method = line[method_pos:comma_pos].split('=')[1]#获取加密方式
print("Decode Method:", method)
uri_pos = line.find("URI")
quotation_mark_pos = line.rfind('"')
key_path = line[uri_pos:quotation_mark_pos].split('"')[1]
key_url = key_path
res = requests.get(key_url,headers=headers)
key = res.content #获取加密密钥

#print("key:", key)

"""
获取.ts文件链接地址方式可根据需要进行定制
"""
if '#EXTINF' in line:
# 获取每一媒体序列的.ts文件链接地址
if 'http' in list_content[index + 1]:
href = list_content[index + 1]
player_list.append(href)
else:
href = base_url + list_content[index+1]
player_list.append(href)
if(len(key)):
print('此视频经过加密')
#print(player_list)#打印ts地址列表
for i,j in enumerate(player_list):
if not os.path.exists('{}/'.format(movie_name + str(i+1) + '.ts')):
cryptor = AES.new(key, AES.MODE_CBC, key)
res = requests.get(j,headers=headers)
requests.adapters.DEFAULT_RETRIES = 5
with open('{}/'.format(movie_name) + str(i+1) + '.ts','wb') as file:
file.write(cryptor.decrypt(res.content))#将解密后的视频写入文件
print('正在写入第{}个文件'.format(i+1))
#time.sleep(5)
else:
#print(i)
pass
else:
print('此视频未加密')
#print(player_list)#打印ts地址列表
for i,j in enumerate(player_list):
if not os.path.exists('{}/'.format(movie_name + str(i+1) + '.ts')):
res = requests.get(j,headers=headers)
with open('{}/'.format(movie_name) + str(i+1) + '.ts','wb') as file:
file.write(res.content)#将解密后的视频写入文件
print('正在写入第{}个文件'.format(i+1))
print('下载完成')

name = 'nz'
url = "https://vod3.buycar5.cn/20210402/Z4mMbiNW/1000kb/hls/index.m3u8"
m3u8(url,name)

示例三

1
2
3
4
5
6
7
8
9
10
11
12
13
14
15
16
17
18
19
20
21
22
23
24
25
26
27
28
29
30
31
32
33
34
35
36
37
38
39
40
41
42
43
44
45
46
47
48
49
50
51
52
53
54
55
56
57
58
59
60
61
62
63
# 以下代码来源:https://blog.csdn.net/as604049322/article/details/118314130
# 原博客为 下载 B 站 实时视频
# 根据实际场景进行一定改写
# 其中 get_real_url 函数用于处理多层 m3u8 index 的情况,即嵌套 m3u8
# get_live_url 是针对 B站写的,没必要了解
# down_video 就是根据 m3u8链接下载视频,从代码来看就是用了一个循环,在考虑这样会不会出现掉帧的问题


import time
import m3u8
import requests

headers = {
"User-Agent": "Mozilla/5.0 (Windows NT 10.0; WOW64) AppleWebKit/537.36 (KHTML, like Gecko) Chrome/86.0.4240.198 Safari/537.36"
}


def get_live_url(cid, platform='h5'):
playUrl = 'https://api.live.bilibili.com/xlive/web-room/v1/playUrl/playUrl'
params = {
'cid': cid, # cid序列号
'qn': 150, # 播放的视频质量
'platform': platform, # 视频的播放形式
'ptype': 16
}
response = requests.get(playUrl, headers=headers, params=params).json()
text = response['data']['durl']
url = text[-1]['url']
return url


def get_real_url(url):
playlist = m3u8.load(uri=url, headers=headers)
return playlist.playlists[0].absolute_uri


def download_video(url, max_count=1000, max_size=120*1024*1024):
max_id = None
size = 0
for i in range(1, max_count+1):
playlist = m3u8.load(uri=url, headers=headers)
for seg in playlist.segments:
current_id = int(seg.uri[1:seg.uri.find(".")])
if max_id and current_id <= max_id:
continue
with open("combine.mp4", "ab" if max_id else "wb") as f:
r = requests.get(seg.absolute_uri, headers=headers)
data = r.content
size += len(data)
f.write(data)
print(
f"\r下载次数({i}/{max_count}),已下载:{size/1024/1024:.2f}MB", end="")
if size >= max_size:
print("\n文件已经超过大小限制,下载结束!")
return
max_id = current_id
time.sleep(2)


url = get_live_url('22273117')
real_url = get_real_url(url)
download_video(real_url)

示例四

1
2
3
4
5
6
7
8
9
10
11
12
13
14
15
16
17
18
19
20
21
22
23
24
25
26
27
28
29
30
31
32
33
34
35
36
37
38
39
40
41
42
43
44
45
46
47
48
49
50
51
52
53
54
55
56
57
58
59
60
61
62
63
64
65
66
67
68
69
70
71
72
73
74
75
76
77
78
79
80
81
82
83
84
85
86
87
88
89
# 之前的文件 ts_download_online 是参照一个博客,针对的是b站直播视频的下载
# 把其应用到其他地方发现有一些问题,没有很好的进行去除重复视频的机制
# 在GitHub上找到一个其他的代码,思路可以借鉴
# 了解m3u8原理后进行改写也相对简单
# 以下代码源于:https://github.com/1chandan1/StreamDownload
# 核心思想就是添加一个数组保存已经下载好的url,然后每次下载之前都检查一下数组中是否已经有该url

from time import time
import m3u8
import requests
from threading import Thread

check = []
a = 0
stop = False
Vname = input("Video name :")
url = input("Enter the m3u8 link of the resolution that you want:")
while True:
try:
r = requests.get(url)
m3u8_master = m3u8.loads(r.text)
m3u8_master.data['playlists'][-1]['uri']
url = input(
"\nIt may be the master m3u8 link. Enter link of indivisual resolution which you want :\n"
)
continue
except:
pass
try:
r = requests.get(url)
Playlist = m3u8.loads(r.text)
tsfile = Playlist.data['segments']
if tsfile == []:
url = input("\nEnter correct Link :")
continue
break
except:
url = input("\nEnter correct Link :")
print("\nPress Enter to STOP\n")


def downLink():
global a, run
start = time()
while True:
global stop
if stop:
print("\nSTOP")
break
r = requests.get(url)
Playlist = m3u8.loads(r.text)
tsfile = Playlist.data['segments']
for link in tsfile:
if link["uri"] not in check:
check.append(link["uri"])
a += 1
print(time() - start, end="\r")
if time() - start > 3000:
run = False
break


def download():
global a, stop
b = 0
run = True
with open(Vname + ".ts", "wb") as f:
while run:
if a > b:
p = requests.get(check[b])
f.write(p.content)
b += 1
if stop:
f.close()
break


def STOP():
global stop
input()
stop = True


s1 = Thread(target=downLink)
s2 = Thread(target=download)
s3 = Thread(target=STOP)
s1.start()
s2.start()
s3.start()

对于实时视频流原理是一样的,只是需要循环请求m3u8文件获取ts片段路径,另外如果加密就利用Crypto.Cipher包进行解密,解密的输入包括key和iv。

diffusion_model

原论文:Denoising Diffusion Probabilistic Models
以下讲解整个扩散模型流程,不讲解数学推导。
diffusion model是一种生成模型,通常使用一个正向的扩散过程和一个反向的逆扩散过程解释其原理。

正向的扩散过程通过添加高斯噪声实现。


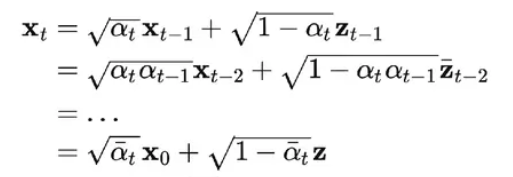
通过马尔可夫链,经过推导有

其中

反向过程定义为

根据马尔可夫链及相关推导有

因为有

所以上式u_t可以简化为

注意以上关于u_t的两种写法都可以,两种写法我在代码中都见过。

loss函数为

最终需要优化的损失函数为

这个时候根据不同建模会得到不同的损失函数,如论文是让网络去学习那个正向过程高斯采样的噪音,得到最终的损失函数表达式为

下面结合代码了解各个超参数应用在什么地方, 下面的代码是拟合一个s型曲线,是二维分布。从diffusion model的loss可以知道其是针对点做的损失函数,刚开始我挺迷的这样不丢失了图像的结构信息了嘛,但是后来突然感悟图像的结构信息就蕴藏在要学习的网络中,网络用的是卷积网络呀,都是结合了图像结构信息而学到的参数。

1
2
3
4
5
6
7
8
9
10
11
12
13
14
15
16
17
18
19
20
21
22
23
24
25
26
27
28
29
30
31
32
33
34
35
36
37
38
39
40
41
42
43
44
45
46
47
48
49
50
51
52
53
54
55
56
57
58
59
60
61
62
63
64
65
66
67
68
69
70
71
72
73
74
75
76
77
78
79
80
81
82
83
84
85
86
87
88
89
90
91
92
93
94
95
96
97
98
99
100
101
102
103
104
105
106
107
108
109
110
111
112
113
114
115
116
117
118
119
120
121
122
123
124
125
126
127
128
129
130
131
132
133
134
135
136
137
138
139
140
141
142
143
144
145
146
147
148
149
150
151
152
153
154
155
156
157
158
159
160
161
162
163
164
165
166
167
168
169
170
171
172
173
174
175
176
177
178
179
180
181
182
183
184
185
186
187
188
189
190
191
192
193
194
195
196
197
198
199
200
201
202
203
204
205
206
207
208
209
210
211
212
213
214
215
216
217
218
219
220
221
222
223
224
225
226
227
228
229
230
231
232
233
234
235
236
237
238
239
240
241
242
243
244
245
246
247
248
249
250
251
252
# %matplotlib inline
import matplotlib.pyplot as plt
import numpy as np
from sklearn.datasets import make_s_curve
import torch

s_curve,_ = make_s_curve(10**4,noise=0.1)
s_curve = s_curve[:,[0,2]]/10.0 # (10000, 2)

data = s_curve.T

fig,ax = plt.subplots()
ax.scatter(*data,color='blue',edgecolor='white');

ax.axis('off')

dataset = torch.Tensor(s_curve).float() #(10000, 2)


# 确定超参数的值
num_steps = 100

#制定每一步的beta
betas = torch.linspace(-6,6,num_steps)
betas = torch.sigmoid(betas)*(0.5e-2 - 1e-5)+1e-5

#计算alpha、alpha_prod、alpha_prod_previous、alpha_bar_sqrt等变量的值
alphas = 1-betas
alphas_prod = torch.cumprod(alphas,0)
alphas_prod_p = torch.cat([torch.tensor([1]).float(),alphas_prod[:-1]],0)
alphas_bar_sqrt = torch.sqrt(alphas_prod)
one_minus_alphas_bar_log = torch.log(1 - alphas_prod)
one_minus_alphas_bar_sqrt = torch.sqrt(1 - alphas_prod)

assert alphas.shape==alphas_prod.shape==alphas_prod_p.shape==\
alphas_bar_sqrt.shape==one_minus_alphas_bar_log.shape\
==one_minus_alphas_bar_sqrt.shape
print("all the same shape",betas.shape) # (100)

# 确定扩散过程任意时刻的采样值
#计算任意时刻的x采样值,基于x_0和重参数化
def q_x(x_0,t):
"""可以基于x[0]得到任意时刻t的x[t]"""
noise = torch.randn_like(x_0)
alphas_t = alphas_bar_sqrt[t]
alphas_1_m_t = one_minus_alphas_bar_sqrt[t]
return (alphas_t * x_0 + alphas_1_m_t * noise)#在x[0]的基础上添加噪声


# 演示原始数据分布加噪100步后的结果
num_shows = 20
fig,axs = plt.subplots(2,10,figsize=(28,3))
plt.rc('text',color='black')

#共有10000个点,每个点包含两个坐标
#生成100步以内每隔5步加噪声后的图像
for i in range(num_shows):
j = i//10
k = i%10
q_i = q_x(dataset,torch.tensor([i*num_steps//num_shows]))#生成t时刻的采样数据
axs[j,k].scatter(q_i[:,0],q_i[:,1],color='red',edgecolor='white')
axs[j,k].set_axis_off()
axs[j,k].set_title('$q(\mathbf{x}_{'+str(i*num_steps//num_shows)+'})$')


# 编写拟合逆扩散过程高斯分布的模型
import torch
import torch.nn as nn


class MLPDiffusion(nn.Module):
def __init__(self, n_steps, num_units=128):
super(MLPDiffusion, self).__init__()

self.linears = nn.ModuleList(
[
nn.Linear(2, num_units),
nn.ReLU(),
nn.Linear(num_units, num_units),
nn.ReLU(),
nn.Linear(num_units, num_units),
nn.ReLU(),
nn.Linear(num_units, 2),
]
)
self.step_embeddings = nn.ModuleList(
[
nn.Embedding(n_steps, num_units),
]
)

def forward(self, x, t):
# x = x_0
for idx, embedding_layer in enumerate(self.step_embeddings):
t_embedding = embedding_layer(t)
x = self.linears[2 * idx](x)
x += t_embedding
x = self.linears[2 * idx + 1](x)

x = self.linears[-1](x)

return x


# 编写训练的误差函数
def diffusion_loss_fn(model, x_0, alphas_bar_sqrt, one_minus_alphas_bar_sqrt, n_steps):
"""对任意时刻t进行采样计算loss"""
batch_size = x_0.shape[0]

# 对一个batchsize样本生成随机的时刻t
t = torch.randint(0, n_steps, size=(batch_size // 2,))
t = torch.cat([t, n_steps - 1 - t], dim=0)
t = t.unsqueeze(-1) #(batch_size, 1)

# x0的系数
a = alphas_bar_sqrt[t]

# eps的系数
aml = one_minus_alphas_bar_sqrt[t]

# 生成随机噪音eps
e = torch.randn_like(x_0) # (batch_size, 2)

# 构造模型的输入
x = x_0 * a + e * aml

# 送入模型,得到t时刻的随机噪声预测值
output = model(x, t.squeeze(-1))

# 与真实噪声一起计算误差,求平均值
return (e - output).square().mean()


# 编写逆扩散采样函数(inference)
def p_sample_loop(model, shape, n_steps, betas, one_minus_alphas_bar_sqrt):
"""从x[T]恢复x[T-1]、x[T-2]|...x[0]"""
cur_x = torch.randn(shape) # (1000, 2)
x_seq = [cur_x]
for i in reversed(range(n_steps)):
cur_x = p_sample(model, cur_x, i, betas, one_minus_alphas_bar_sqrt)
x_seq.append(cur_x)
return x_seq


def p_sample(model, x, t, betas, one_minus_alphas_bar_sqrt):
"""从x[T]采样t时刻的重构值"""
t = torch.tensor([t])

coeff = betas[t] / one_minus_alphas_bar_sqrt[t]

eps_theta = model(x, t)

mean = (1 / (1 - betas[t]).sqrt()) * (x - (coeff * eps_theta))

z = torch.randn_like(x) # (1000, 2)

# 这里用的论文中提到的 betas[t],也可以用注释部分,但是需要该一下函数,把参数传进来

sigma_t = betas[t].sqrt()

# sigma_t = betas[t]* (1 - alphas_prod_p[t]) / (1 - alphas_prod[t])

sample = mean + sigma_t * z

return (sample)


# 开始训练模型,打印loss及中间重构效果
seed = 1234

# 这个类好像没用到呀!
class EMA():
"""构建一个参数平滑器"""

def __init__(self, mu=0.01):
self.mu = mu
self.shadow = {}

def register(self, name, val):
self.shadow[name] = val.clone()

def __call__(self, name, x):
assert name in self.shadow
new_average = self.mu * x + (1.0 - self.mu) * self.shadow[name]
self.shadow[name] = new_average.clone()
return new_average


print('Training model...')
batch_size = 128
dataloader = torch.utils.data.DataLoader(dataset, batch_size=batch_size, shuffle=True)
num_epoch = 4000
plt.rc('text', color='blue')

model = MLPDiffusion(num_steps) # 输出维度是2,输入是x和step
optimizer = torch.optim.Adam(model.parameters(), lr=1e-3)

for t in range(num_epoch):
for idx, batch_x in enumerate(dataloader):
loss = diffusion_loss_fn(model, batch_x, alphas_bar_sqrt, one_minus_alphas_bar_sqrt, num_steps)
optimizer.zero_grad()
loss.backward()
torch.nn.utils.clip_grad_norm_(model.parameters(), 1.)
optimizer.step()

if (t % 100 == 0):
print(loss)
x_seq = p_sample_loop(model, dataset.shape, num_steps, betas, one_minus_alphas_bar_sqrt)

fig, axs = plt.subplots(1, 10, figsize=(28, 3))
for i in range(1, 11):
cur_x = x_seq[i * 10].detach()
axs[i - 1].scatter(cur_x[:, 0], cur_x[:, 1], color='red', edgecolor='white');
axs[i - 1].set_axis_off();
axs[i - 1].set_title('$q(\mathbf{x}_{' + str(i * 10) + '})$')


# 动画演示扩散过程和逆扩散过程
import io
from PIL import Image

imgs = []
for i in range(100):
plt.clf()
q_i = q_x(dataset, torch.tensor([i]))
plt.scatter(q_i[:, 0], q_i[:, 1], color='red', edgecolor='white', s=5);
plt.axis('off');

img_buf = io.BytesIO()
plt.savefig(img_buf, format='png')
img = Image.open(img_buf)
imgs.append(img)

reverse = []
for i in range(100):
plt.clf()
cur_x = x_seq[i].detach()
plt.scatter(cur_x[:, 0], cur_x[:, 1], color='red', edgecolor='white', s=5);
plt.axis('off')

img_buf = io.BytesIO()
plt.savefig(img_buf, format='png')
img = Image.open(img_buf)
reverse.append(img)


imgs = imgs +reverse
imgs[0].save("diffusion.gif",format='GIF',append_images=imgs,save_all=True,duration=100,loop=0)

参考资料

相机坐标_世界坐标转换

工程中有些图像处理任务需要真实物理尺寸,本文讲解如何根据图像坐标系与真实物理坐标系之间的对应关系从图像中获取真实物理尺寸。
参考:

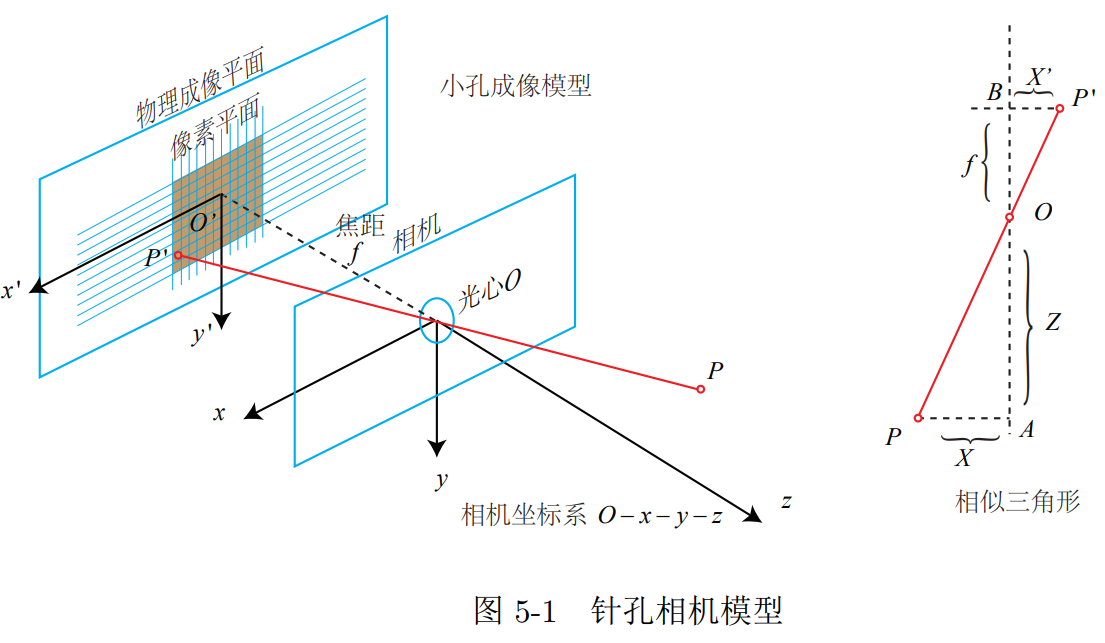
针孔相机模型

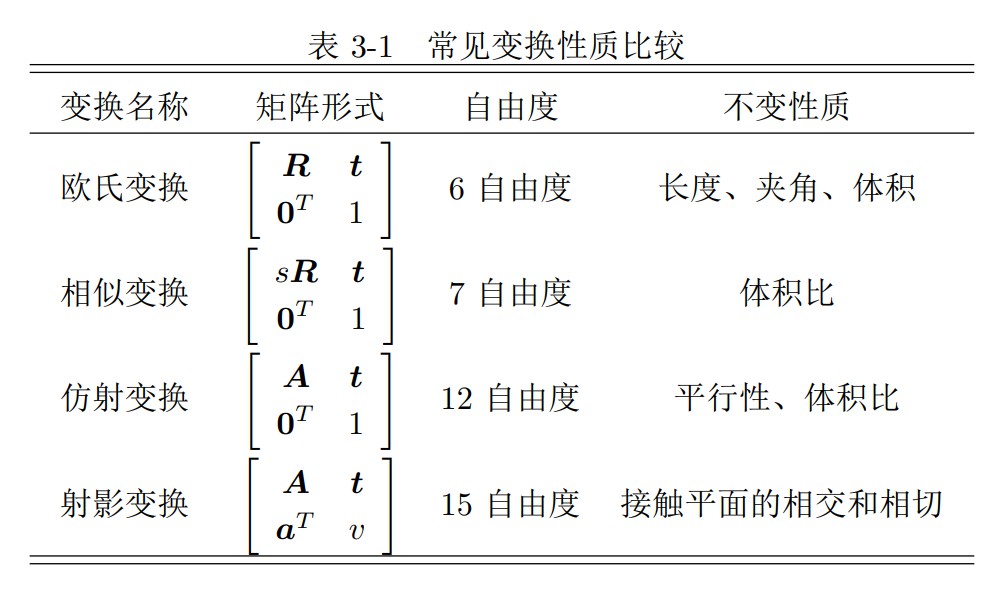
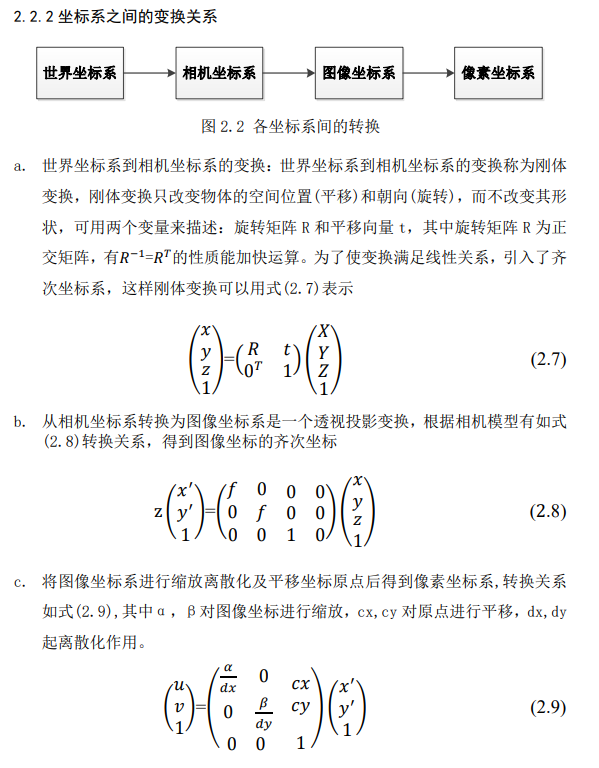
先了解一下常见的几种3D几何变换


单目相机成像模型如下


需要经过如下步骤

几种变换求解

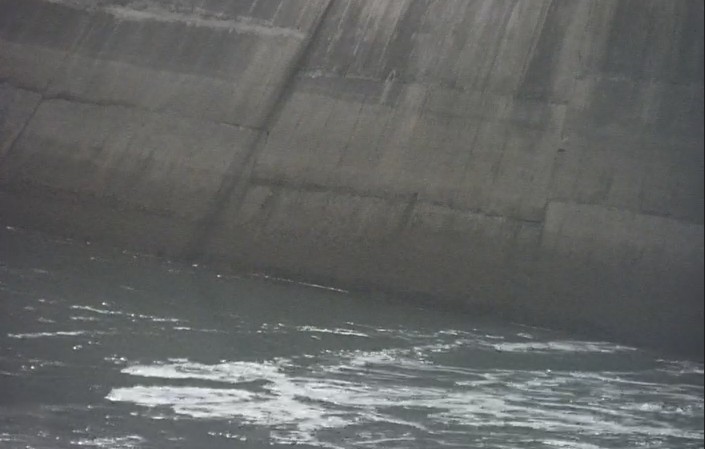
首先讲清楚需求:给定一个图像,要转换成俯视图视角。

由于3D空间点映射到2D相平面是存在不可逆的信息损失的(基深度方向的信息损失),所以不可能单纯根据一个图像就还原成俯视图视角下的图像(其他视角也不行)。但是如果这些点在同一个平面上,是可以还原成垂直这个平面视角的图像的。

一种思路就是在图像中选取四个点,要求这四个点在俯视图中要是一个矩形框,根据点的对应关系可以得到单应性矩阵,然后根据单应性矩阵得到转换后的图像。

还有一种思路是根据PnP方法求得相机位姿,然后选一个矩形框,根据相机位姿得到对应的像素坐标,然后再根据像素坐标和这个框坐标的对应关系获取单应性矩阵。当然这种思路的意义就是可以从相机获取相机内参及方位角(世界坐标系可以建在以相机为原点的位置,这样及省去了位移),从而即使相机有变动也不用再去现场找矩形框对应的点,但是具体没实践过。

关于怎样通过相机内参及外参,将该视角下的图像转换为另一视角下的图像。具体过程就是先求当前视角转换到另一视角的矩阵,得到当前视角相机坐标系上的点映射到另一视角相机坐标系上的点的矩阵。通过相机内存矩阵求逆得到当前视角像素坐标系映射到当前视角相机坐标系的矩阵,然后在将当前视角相机坐标系下的点乘以之前求到的视角转换矩阵就得到另一视角相机坐标系下的点,然后乘以相机内参矩阵映射到像素坐标。参考:https://blog.csdn.net/u013019296/article/details/119259585

1
2
3
4
5
6
7
8
9
10
11
12
13
14
15
16
# 相机内参矩阵
Mat cameraMatrix = (Mat_<double>(3, 3) << 700.0, 0.0, 320.0,
0.0, 700.0, 240.0,
0, 0, 1);
# 当前视角相机外参
Mat R1 = c1Mo(Range(0, 3), Range(0, 3));
# 另一视角相机外参
Mat R2 = c2Mo(Range(0, 3), Range(0, 3));
//c1Mo * oMc2
# 当前视角相加坐标系下的点转换到另一视角相机坐标系下的转换矩阵,这里直接转置是求逆与求转置等价
Mat R_2to1 = R1*R2.t();//同一平面两个不同相机坐标系的单应矩阵
// [compute-homography]
# 最后将三者相乘,得到不同视角下的转换矩阵
Mat H = cameraMatrix * R_2to1 * cameraMatrix.inv();//同一平面计算出两个图像间的单应矩阵H
H /= H.at<double>(2, 2);//归一化
cout << "H:\n" << H << endl;
  • 单应性不严谨的定义:用 [无镜头畸变] 的相机从不同位置拍摄 [同一平面物体] 的图像之间存在单应性,可以用 [透视变换] 表示。可以得到一个直接描述图像坐标变换的矩阵。
  • 对极几何约束:根据两个视角中点的对应关系求解相机运动(旋转+平移)的一种方式
  • 三角测量:在使用对极约束后估算点的深度信息的一种方法。
  • PnP(Perspective-n-Point)是求解 3D 到 2D 点对运动的方法。它描述了当我们知道 n 个 3D 空间点以及它们的投影位置时,如何估计相机所在的位姿。在双目或 RGB-D 的视觉里程计中,我们可以直接使用 PnP 估计相机运动。而在单目视觉里程计中,必须先进行初始化,然后才能使用 PnP。3D-2D 方法不需要使用对极约束,又可以在很少的匹配点中获得较好的运动估计,是最重要的一种姿态估计方法。
  • PnP 问题有很多种求解方法,例如用三对点估计位姿的 P3P,直接线性变换(DLT),EPn(Efficient PnP),UPnP 等等)。此外,还能用非线性优化的方式,构建最小二乘问题并迭代求解,也就是万金油式的 Bundle Adjustment。

相关代码

获取图像中点的坐标可以使用以下代码

1
2
3
4
5
6
7
8
9
from PIL import Image
from pylab import *
im = array(Image.open(r"water.jpg"))
imshow(im)
print('Please click 4 points')
x =ginput(4)
print('you clicked:',x)
show()

然后就可以获取单应性矩阵,并根据单应性矩阵得到俯视图了(特别注意:为了获取俯视图,要求进行映射的四个点在俯视视图中是一个矩形,因为就是将这四个点映射到俯视视图指定像素上,这样才方便具体实践)

1
2
3
4
5
6
7
8
9
10
11
12
13
14
15
16
17
18
19
20
import cv2
import numpy as np

img = cv2.imread(r"water.jpg")
w, h, _ = img.shape

width,height = 250,350 #所需图像大小

#所需图像部分四个顶点的像素点坐标
pts1 = np.float32([[658, 227],[943, 286],[516, 527],[837, 597]]) #所需图像部分四个顶点的像素点坐标
pts2 = np.float32([[0+100,0+100],[0.2*width+100,0+100],[0+100,0.2*height+100],[0.2*width+100,0.2*height+100]]) #定义对应的像素点坐标(特别注意这里是找的四个点映射到俯视图后的坐标)
matrix_K = cv2.getPerspectiveTransform(pts1,pts2) #使用getPerspectiveTransform()得到转换矩阵
print(matrix_K)
img_K = cv2.warpPerspective(img,matrix_K,(width,height)) #使用warpPerspective()进行透视变换

cv2.imshow("Original Image",img)
cv2.imshow("img K",img_K)

cv2.waitKey(0)

以上代码只是一种理想情况,也就是需要找到水面上一个矩形框,知道矩形框实际大小,水位在变化,找一个理想的矩形框也很难。可不可以只找某一平面的四个点的坐标,然后水位变化也可以呢,以下代码可以解决此工程问题,参考:

1
2
3
4
5
6
7
8
9
10
11
12
13
14
15
16
17
18
19
20
21
22
23
24
25
26
27
28
29
30
31
32
33
34
35
36
37
38
39
40
41
42
43
44
45
46
47
48
49
50
51
52
53
54
55
56
57
58
59
60
61
62
63
64
65
66
67
68
69
70
71
72
73
74
75
76
77
78
79
80
81
82
83
84
85
86
87
88
89
90
91
92
93
94
95
96
97
98
99
100
101
102
103
104
105
106
107
108
109
110
111
112
113
114
115
116
117
118
119
120
121
122
123
124
125
126
127
128
129
130
131
132
133
134
135
136
137
138
139
140
141
142
143
144
145
146
147
148
149
150
151
152
153
154
155
156
157
158
159
160
161
162
163
164
165
166
167
168
169
170
171
172
173
174
175
176
177
178
179
180
181
182
183
184
185
186
187
188
189
190
191
192
193
194
195
196
197
198
199
200
201
202
203
204
205
206
207
208
209
210
211
212
213
214
215
216
217
218
219
220
221
222
223
224
225
226
227
228
229
230
231
232
233
234
235
236
237
238
239
240
241
242
243
244
245
246
247
248
249
250
251
252
253
254
255
256
257
258
259
260
261
262
263
264
265
266
267
268
269
270
271
272
273
274
275
276
277
278
279
280
281
282
283
284
285
286
287
288
289
290
291
292
293
294
295
296
297
298
299
300
301
302
303
304
305
306
307
308
309
310
311
312
313
314
315
316
317
318
319
320
321
322
323
324
325
326
327
328
329
330
331
332
333
334
335
336
337
338
339
340
341
342
343
344
345
346
347
348
349
350
351
352
353
354
355
356
357
358
359
360
361
362
363
364
365
366
367
368
369
370
371
372
373
374
375
376
377
378
379
380
381
382
383
384
385
386
387
388
389
390
391
392
393
394
395
396
397
398
399
400
401
402
403
404
405
406
407
408
409
410
411
412
413
414
415
416
417
418
419
420
421
422
423
424
425
426
427
428
429
430
431
432
433
434
435
436
437
438
439
440
441
442
443
444
445
446
447
448
449
450
451
452
453
454
455
456
457
458
459
460
461
462
463
464
465
466
467
468
469
470
471
472
473
474
475
476
477
478
479
480
481
482
483
484
485
486
487
488
489
490
491
492
493
494
495
496
497
498
499
500
501
502
503
504
505
506
507
508
509
510
511
512
513
514
515
516
517
518
519
520
521
522
523
524
525
526
527
528
529
530
531
532
533
534
535
536
537
538
539
540
541
542
543
544
545
import numpy as np
import cv2
from shapely.geometry import Polygon, LineString
from shapely.affinity import rotate
import rasterio
import argparse


def get_gcp_mean(dst):
return np.array(dst).mean(axis=0)

# 从定义的四个感兴趣的点生成矩形 bbox
def set_bbox_from_corners(corners, resolution, dst):
"""
Establish bbox based on a set of camera perspective corner points Assign corner coordinates to camera
configuration

Parameters
----------
corners : list of lists (4)
[columns, row] coordinates in camera perspective

"""
assert (np.array(corners).shape == (4,
2)), f"a list of lists of 4 coordinates must be given, resulting in (4, " \
f"2) shape. Current shape is {corners.shape} "

# get homography, this is the only place besides self.get_M where cv.get_M is used.
M_gcp = get_M()
# TODO: make derivation dependent on 3D or 2D point availability
# if self.gcps["src"].shape == 3:
# # TODO: homography from solvepnp
bbox = get_aoi(M_gcp, corners, resolution=0.05)
# bbox is offset by self.gcp_mean. Regenerate bbox after adding offset
bbox_xy = np.array(bbox.exterior.coords)
# 在计算get_M()的时候减去了gcp_mean,所以现在要加gcp_mean
gcp_mean = np.array(dst).mean(axis=0)
bbox_xy += gcp_mean[0:2]
bbox = Polygon(bbox_xy)
return bbox, bbox_xy[0:4]

# 根据像素坐标系中感兴趣的点和单应性矩阵得到矩形框
def get_aoi(M, src_corners, resolution=None):
"""Get rectangular AOI from 4 user defined points within frames.

Parameters
----------
src : list of tuples
(col, row) pairs of ground control points
dst : list of tuples
projected (x, y) coordinates of ground control points
src_corners : dict with 4 (x,y) tuples
names "up_left", "down_left", "up_right", "down_right", source corners

Returns
-------
aoi : shapely.geometry.Polygon
bounding box of aoi (rotated)
"""
# retrieve the M transformation matrix for the conditions during GCP. These are used to define the AOI so that
# dst AOI remains the same for any movie
# prepare a simple temporary np.array of the src_corners
_src_corners = np.array(src_corners)
assert(_src_corners.shape==(4, 2)), f"a list of lists of 4 coordinates must be given, resulting in (4, 2) shape. " \
f"Current shape is {src_corners.shape} "
# reproject corner points to the actual space in coordinates
_dst_corners = cv2.perspectiveTransform(np.float32([_src_corners]), M)[0]
polygon = Polygon(_dst_corners)
coords = np.array(polygon.exterior.coords)
# estimate the angle of the bounding box
# retrieve average line across AOI
point1 = (coords[0] + coords[3]) / 2
point2 = (coords[1] + coords[2]) / 2
diff = point2 - point1
angle = np.arctan2(diff[1], diff[0])
# rotate the polygon over this angle to get a proper bounding box
polygon_rotate = rotate(
polygon, -angle, origin=tuple(_dst_corners[0]), use_radians=True
)
xmin, ymin, xmax, ymax = polygon_rotate.bounds
if resolution is not None:
xmin = round_to_multiple(xmin, resolution)
xmax = round_to_multiple(xmax, resolution)
ymin = round_to_multiple(ymin, resolution)
ymax = round_to_multiple(ymax, resolution)
# 这个地方返回的就是一个矩形框了
bbox_coords = [(xmin, ymax), (xmax, ymax), (xmax, ymin), (xmin, ymin), (xmin, ymax)]
bbox = Polygon(bbox_coords)
# now rotate back
bbox = rotate(bbox, angle, origin=tuple(_dst_corners[0]), use_radians=True)
return bbox


def round_to_multiple(number, multiple):
return multiple * round(number / multiple)


def get_bbox(bbox, dst, camera=False, h_a=None, redistort=False):
"""

Parameters
----------
camera : bool, optional
If set, the bounding box will be returned as row and column coordinates in the camera perspective.
In this case ``h_a`` may be set to provide the right water level, to estimate the bounding box for.
h_a : float, optional
If set with ``camera=True``, then the bbox coordinates will be transformed to the camera perspective,
using h_a as a present water level. In case a video with higher (lower) water levels is used, this
will result in a different perspective plane than the control video.
redistort : bool, optional
If set in combination with ``camera``, the bbox will be redistorted in the camera objective using the
distortion coefficients and camera matrix. Not used in orthorectification because this occurs by default
on already undistorted images.

Returns
-------
A bounding box, that in the used CRS is perfectly rectangular, and aligned in the up/downstream direction.
It can (and certainly will) be rotated with respect to a typical bbox with xlim, ylim coordinates.
If user sets ``camera=True`` then the geographical bounding box will be converted into a camera perspective,
using the homography belonging to the available ground control points and current water level.

This can then be used to reconstruct the grid for velocimetry calculations.
"""
bbox = bbox
if camera:
coords = np.array(bbox.exterior.coords)
# convert to perspective rowcol coordinates
M = get_M(reverse=True, h_a=h_a)
# reduce coords by control point mean
gcp_mean = np.array(dst).mean(axis=0)
coords -= gcp_mean[0:2]
# TODO: re-distort if needed
corners = cv2.perspectiveTransform(np.float32([coords]), M)[0]
# if redistort:
# # for visualization on still distorted frames this can be done. DO NOT do this if used for
# # orthorectification, as this typically occurs on undistorted images.
# corners = cv.undistort_points(corners, self.camera_matrix, self.dist_coeffs, reverse=True)

bbox = Polygon(corners)
return bbox


def get_M(h_a=None, to_bbox_grid=False, reverse=False):
"""Establish a transformation matrix for a certain actual water level `h_a`. This is done by mapping where the
ground control points, measured at `h_ref` will end up with new water level `h_a`, given the lens position.

Parameters
----------
h_a : float, optional
actual water level [m] (Default: None)
to_bbox_grid : bool, optional
if set, the M will be computed in row, column values of the target bbox, with set resolution
reverse : bool, optional
if True, the reverse matrix is prepared, which can be used to transform projected
coordinates back to the original camera perspective. (Default: False)

Returns
-------
M : np.ndarray
2x3 transformation matrix

"""
# src = cv.undistort_points(self.gcps["src"], self.camera_matrix, self.dist_coeffs)
# print("origin src self.gcps: ", self.gcps["src"])
# print("get_m src:",src)
if to_bbox_grid:
# lookup where the destination points are in row/column space
# dst_a is the destination point locations position with the actual water level
dst_a = transform_to_bbox(
get_dst_a(h_a),
bbox,
resolution
)
dst_a = np.array(dst_a)
else:
# in case we are dealing with a 2D 4-point, then reproject points on water surface, else keep 3D points
# 将参考平面四个点映射到水面
dst_a = get_dst_a(h_a) if gcp_dims == 2 else dst

# reduce dst_a with its mean to get much more accurate projection result in case x and y order of
# magnitude is very large
gcp_mean = np.array(dst).mean(axis=0)
dst_a -= gcp_mean
# src_a = self.get_src(**lens_pars)
if dst_a.shape[-1] == 3:
# compute the water level in the coordinate system reduced with the mean gcp coordinate
z_a = get_z_a(h_a)
gcp_mean = np.array(dst).mean(axis=0)
z_a -= gcp_mean[-1]
# treating 3D homography
return get_M_3D(
src=src,
dst=dst_a,
camera_matrix=camera_matrix,
dist_coeffs=dist_coeffs,
z=z_a,
reverse=reverse
)
else:
return get_M_2D(
src=src,
dst=dst_a,
reverse=reverse
)


# 根据四个对应的2D坐标点得到单应性矩阵
def get_M_2D(src, dst, reverse=False):
"""
Retrieve homography matrix for between (4) src and (4) dst points with only x, y coordinates (no z)

Parameters
----------
src : list of lists
[x, y] with source coordinates, typically cols and rows in image
dst : list of lists
[x, y] with target coordinates after reprojection, can e.g. be in crs [m]
reverse : bool, optional
If set, the reverse homography to back-project to camera objective will be retrieved

Returns
-------
M : np.ndarray
homography matrix (3x3), used in cv2.warpPerspective
"""
# set points to float32
_src = np.float32(src)
_dst = np.float32(dst)
# define transformation matrix based on GCPs
if reverse:
M = cv2.getPerspectiveTransform(_dst, _src)
else:
M = cv2.getPerspectiveTransform(_src, _dst)
return M

# 先得到相机外参(需要内参已知),于是就得到了像素到世界坐标(要求的俯视平面为x-y平面,z=0)的映射矩阵,而我们要求的单应矩阵其实就是这样的一个映射
def get_M_3D(src, dst, camera_matrix, dist_coeffs=np.zeros((1, 4)), z=0., reverse=False):
"""
Retrieve homography matrix for between (6+) 2D src and (6+) 3D dst (x, y, z) points

Parameters
----------
src : list of lists
[x, y] with source coordinates, typically cols and rows in image
dst : list of lists
[x, y, z] with target coordinates after reprojection, can e.g. be in crs [m]
camera_matrix : np.ndarray (3x3)
Camera intrinsic matrix
dist_coeffs : p.ndarray, optional
1xN array with distortion coefficients (N = 4, 5 or 8)
z : float, optional
Elevation plane (real-world coordinate crs) of projected image
reverse : bool, optional
If set, the reverse homography to back-project to camera objective will be retrieved

Returns
-------
M : np.ndarray
homography matrix (3x3), used in cv2.warpPerspective

Notes
-----
See rectification workflow OpenCV
http://docs.opencv.org/modules/calib3d/doc/camera_calibration_and_3d_reconstruction.html
Code based on:
https://www.openearth.nl/flamingo/_modules/flamingo/rectification/rectification.html

"""
# set points to float32
_src = np.float32(src)
_dst = np.float32(dst)
# import pdb;pdb.set_trace()
camera_matrix = np.float32(camera_matrix)
dist_coeffs = np.float32(dist_coeffs)
# define transformation matrix based on GCPs
success, rvec, tvec = cv2.solvePnP(_dst, _src, camera_matrix, dist_coeffs)
# convert rotation vector to rotation matrix
R = cv2.Rodrigues(rvec)[0]
# assume height of projection plane
R[:, 2] = R[:, 2] * z
# add translation vector
R[:, 2] = R[:, 2] + tvec.flatten()
# compute homography
if reverse:
# From perspective to objective
M = np.dot(camera_matrix, R)
else:
# from objective to perspective
M = np.linalg.inv(np.dot(camera_matrix, R))
# normalize homography before returning
return M / M[-1, -1]


def transform_to_bbox(coords, bbox, resolution):
"""transforms a set of coordinates defined in crs of bbox, into a set of coordinates in cv2 compatible pixels

Parameters
----------
coords : list of lists
[x, y] with coordinates
bbox : shapely Polygon
Bounding box. The coordinate order is very important and has to be upstream-left, downstream-left,
downstream-right, upstream-right, upstream-left
resolution : float
resolution of target pixels within bbox

Returns
-------
colrows : list
tuples of columns and rows

"""
# first assemble x and y coordinates
xs, ys = zip(*coords)
transform = _get_transform(bbox, resolution)
rows, cols = rasterio.transform.rowcol(transform, xs, ys, op=float)
return list(zip(cols, rows))


def _get_transform(bbox, resolution=0.01):
"""Return a rotated Affine transformation that fits with the bounding box and resolution.

Parameters
----------
bbox : shapely.geometry.Polygon
polygon of bounding box. The coordinate order is very important and has to be:
(upstream-left, downstream-left, downstream-right, upstream-right, upstream-left)
resolution : float, optional
resolution of target grid in meters (default: 0.01)

Returns
-------
affine : rasterio.transform.Affine
"""
corners = np.array(bbox.exterior.coords)
# estimate the angle of the bounding box
top_left_x, top_left_y = corners[0]
# retrieve average line across AOI
point1 = corners[0]
point2 = corners[1]
diff = point2 - point1
# compute the angle of the projected bbox area of interest
angle = np.arctan2(diff[1], diff[0])
# compute per col the x and y diff
dx_col, dy_col = np.cos(angle) * resolution, np.sin(angle) * resolution
# compute per row the x and y offsets
dx_row, dy_row = (
np.cos(angle + 1.5 * np.pi) * resolution,
np.sin(angle + 1.5 * np.pi) * resolution,
)
return rasterio.transform.Affine(
dx_col, dy_col, top_left_x, dx_row, dy_row, top_left_y
)

# 将参考平面四个点映射到水面
def get_dst_a(h_a=0.0, h_ref=0.0, lens_position=None):
"""
h_a : float, optional
actual water level measured [m], if not set, assumption is that a single video
is processed and thus changes in water level are not relevant. (default: None)

Returns
-------
Actual locations of control points (in case these are only x, y) given the current set water level and
the camera location
"""
# map where the destination points are with the actual water level h_a.
if h_a is None or h_a == h_ref:
# fill in the same value for h_ref and h_a
dst_a = dst
else:
h_ref = h_ref
lens_position = lens_position
dst_a = _get_gcps_a(
lens_position,
h_a,
dst,
z_0,
h_ref,
)
return dst_a

# 根据三角形的相似原理计算真实水面四个点的位置
def _get_gcps_a(lensPosition, h_a, coords, z_0=0.0, h_ref=0.0):
"""Get the actual x, y locations of ground control points at the actual water level

Parameters
----------
lensPosition : list of floats
x, y, z location of cam in local crs [m]
h_a : float
actual water level in local level measuring system [m]
coords : list of lists
gcp coordinates [x, y] in original water level
z_0 : float, optional
reference zero plain level, i.e. the crs amount of meters of the zero level of staff gauge (default: 0.0)
h_ref : float, optional
reference water level during taking of gcp coords with ref to staff gauge zero level (default: 0.0)

Returns
-------
coords : list
rows/cols for use in getPerspectivetransform

"""
# get modified gcps based on camera location and elevation values
cam_x, cam_y, cam_z = lensPosition
x, y = zip(*coords)
# compute the z during gcp coordinates
z_ref = h_ref + z_0
# compute z during current frame
z_a = z_0 + h_a
# compute the water table to camera height difference during field referencing
cam_height_ref = cam_z - z_ref
# compute the actual water table to camera height difference
cam_height_a = cam_z - z_a
rel_diff = cam_height_a / cam_height_ref
# apply the diff on all coordinate, both x, and y directions
_dest_x = list(cam_x + (np.array(x) - cam_x) * rel_diff)
_dest_y = list(cam_y + (np.array(y) - cam_y) * rel_diff)
dest_out = list(zip(_dest_x, _dest_y))
return dest_out


def get_z_a(h_a=None):
"""
h_a : float, optional
actual water level measured [m], if not set, assumption is that a single video
is processed and thus changes in water level are not relevant. (default: None)

Returns
-------
Actual locations of control points (in case these are only x, y) given the current set water level and
the camera location
"""
if h_a is None:
return z_0
else:
return z_0 + (h_a - h_ref)


def shape():
"""
Returns rows and columns in projected frames from ``Frames.project``

Returns
-------
rows : int
Amount of rows in projected frame
cols : int
Amount of columns in projected frame
"""
cols, rows = _get_shape(
bbox,
resolution=resolution,
round=1
)
return rows, cols


def _get_shape(bbox, resolution=0.01, round=1):
"""
defines the number of rows and columns needed in a target raster, to fit a given bounding box.

:param bbox: shapely Polygon, bounding box
:param resolution: resolution of target raster
:param round: number of pixels to round intended shape to
:return: numbers of rows and columns for target raster
"""
coords = bbox.exterior.coords
box_length = LineString(coords[0:2]).length
box_width = LineString(coords[1:3]).length
cols = int(np.ceil((box_length / resolution) / round)) * round
rows = int(np.ceil((box_width / resolution) / round)) * round
return cols, rows

if __name__ == '__main__':

# 需要4个对应的像素坐标点和真实物理坐标系点
src=[
[1421, 1001],
[1251, 460],
[421, 432],
[470, 607]
]
dst=[
[642735.8076, 8304292.1190], # lowest right coordinate
[642737.5823, 8304295.593], # highest right coordinate
[642732.7864, 8304298.4250], # highest left coordinate
[642732.6705, 8304296.8580] # highest right coordinate
]
corners = [
[292, 817],
[50, 166],
[1200, 236],
[1600, 834]
]
# 转换为俯视图每个像素对应的距离,单位为m
resolution = 0.01
# 参考点的高度
h_ref = 0.0
# 水面的高度
h_a = 0.0
# 摄像头在世界坐标系下的位置
lens_position = None
# 基准海拔
z_0 = 1182.2
gcp_dims = 2
camera_matrix = None
dist_coeffs = None

flags = cv2.INTER_AREA
# 根据corners在世界坐标系上求得一个适度的矩形框
bbox, bbox_xy = set_bbox_from_corners(corners, resolution, dst)
# 将这个矩形区域映射到像素坐标系下
src_v2 = get_bbox(bbox, dst, camera=True, h_a=0.0).exterior.coords[0:4]
# 获取要映射的dst地址大小,最简单的方式就是直接设置成 [[0,0],[width,0],[0,height],[width,height]]
# 这里作者为了实现一个像素对应0.01m,特意设置了一个坐标
# 注意,以上能够实现视角转换全得益于矩形框在世界坐标系下是矩形框
dst_xy = bbox_xy
dst_v2 = transform_to_bbox(dst_xy, bbox, resolution)
# 得到转换矩阵
M = get_M_2D(src_v2, dst_v2)

# 应用转换矩阵得到俯视图
# img = cv2.imread('ng_test.png')
video_path = r'ngwerere_20191103.mp4'
cap = cv2.VideoCapture(video_path)
frame_list = []
while True:
ret, frame = cap.read()
if ret:
frame = cv2.cvtColor(frame, cv2.COLOR_BGR2GRAY)
frame_list.append(frame)
else:
break
shape = shape()
img1 = frame_list[0]
img2 = frame_list[1]
final_frame1 = cv2.warpPerspective(img1, M, shape, flags=flags)
final_frame2 = cv2.warpPerspective(img2, M, shape, flags=flags)
cv2.imwrite("transfer_ng1v2_1.png", final_frame1)
cv2.imwrite("transfer_ng2v2_2.png", final_frame2)

在得到俯视图后就可以进一步求解面积,速度等变量了。
根据水纹求解速度有两类方法,一类为 Space-time image velocimetry(stiv),根据波纹得到纹理图,然后再根据纹理角得到速度。
另一类为Particle Image Velocimetry(piv)家族基于图像测流速方法,也是从水面中找特殊描述子然后进行追踪。
以下代码为stiv部分实现。

1
2
3
4
5
6
7
8
9
10
11
12
13
14
15
16
17
18
19
20
21
22
23
24
25
26
27
28
29
30
31
32
33
34
35
36
37
38
39
40
41
42
43
44
45
46
47
48
49
50
51
52
53
54
55
56
57
58
59
60
61
62
63
64
65
66
67
68
69
70
71
72
73
74
75
76
77
78
79
80
81
82
83
84
85
86
87
88
89
90
91
92
93
94
95
96
97
98
99
100
101
102
103
104
105
106
107
108
109
110
111
112
113
114
115
116
117
118
119
120
121
122
123
124
125
126
127
128
129
130
131
132
133
134
135
136
137
138
139
140
141
142
143
144
145
146
147
148
149
150
151
152
153
154
155
156
157
158
159
160
161
162
163
164
165
166
import datetime
import cv2
import numpy as np
import math
import time
import os
import m3u8
import requests
import eventlet


def get_alpha_confidence(img, window = 3):
length = min(img.shape[0], img.shape[1])
length = length if length % 2 == 0 else length -1
img = img[0:length, 0:length]

#计算水平方向边缘信息
scharrx = cv2.Scharr(img,cv2.CV_64F,1,0)
#计算垂直方向边缘信息
scharry = cv2.Scharr(img,cv2.CV_64F,0,1)

step = int(length / window)

alpha_list = []
c_list = []

for i in range(window):
for j in range(window):
Gxx = np.sum(scharrx[i*step: (i+1)*step, j*step: (j+1)*step] * scharrx[i*step: (i+1)*step, j*step: (j+1)*step])
Gxy = np.sum(scharrx[i*step: (i+1)*step, j*step: (j+1)*step] * scharry[i*step: (i+1)*step, j*step: (j+1)*step])
Gyy = np.sum(scharry[i*step: (i+1)*step, j*step: (j+1)*step] * scharry[i*step: (i+1)*step, j*step: (j+1)*step])
# print((2 * Gxy) / (Gyy - Gxx))
alpha = (math.atan((2 * Gxy) / (Gyy - Gxx)) / 2) * 180 / math.pi
if alpha < 0:
alpha = 90 + alpha

# 计算清晰置信度
c = math.sqrt((Gxx - Gyy) ** 2 + 4 * (Gxy ** 2)) / (Gxx + Gyy)
alpha_list.append(alpha)
c_list.append(c)

f_alpha = 0
c_sum = 0
for i in range(len(alpha_list)):
f_alpha = f_alpha + alpha_list[i] * c_list[i]
c_sum = c_sum + c_list[i]
print(alpha_list)
print(c_list)
f_alpha = f_alpha / c_sum

return f_alpha


def timeout(_time):
with eventlet.Timeout(_time, False): # 设置超时间
time.sleep(2)
return 'str'
return '不好意思函数调用超时'


def get_xt_img(url, max_count=15, frames=200, width_start=267, width_end=350, height_start=334):
size = 0
time_cur = str(time.strftime('%Y-%m-%d-%H-%M-%S'))
check = []

img_path = os.path.join("path-to-save")
if not os.path.exists(img_path):
os.makedirs(img_path)

# video_path = img_path + "\\" + 'stiv_post_ljx_online.mp4'
video_path = "path-to-video"
if os.path.exists(video_path):
# 删除文件
try:
os.remove(video_path)
except Exception as r:
print("delete online.mp4 wrong {}".format(r))

i = 0
while i < max_count:
try:
print("check: {}".format(check))
playlist = m3u8.load(uri=url, headers=headers, timeout=3)
for seg in playlist.segments:
if seg.absolute_uri[seg.absolute_uri.find("?") - 5:seg.absolute_uri.find("?")] not in check:
check.append(seg.absolute_uri[seg.absolute_uri.find("?") - 5:seg.absolute_uri.find("?")])
else:
continue
with open(video_path, "ab") as f:
r = requests.get(seg.absolute_uri, headers=headers, timeout=5)
data = r.content
size += len(data)
if data:
f.write(data)

i = i + 1
except:
i = i + 1

timeout(3)

frame_img = None
if os.path.exists(video_path):
cap = cv2.VideoCapture(video_path)
c = 0
frame_list = []
while True:
ret, frame = cap.read()

# 旋转一下
alpha_rotate = math.atan(81 / 171) * 180 / math.pi
if frame is not None:
frame = rotate(frame, -alpha_rotate)
if c == 0:
cv2.imwrite("xuanzh.png", frame)
if ret:
frame = cv2.cvtColor(frame, cv2.COLOR_BGR2RGB)
frame_list.append(frame)
c += 1
else:
print("所有帧都已经保存完成")
break

# frame_sample = frame_list[::5]
# 生成 x-t 图像
xt_img = np.zeros((frames, width_end-width_start), np.uint8)
for k in range(frames):
# print("len frame: ", len(frame_list))
cur_frame = cv2.cvtColor(frame_list[k], cv2.COLOR_BGR2GRAY)
xt_img[k, :] = np.flip(cur_frame[height_start, width_start:width_end])

return xt_img, time_cur


def rotate(image, angle, center=None, scale=1.0):
# grab the dimensions of the image
(h, w) = image.shape[:2]

# if the center is None, initialize it as the center of
# the image
if center is None:
center = (w // 2, h // 2)

# perform the rotation
M = cv2.getRotationMatrix2D(center, angle, scale)
rotated = cv2.warpAffine(image, M, (w, h))

# return the rotated image
return rotated


if __name__ == '__main__':

url = r"url-to-get-video"
headers = {
"User-Agent": "Mozilla/5.0 (Windows NT 10.0; Win64; x64) AppleWebKit/537.36 (KHTML, like Gecko) Chrome/86.0.4240.111 Safari/537.36 Edg/86.0.622.56",
"Connection": "close"
}

image, time_cur = get_xt_img(url)
cv2.imwrite('lyx_test.png', image)
alpha = get_alpha_confidence(image)
print(alpha)
cv2.imshow("xt image", image)

cv2.waitKey(0)

cycleGAN代码分析

本文浅析cycleGAN代码,实现对cycleGAN代码有一个基本认识
所分析的代码仓库:https://github.com/junyanz/pytorch-CycleGAN-and-pix2pix

装饰器

由于使用到了 abc 模块(一个抽象工具模块),顺带介绍一下python装饰器的使用。
装饰器的作用是在不改变原代码的情况下拓展函数功能,经常用于有切面需求的场景,比如:插入日志、性能测试、事务处理、缓存、权限校验等场景。装饰器包括函数装饰器和类装饰器,其中函数装饰器通过闭包实现(高阶函数的作用)。

1
2
3
4
5
6
7
8
9
10
11
12
def add_log(func):
def use_logging(*args, **kwargs):
print("add logging")
return func(*args, **kwargs)
return use_logging

@add_log
def bar():
print("I am bar")

# bar = add_log(bar)
bar()

如上代码,通过装饰器add_log装饰后的bar() 等价为 add_log(bar)()
如果要使用带参数的装饰器,就需要嵌套一层以传入参数

1
2
3
4
5
6
7
8
9
10
11
12
13
14
15
16
17
def param_log(level):
def decorator(func):
def wrapper(*args, **kwargs):
if level == "warn":
print("level is warn")
else:
print("level is not warn")
return func(*args, **kwargs)
return wrapper
return decorator


@param_log(level="warn")
def foo():
print("I am foo")

foo()

类装饰器通过 init 函数初始化要装饰的函数,具体实现在 call 函数中

1
2
3
4
5
6
7
8
9
10
11
12
13
14
15
class Foo(object):
def __init__(self, func):
self._func = func

def __call__(self):
print('class decorator runing')
self._func()
print('class decorator ending')


@Foo
def bar():
print('bar')

bar()

abc 模块中定义了抽象方法装饰器

1
2
3
def abstractmethod(funcobj):
funcobj.__isabstractmethod__ = True
return funcobj

cycleGAN

GAN网络的训练方式有点特殊,因此其整体框架稍有不同,下面对其进行分析

1
2
3
4
5
6
7
8
9
10
11
12
13
14
15
16
17
18
19
20
21
22
23
24
25
26
27
28
29
30
31
32
33
34
35
36
37
38
39
40
41
42
43
44
45
46
47
48
49
50
51
52
53
54
55
56
57
58
59
60
61
62
63
64
65
66
67
68
69
70
71
72
73
74
75
76
77
78
79
80
81
82
83
84
85
86
87
88
89
90
91
92
93
94
95
96
97
98
99
100
101
102
103
104
105
106
107
108
109
110
111
112
113
114
115
116
117
118
119
120
121
122
123
124
125
126
127
128
129
130
131
132
133
134
135
136
137
138
139
140
141
142
143
144
145
146
147
148
149
150
151
152
153
154
155
156
157
158
159
160
161
162
163
164
165
166
167
168
169
170
171
172
173
174
175
176
177
178
179
180
181
182
183
184
185
186
187
188
189
190
191
192
193
194
195
import torch
import itertools
from util.image_pool import ImagePool
from .base_model import BaseModel
from . import networks


class CycleGANModel(BaseModel):
"""
This class implements the CycleGAN model, for learning image-to-image translation without paired data.

The model training requires '--dataset_mode unaligned' dataset.
By default, it uses a '--netG resnet_9blocks' ResNet generator,
a '--netD basic' discriminator (PatchGAN introduced by pix2pix),
and a least-square GANs objective ('--gan_mode lsgan').

CycleGAN paper: https://arxiv.org/pdf/1703.10593.pdf
"""
@staticmethod
def modify_commandline_options(parser, is_train=True):
"""Add new dataset-specific options, and rewrite default values for existing options.

Parameters:
parser -- original option parser
is_train (bool) -- whether training phase or test phase. You can use this flag to add training-specific or test-specific options.

Returns:
the modified parser.

For CycleGAN, in addition to GAN losses, we introduce lambda_A, lambda_B, and lambda_identity for the following losses.
A (source domain), B (target domain).
Generators: G_A: A -> B; G_B: B -> A.
Discriminators: D_A: G_A(A) vs. B; D_B: G_B(B) vs. A.
Forward cycle loss: lambda_A * ||G_B(G_A(A)) - A|| (Eqn. (2) in the paper)
Backward cycle loss: lambda_B * ||G_A(G_B(B)) - B|| (Eqn. (2) in the paper)
Identity loss (optional): lambda_identity * (||G_A(B) - B|| * lambda_B + ||G_B(A) - A|| * lambda_A) (Sec 5.2 "Photo generation from paintings" in the paper)
Dropout is not used in the original CycleGAN paper.
"""
parser.set_defaults(no_dropout=True) # default CycleGAN did not use dropout
if is_train:
parser.add_argument('--lambda_A', type=float, default=10.0, help='weight for cycle loss (A -> B -> A)')
parser.add_argument('--lambda_B', type=float, default=10.0, help='weight for cycle loss (B -> A -> B)')
parser.add_argument('--lambda_identity', type=float, default=0.5, help='use identity mapping. Setting lambda_identity other than 0 has an effect of scaling the weight of the identity mapping loss. For example, if the weight of the identity loss should be 10 times smaller than the weight of the reconstruction loss, please set lambda_identity = 0.1')

return parser

def __init__(self, opt):
"""Initialize the CycleGAN class.

Parameters:
opt (Option class)-- stores all the experiment flags; needs to be a subclass of BaseOptions
"""
BaseModel.__init__(self, opt)
# specify the training losses you want to print out. The training/test scripts will call <BaseModel.get_current_losses>
self.loss_names = ['D_A', 'G_A', 'cycle_A', 'idt_A', 'D_B', 'G_B', 'cycle_B', 'idt_B']
# specify the images you want to save/display. The training/test scripts will call <BaseModel.get_current_visuals>
visual_names_A = ['real_A', 'fake_B', 'rec_A']
visual_names_B = ['real_B', 'fake_A', 'rec_B']
if self.isTrain and self.opt.lambda_identity > 0.0: # if identity loss is used, we also visualize idt_B=G_A(B) ad idt_A=G_A(B)
print("!!!!!!!!! use identity loss")
visual_names_A.append('idt_B')
visual_names_B.append('idt_A')

self.visual_names = visual_names_A + visual_names_B # combine visualizations for A and B
# specify the models you want to save to the disk. The training/test scripts will call <BaseModel.save_networks> and <BaseModel.load_networks>.
if self.isTrain:
self.model_names = ['G_A', 'G_B', 'D_A', 'D_B']
else: # during test time, only load Gs
self.model_names = ['G_A', 'G_B']

# define networks (both Generators and discriminators)
# The naming is different from those used in the paper.
# Code (vs. paper): G_A (G), G_B (F), D_A (D_Y), D_B (D_X)
self.netG_A = networks.define_G(opt.input_nc, opt.output_nc, opt.ngf, opt.netG, opt.norm,
not opt.no_dropout, opt.init_type, opt.init_gain, self.gpu_ids)
self.netG_B = networks.define_G(opt.output_nc, opt.input_nc, opt.ngf, opt.netG, opt.norm,
not opt.no_dropout, opt.init_type, opt.init_gain, self.gpu_ids)

if self.isTrain: # define discriminators
self.netD_A = networks.define_D(opt.output_nc, opt.ndf, opt.netD,
opt.n_layers_D, opt.norm, opt.init_type, opt.init_gain, self.gpu_ids)
self.netD_B = networks.define_D(opt.input_nc, opt.ndf, opt.netD,
opt.n_layers_D, opt.norm, opt.init_type, opt.init_gain, self.gpu_ids)

if self.isTrain:
if opt.lambda_identity > 0.0: # only works when input and output images have the same number of channels
assert(opt.input_nc == opt.output_nc)
self.fake_A_pool = ImagePool(opt.pool_size) # create image buffer to store previously generated images
self.fake_B_pool = ImagePool(opt.pool_size) # create image buffer to store previously generated images
# define loss functions
self.criterionGAN = networks.GANLoss(opt.gan_mode).to(self.device) # define GAN loss.
self.criterionCycle = torch.nn.L1Loss()
self.criterionIdt = torch.nn.L1Loss()
# initialize optimizers; schedulers will be automatically created by function <BaseModel.setup>.
self.optimizer_G = torch.optim.Adam(itertools.chain(self.netG_A.parameters(), self.netG_B.parameters()), lr=opt.lr, betas=(opt.beta1, 0.999))
self.optimizer_D = torch.optim.Adam(itertools.chain(self.netD_A.parameters(), self.netD_B.parameters()), lr=opt.lr, betas=(opt.beta1, 0.999))
self.optimizers.append(self.optimizer_G)
self.optimizers.append(self.optimizer_D)

def set_input(self, input):
"""Unpack input data from the dataloader and perform necessary pre-processing steps.

Parameters:
input (dict): include the data itself and its metadata information.

The option 'direction' can be used to swap domain A and domain B.
"""
AtoB = self.opt.direction == 'AtoB'
self.real_A = input['A' if AtoB else 'B'].to(self.device)
self.real_B = input['B' if AtoB else 'A'].to(self.device)
self.image_paths = input['A_paths' if AtoB else 'B_paths']

def forward(self):
"""Run forward pass; called by both functions <optimize_parameters> and <test>."""
self.fake_B = self.netG_A(self.real_A) # G_A(A)
self.rec_A = self.netG_B(self.fake_B) # G_B(G_A(A))
self.fake_A = self.netG_B(self.real_B) # G_B(B)
self.rec_B = self.netG_A(self.fake_A) # G_A(G_B(B))

def backward_D_basic(self, netD, real, fake):
"""Calculate GAN loss for the discriminator

Parameters:
netD (network) -- the discriminator D
real (tensor array) -- real images
fake (tensor array) -- images generated by a generator

Return the discriminator loss.
We also call loss_D.backward() to calculate the gradients.
"""
# Real
pred_real = netD(real)
loss_D_real = self.criterionGAN(pred_real, True)
# Fake
pred_fake = netD(fake.detach())
loss_D_fake = self.criterionGAN(pred_fake, False)
# Combined loss and calculate gradients
loss_D = (loss_D_real + loss_D_fake) * 0.5
loss_D.backward()
return loss_D

def backward_D_A(self):
"""Calculate GAN loss for discriminator D_A"""
fake_B = self.fake_B_pool.query(self.fake_B)
self.loss_D_A = self.backward_D_basic(self.netD_A, self.real_B, fake_B)

def backward_D_B(self):
"""Calculate GAN loss for discriminator D_B"""
fake_A = self.fake_A_pool.query(self.fake_A)
self.loss_D_B = self.backward_D_basic(self.netD_B, self.real_A, fake_A)

def backward_G(self):
"""Calculate the loss for generators G_A and G_B"""
lambda_idt = self.opt.lambda_identity
lambda_A = self.opt.lambda_A
lambda_B = self.opt.lambda_B
# Identity loss
if lambda_idt > 0:
# G_A should be identity if real_B is fed: ||G_A(B) - B||
self.idt_A = self.netG_A(self.real_B)
self.loss_idt_A = self.criterionIdt(self.idt_A, self.real_B) * lambda_B * lambda_idt
# G_B should be identity if real_A is fed: ||G_B(A) - A||
self.idt_B = self.netG_B(self.real_A)
self.loss_idt_B = self.criterionIdt(self.idt_B, self.real_A) * lambda_A * lambda_idt
else:
self.loss_idt_A = 0
self.loss_idt_B = 0

# GAN loss D_A(G_A(A))
self.loss_G_A = self.criterionGAN(self.netD_A(self.fake_B), True)
# GAN loss D_B(G_B(B))
self.loss_G_B = self.criterionGAN(self.netD_B(self.fake_A), True)
# Forward cycle loss || G_B(G_A(A)) - A||
self.loss_cycle_A = self.criterionCycle(self.rec_A, self.real_A) * lambda_A
# Backward cycle loss || G_A(G_B(B)) - B||
self.loss_cycle_B = self.criterionCycle(self.rec_B, self.real_B) * lambda_B
# combined loss and calculate gradients
self.loss_G = self.loss_G_A + self.loss_G_B + self.loss_cycle_A + self.loss_cycle_B + self.loss_idt_A + self.loss_idt_B
self.loss_G.backward()

def optimize_parameters(self):
"""Calculate losses, gradients, and update network weights; called in every training iteration"""
# forward
self.forward() # compute fake images and reconstruction images.
# G_A and G_B
self.set_requires_grad([self.netD_A, self.netD_B], False) # Ds require no gradients when optimizing Gs
self.optimizer_G.zero_grad() # set G_A and G_B's gradients to zero
self.backward_G() # calculate gradients for G_A and G_B
self.optimizer_G.step() # update G_A and G_B's weights
# D_A and D_B
self.set_requires_grad([self.netD_A, self.netD_B], True)
self.optimizer_D.zero_grad() # set D_A and D_B's gradients to zero
self.backward_D_A() # calculate gradients for D_A
self.backward_D_B() # calculate graidents for D_B
self.optimizer_D.step() # update D_A and D_B's weights

从forward函数,init函数和optimize_parameters函数进行分析。
init函数初始化一些变量,forward函数构建pipeline,具体需要清楚个命名代表什么。
real_A –> netG_A –> fake_B –> netG_B –> rec_A
real_B –> netG_B –> fake_A –> netG_A –> rec_B
每个epoch调用的是 optimize_parameters。

1
2
3
4
for epoch in range(opt.epoch_count, opt.n_epochs + opt.n_epochs_decay + 1): 
for i, data in enumerate(dataset): # inner loop within one epoch
model.set_input(data) # unpack data from dataset and apply preprocessing
model.optimize_parameters() # calculate loss functions, get gradients, update network weights

关于生成器和判别器是如何搭建的,如无深入研究,建议直接看论文。

CRF总结

介绍CRF的文章看起来总是高深莫测,本文不介绍CRF的数学原理,旨在通过实战及定性上对CRF有一个认识。

BERT+Bi-LSTM+CRF实现NER

参考文章: https://zhuanlan.zhihu.com/p/453350271
参考代码: https://github.com/XavierWww/Chinese-Medical-Entity-Recognition

首先需要对NER标注的数据进行预处理得到文字/标注对,NER任务有多种标注方式,具体方案在本文不详细阐述,本文旨在展示CRF如何用。
直接上 BERT+Bi-LSTM+CRF 模型的代码吧,代码对各个变量代表的意思,及shape进行了详细的标注

1
2
3
4
5
6
7
8
9
10
11
12
13
14
15
16
17
18
19
20
21
22
23
24
25
26
27
28
29
30
31
32
33
34
35
from torchcrf import CRF
class Bert_BiLSTM_CRF(nn.Module):

def __init__(self, tag_to_ix, embedding_dim=768, hidden_dim=256):
super(Bert_BiLSTM_CRF, self).__init__()
self.tag_to_ix = tag_to_ix
self.tagset_size = len(tag_to_ix)
self.hidden_dim = hidden_dim
self.embedding_dim = embedding_dim

self.bert = BertModel.from_pretrained("bert-base-chinese")
self.lstm = nn.LSTM(input_size=embedding_dim, hidden_size=hidden_dim//2,
num_layers=2, bidirectional=True, batch_first=True)
self.dropout = nn.Dropout(p=0.1)
self.linear = nn.Linear(hidden_dim, self.tagset_size)
self.crf = CRF(self.tagset_size, batch_first=True)

def _get_features(self, sentence):
with torch.no_grad():
embeds_out = self.bert(sentence) # ([64, 228, 768])
enc, _ = self.lstm(embeds_out['last_hidden_state']) # ([64, 228, 256])
enc = self.dropout(enc)
feats = self.linear(enc) # ([64, 228, 16])
return feats

def forward(self, sentence, tags, mask, is_test=False):
# sentence ([64, 228]) tags ([64, 228]) mask ([64, 228])
# 64 为 batch size 228为该batch size的最长的句子长度
emissions = self._get_features(sentence)
if not is_test: # Training,return loss
loss=-self.crf.forward(emissions, tags, mask, reduction='mean')
return loss
else: # Testing,return decoding
decode=self.crf.decode(emissions, mask)
return decode

从以上代码可以发现,CRF的训练细节及测试步骤全部封装在CRF类中,训练时调用forward函数,测试时调用decode函数就行。
另外值得注意的是每个句子长度不一,怎样训练效率更高且减小pad的影响呢,这里作者的dataloader如下

1
2
3
4
5
6
7
8
9
10
11
12
13
14
15
16
17
18
19
20
class NerDataset(Dataset):
''' Generate our dataset '''
def __getitem__(self, idx):
words, tags = self.sents[idx], self.tags_li[idx]
token_ids = tokenizer.convert_tokens_to_ids(words)
laebl_ids = [tag2idx[tag] for tag in tags]
seqlen = len(laebl_ids)
return token_ids, laebl_ids, seqlen

train_iter = data.DataLoader(dataset=train_dataset,
batch_size=ner.batch_size,
shuffle=True,
num_workers=4,
collate_fn=PadBatch)
def PadBatch(batch):
maxlen = max([i[2] for i in batch])
token_tensors = torch.LongTensor([i[0] + [0] * (maxlen - len(i[0])) for i in batch])
label_tensors = torch.LongTensor([i[1] + [0] * (maxlen - len(i[1])) for i in batch])
mask = (token_tensors > 0)
return token_tensors, label_tensors, mask

从上述代码可以看出来主要还是DataLoader中collate_fn参数的作用,相当于是告诉DataLoader如何组织 batch 中的每一项。

semantic_segment_工程总结

语义分割有很多实际应用场景,本篇文章结合水位分割做一个总结。

数据预处理

在实际应用场景中,遇到最大的问题是数据的质量问题,一般室外画面光照影响严重,特别是像水面这种受光照影响严重的物质(如果是做图像回归需要特别注意这个问题)。同时摄像头布置也要避免强光影响。而在夜晚这种场景,如果无法使用红外摄像头,肯定是需要灯光照明的,但如果画面中出现强灯光,同时不同站点其光照条件肯定是不同的,这时肯定会影响黑夜的分割效果(光照想太阳光一样,都是影响分割效果的强干扰因素),为了减少灯光因素的影响,需要把这部分切掉再训练。

除了结合工程项目进行特定的数据预处理,一般为了做数据增广,增强模型鲁棒性,语义分割还有很多通用的数据预处理方法,一般随便找个baseline里面都包含了。

标记自己的数据集

分割模型

尝试了分水岭算法分割,k-means聚类分割和基于深度网络的分割模型如PSPNet,SPNet,FCN,DeepLabV3等。前两者分割效果不行,后者泛化性不够。
从如下图片示例也可以进行一些分析,水面受光照影响比较严重,即使是同一片水域,也会形成局部亮斑,而前两者的主要原理就是根据颜色进行阈值划分,很难准确得将整片水域正确分割出来。