image-to-image

让机器生成我们想要的图像是一件很酷的事情,本文总结一下图像生成的paper

Generative Adversarial Nets[2014]

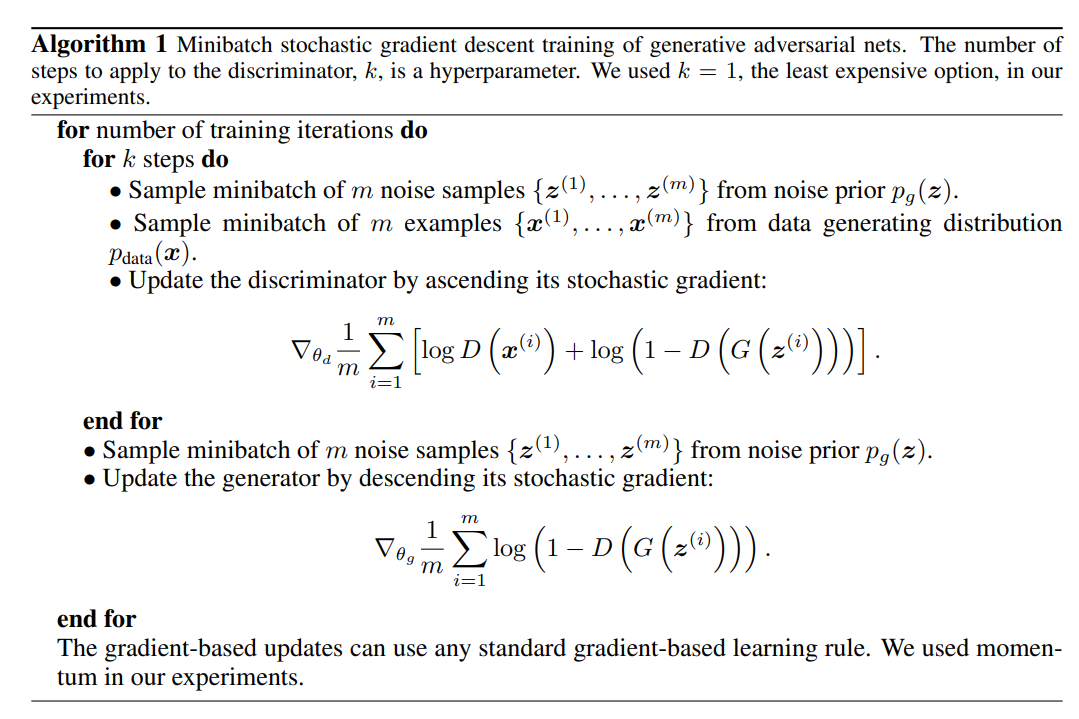
对于一般的任务比如图像识别我们有一个确定的类别来训练网络结构,将这成为判别算法。但是有一些情况是没有唯一真实标签的,比如我们只想生成带有数字的图片,至于这个数字是多少,数字写得好不好看不重要,只要是数字就行,也就是符合数字的这样一个特征分布,这时就没法直接用标签来训练网络结构了,于是引入了判别器,用于判断生成的分布是否与目标领域分布相同。
整个训练过程有必要了解

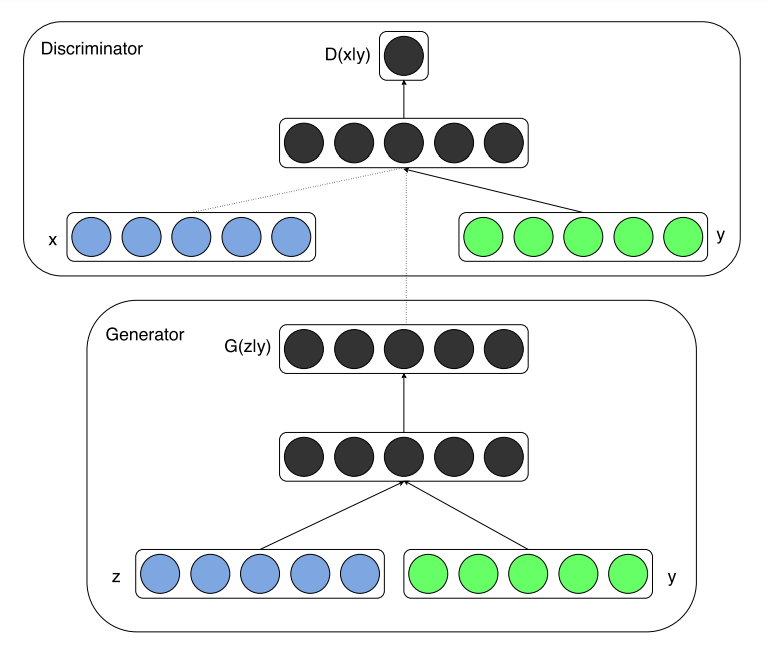
Conditional Generative Adversarial Nets

如果需要生成的不是整个目标图像域的随意一张图片,而是指定类别的图片呢,这时就需要额外添加控制变量

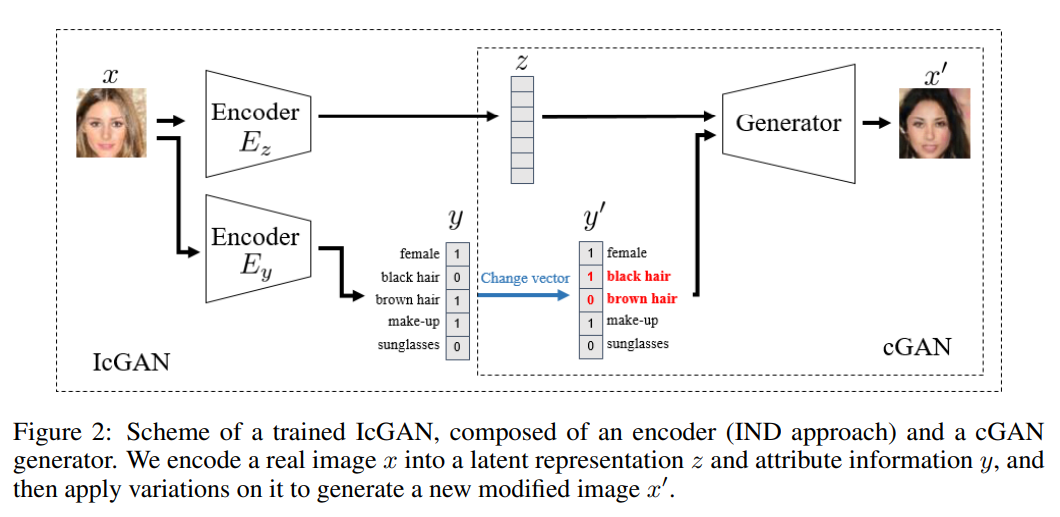
Invertible Conditional GANs for image editing

更进一步,可不可以只改变图像的某些属性,而保留另外一些属性呢,比如给人脸换个发型

Image-to-Image Translation with Conditional Adversarial Networks

一致性损失函数
$\mathcal{L}{L 1}(G)=\mathbb{E}{x, y, z}\left[|y-G(x, z)|_1\right]$
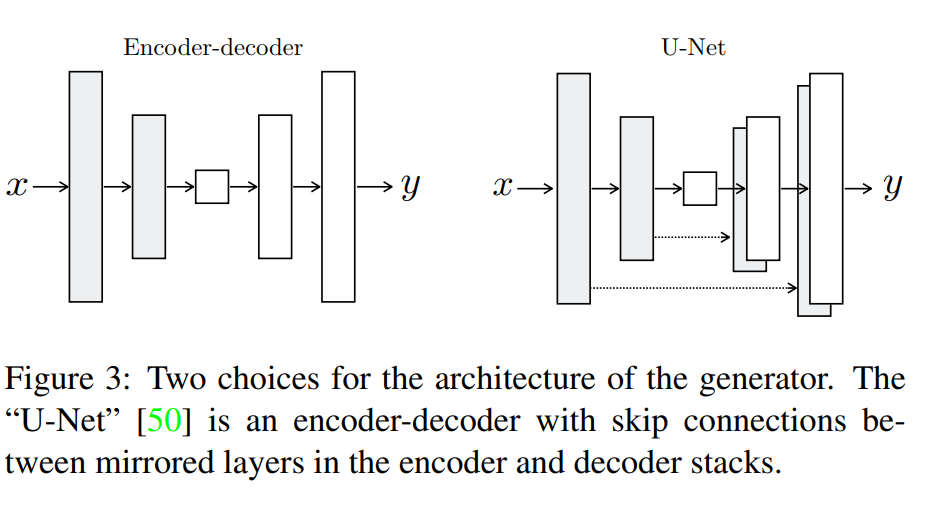
encoder-decoder改成了u-net结构

如果只让判别器分别是fake还是real太粗糙了,因此作者提出分块判别:This discriminator tries to classify if each N ×N patch in an image is real or fake.

Unpaired Image-to-Image Translation using Cycle-Consistent Adversarial Networks

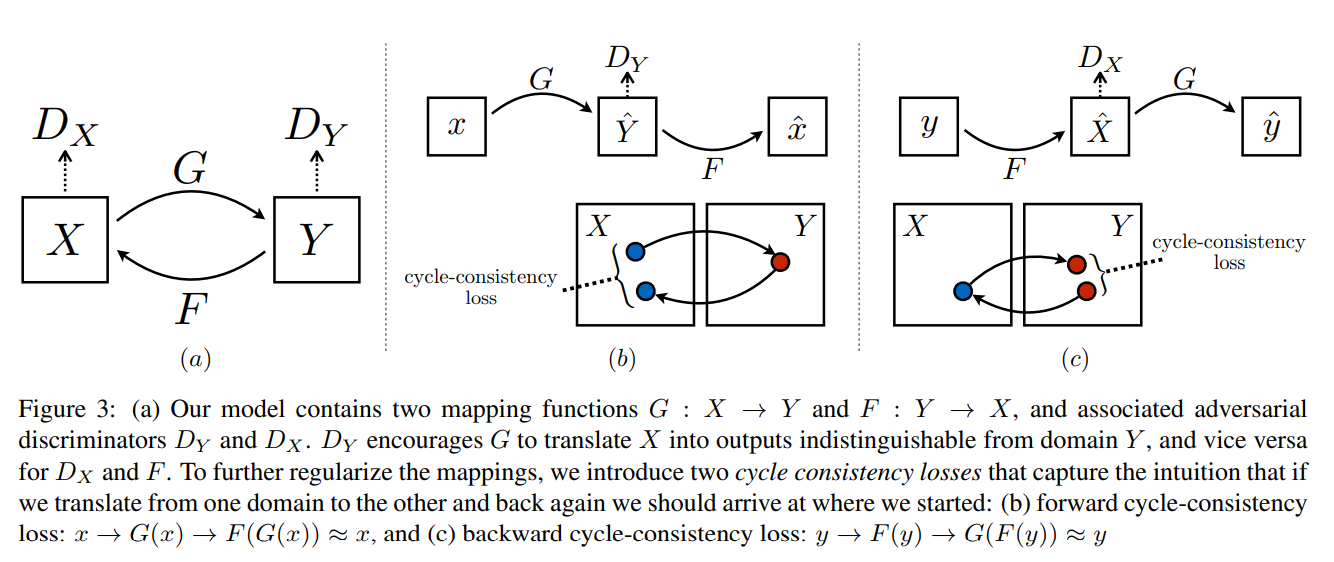
闭环思路,不在需要成对的图像训练网络。

另外需要特别注意的是为了防止 生成器G和生成器F互相包庇,需要引入 identity 损失函数,结合框架图就是 x 经过生成器 F 后生成的图像仍然是 x,而y经过生成器G后生成的图片仍然是y
$\mathcal{L}{\text {identity }}(G, F)=\mathbb{E}{y \sim p_{\text {data }}(y)}\left[|G(y)-y|1\right]+$ $\mathbb{E}{x \sim p_{\text {data }}(x)}\left[|F(x)-x|_1\right]$

更新中

semantic-segment-总结

因为参加了一个语义分割相关的项目,对语义分割方向的论文做一个大致的汇总。

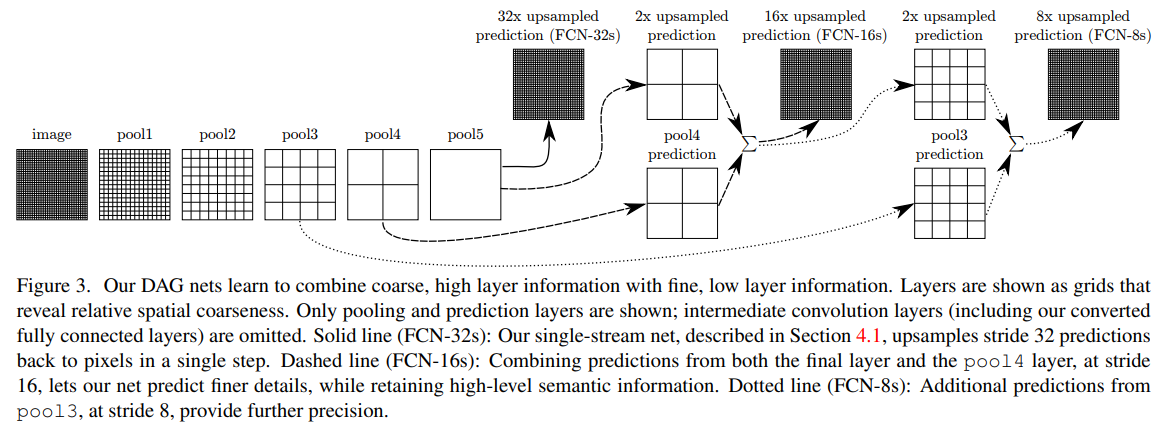
Fully Convolutional Networks for Semantic Segmentation[2014]

实现语义分割端到端训练的开山之作

MULTI-SCALE CONTEXT AGGREGATION BY DILATED CONVOLUTIONS[2015]

使用了空洞卷积,感觉如果是全局上下文比较重要的场景可以试试

PARSENET: LOOKING WIDER TO SEE BETTER[2015]

同样是从全局语义出发,当然文中提到了不同层的语义特征的尺度不同,因此在融合前需要进行归一化

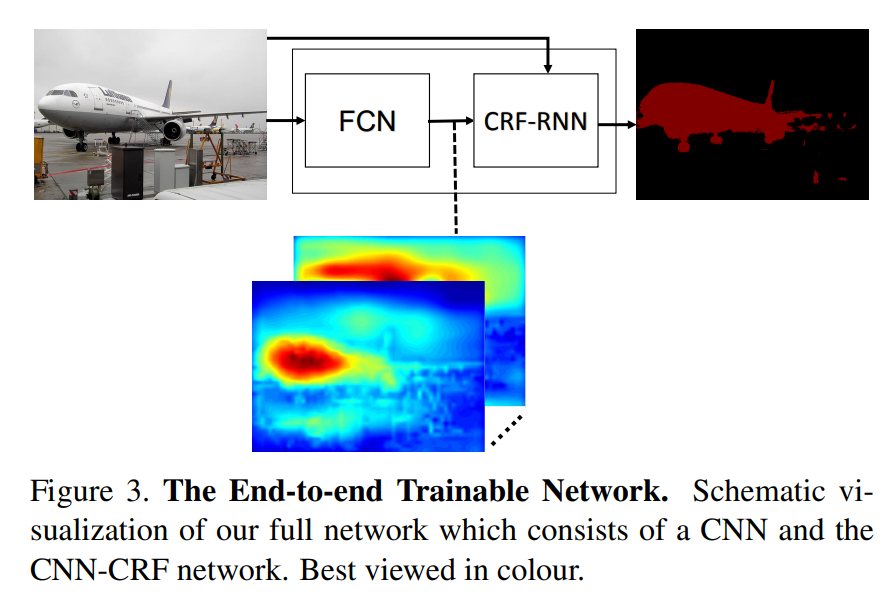
Conditional Random Fields as Recurrent Neural Networks[2016]

将CRF思想融合到卷积中做语义分割的后处理,指标提升了不少,深入研究还有待看代码

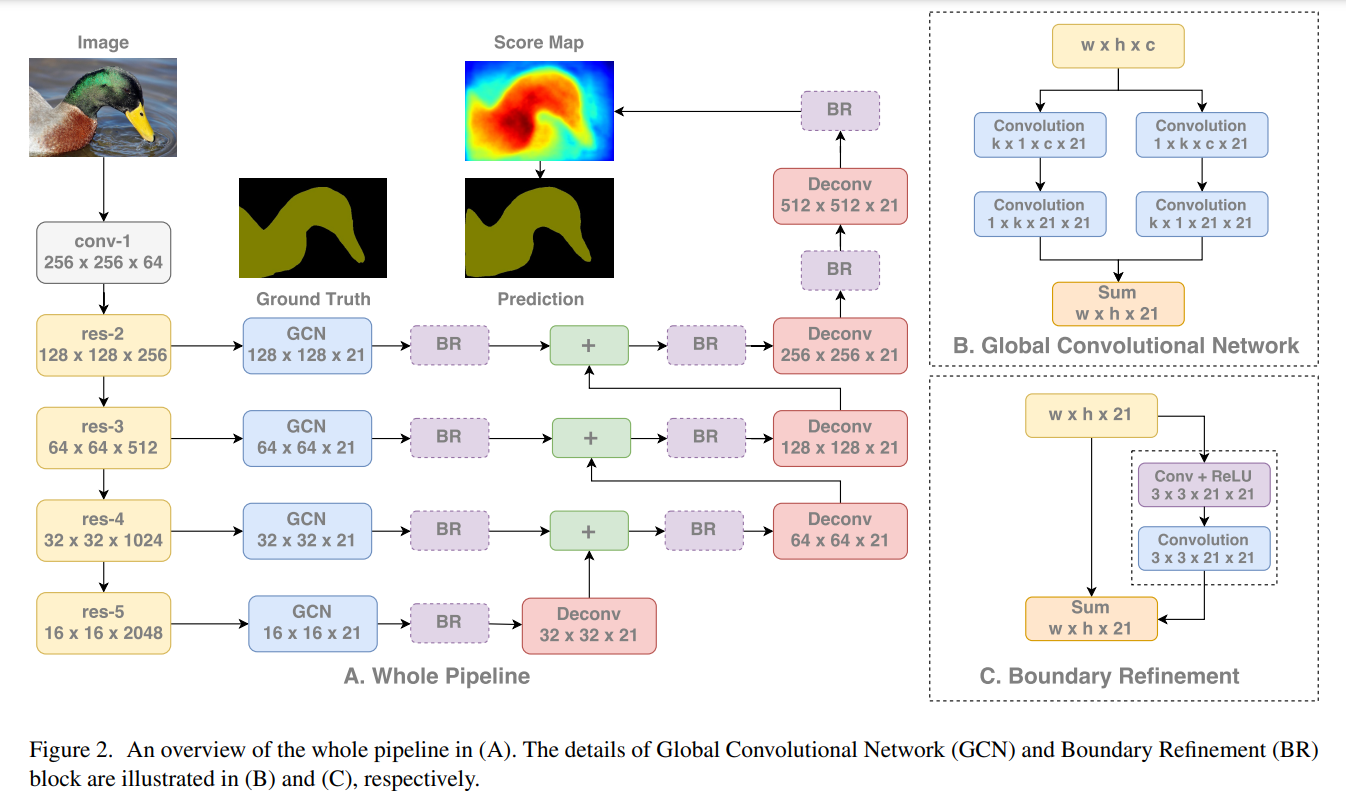
Large Kernel Matters —— Improve Semantic Segmentation by Global Convolutional Network[2017]

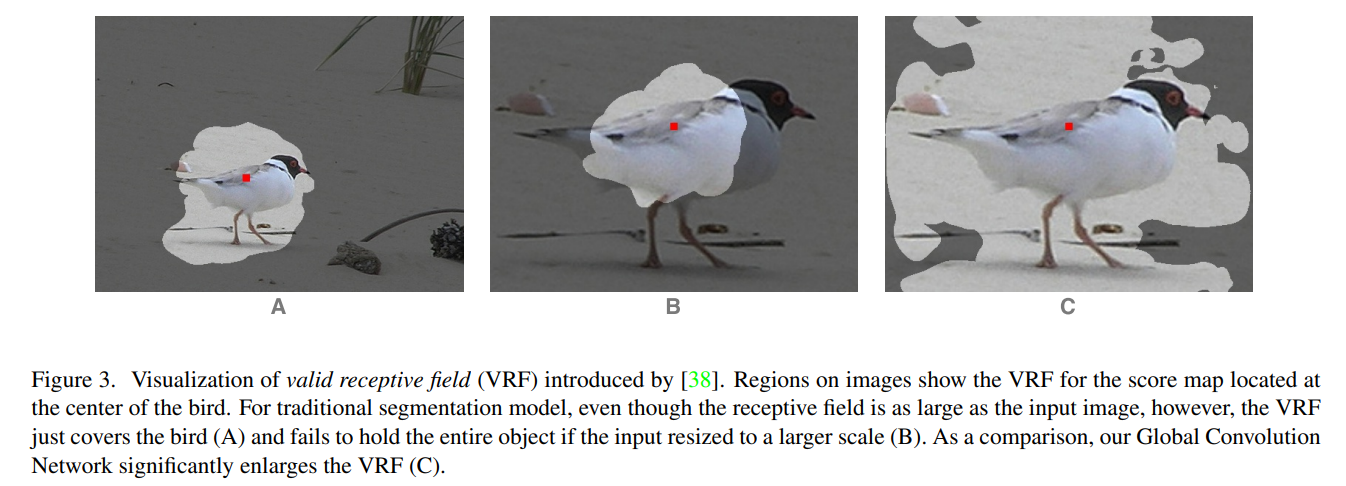
作者将语义分割分为分类与定位,然后提到分类是受感受野影响的,而设置更大的卷积核是有利于增大感受野的,关于语义分割任务的定位,我引用原文如下
Semantic segmentation can be considered as a per-pixel classification problem. There are two challenges in this task: 1) classification: an object associated to a specific semantic concept should be marked correctly; 2) localization: the classification label for a pixel must be aligned to the appropriate coordinates in output score map. A well-designed segmentation model should deal with the two issues simultaneously.
关于localization,我的理解就是自然规律,常识类信息,比如天空在上面
作者从提升分类效果出发,使用更大的卷积核,框架图如下

另外作者还展示了一篇研究真实感受野和理论感受野关系的论文,具体paper:OBJECT DETECTORS EMERGE IN DEEP SCENE CNNS

另外作者关于感受野对分类重要性的举例也很有说服力

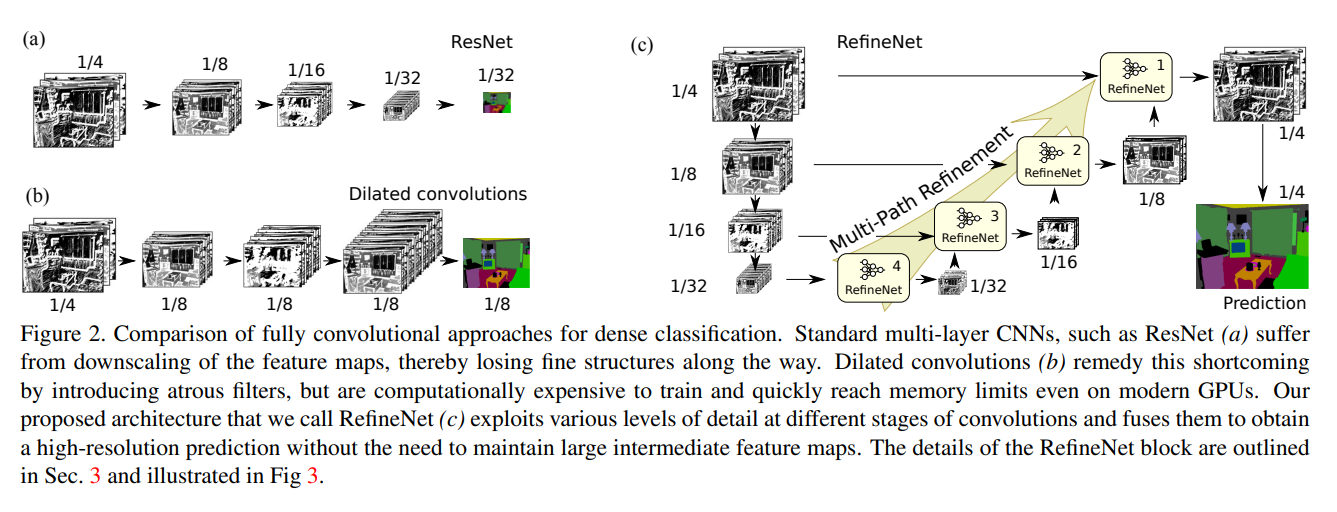
RefineNet: Multi-Path Refinement Networks for High-Resolution Semantic Segmentation[2017]

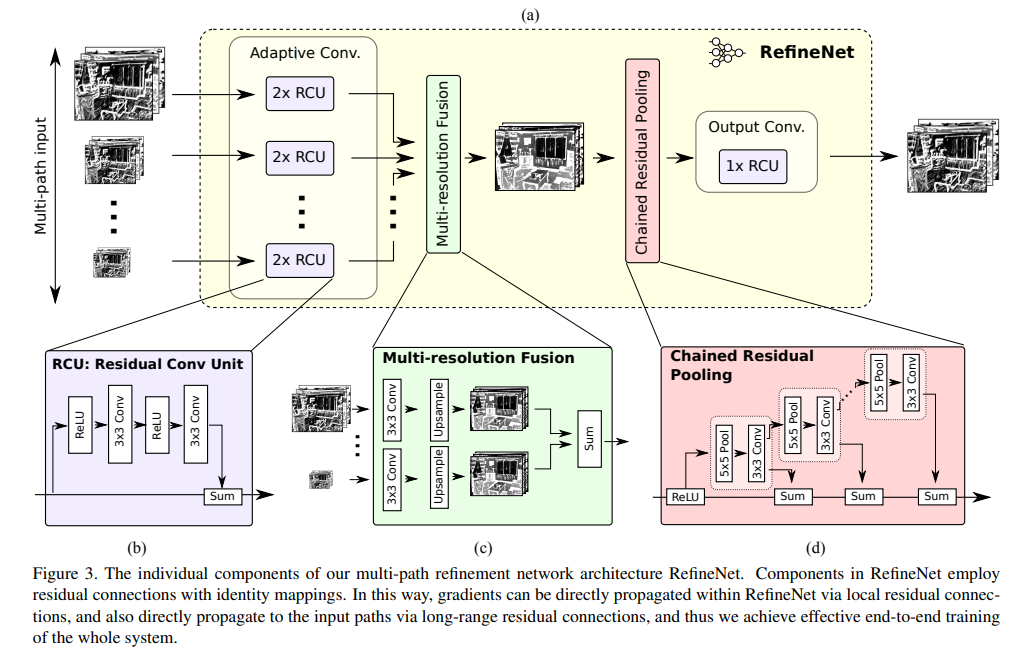
整体思路还是利用底层特征

具体框架图

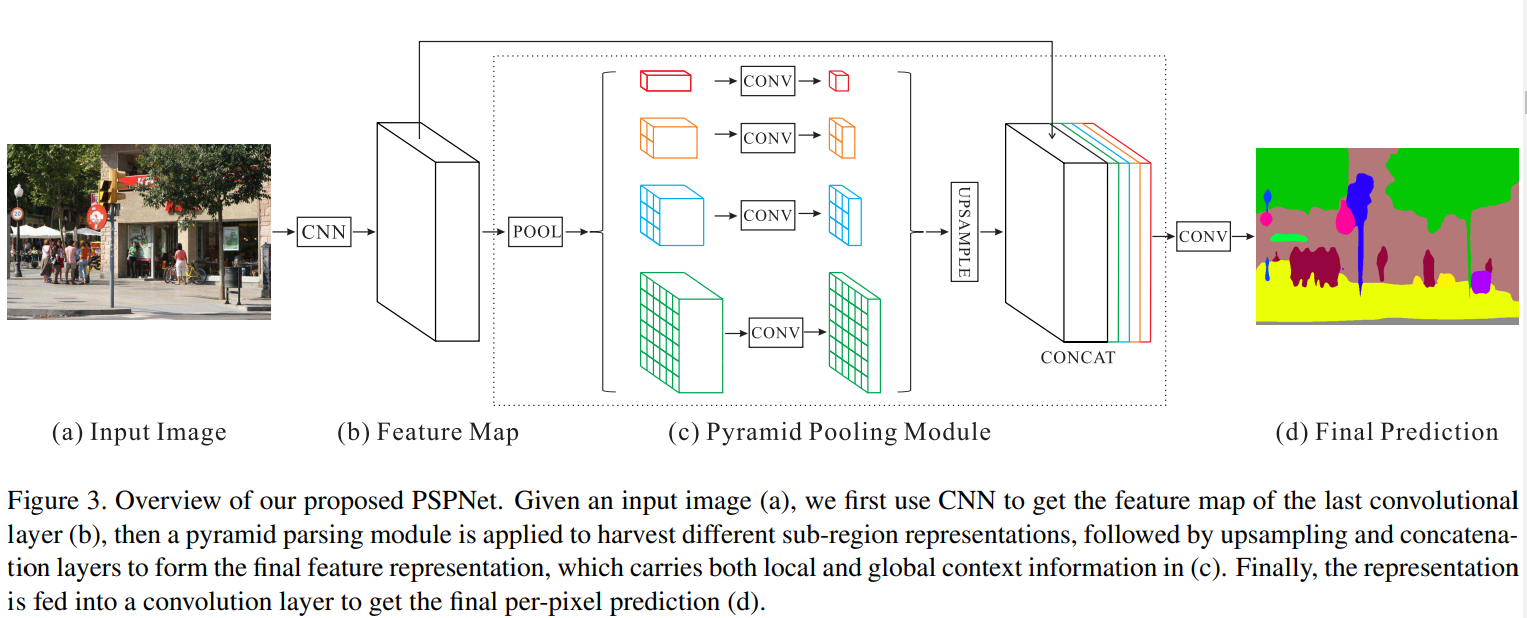
Pyramid Scene Parsing Network[2017]

同样是金字塔的方式利用全局信息及深层次语义信息

Rethinking Atrous Convolution for Semantic Image Segmentation[2017]

以空洞卷积的方式融合全局信息, 虽然思路和前面的文章大差不差,但本文的related work 做了很详细的总结,值得品读。

Encoder-Decoder with Atrous Separable Convolution for Semantic Image Segmentation[2018]

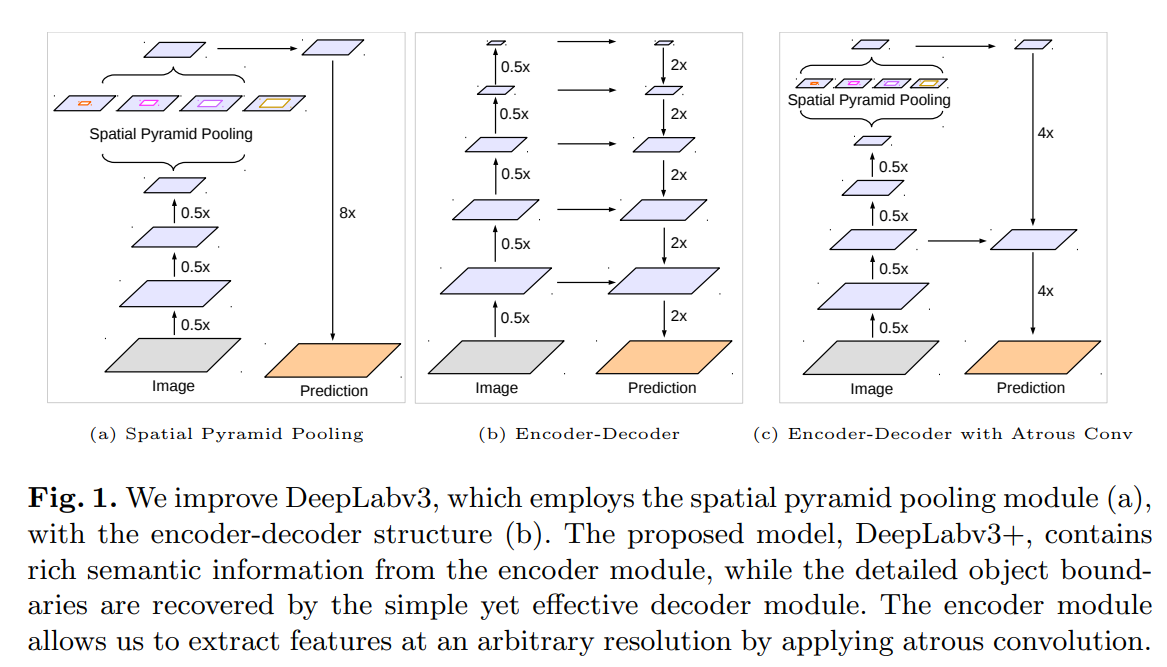
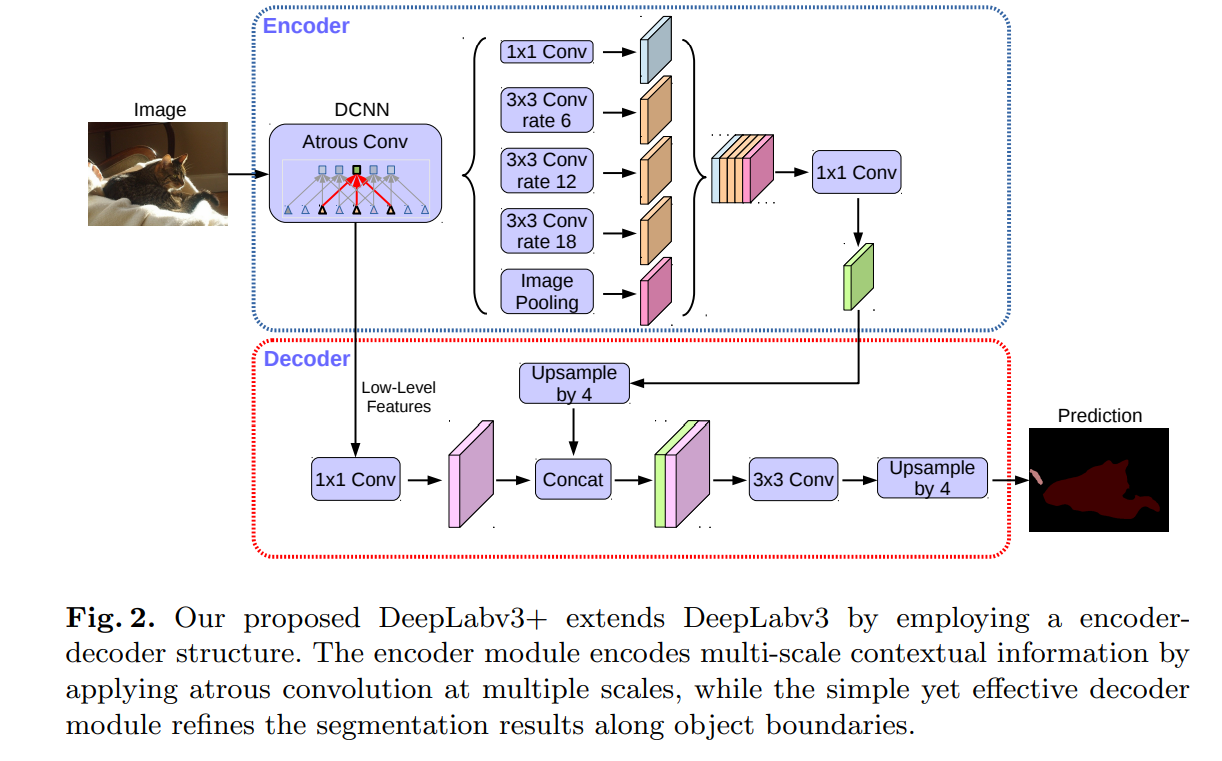
在deeplab-v3的基础上添加编解码器结构进一步融合底层特征,论文从形状信息来表述

更新中

resnet系列

resnet系列任然是很多计算机视觉任务的backbone,本文从论文和代码角度对其进行讲解。

Deep Residual Learning for Image Recognition

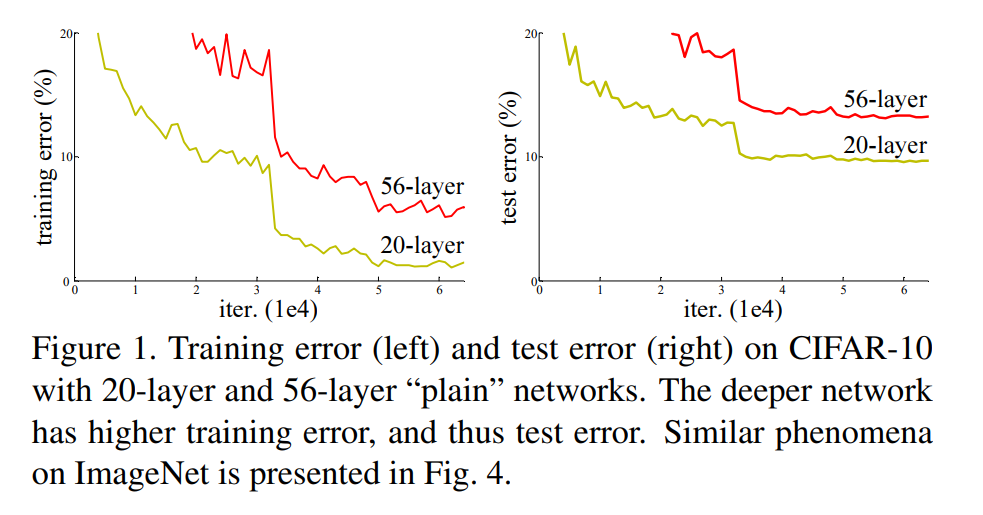
ResNet解决的是网络退化问题(注意不是梯度消失或爆炸),什么是网络退化见下图

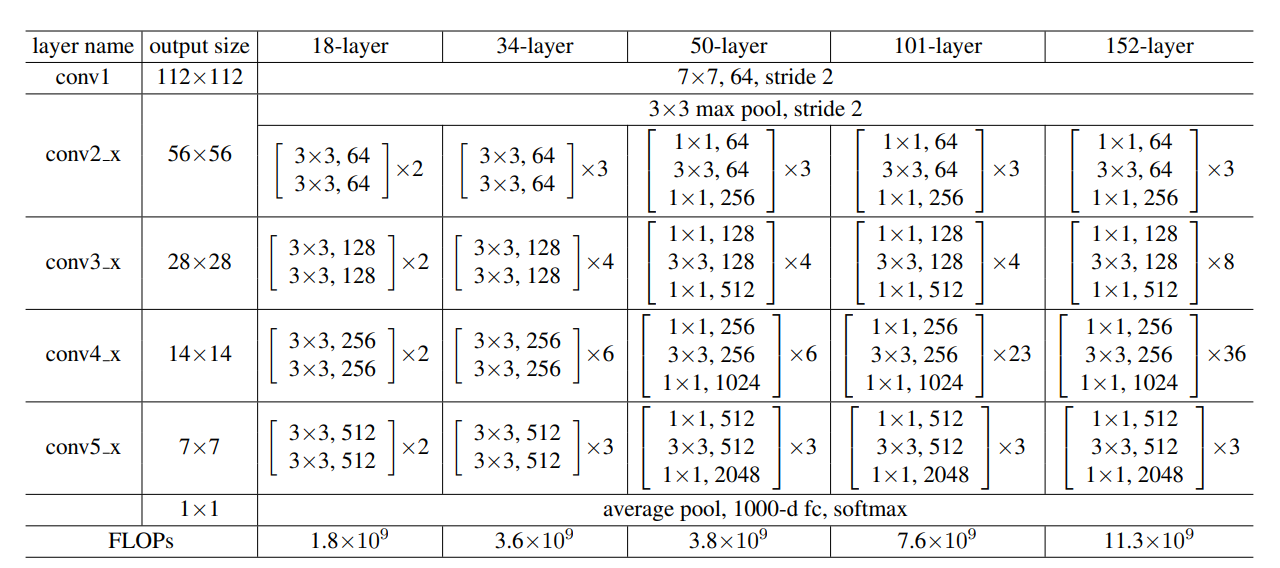
不同深度的网络结构如下

注意每层的第一个block的stride是可以是2或1,剩下的block是1
代码参见:https://github.com/weiaicunzai/pytorch-cifar100/tree/master/models
值得注意的是残差连接需要考虑通道数不同与由于stride导致的大小不同的情况

1
2
3
4
5
6
7
8
9
10
11
12
13
14
15
16
17
18
19
20
21
22
23
24
25
26
27
28
29
30
31
32
33
34
35
36
37
38
39
40
41
42
43
44
45
46
47
48
49
50
51
52
53
54
55
56
57
58
59
60
61
62
63
64
65
66
67
68
69
70
71
72
73
74
75
76
77
78
79
80
81
82
83
84
85
86
87
88
89
90
91
92
93
94
95
96
97
98
99
100
101
102
103
104
105
106
107
108
109
110
111
112
113
114
115
116
117
118
119
120
121
122
123
124
125
126
127
128
129
130
131
132
133
134
135
136
137
138
139
140
141
142
143
144
145
146
147
148
149
150
151
152
153
154
155
156
157
158
159
160
161
162
163
"""resnet in pytorch


[1] Kaiming He, Xiangyu Zhang, Shaoqing Ren, Jian Sun.

Deep Residual Learning for Image Recognition
https://arxiv.org/abs/1512.03385v1
"""

import torch
import torch.nn as nn

class BasicBlock(nn.Module):
"""Basic Block for resnet 18 and resnet 34

"""

#BasicBlock and BottleNeck block
#have different output size
#we use class attribute expansion
#to distinct
expansion = 1

def __init__(self, in_channels, out_channels, stride=1):
super().__init__()

#residual function
self.residual_function = nn.Sequential(
nn.Conv2d(in_channels, out_channels, kernel_size=3, stride=stride, padding=1, bias=False),
nn.BatchNorm2d(out_channels),
nn.ReLU(inplace=True),
nn.Conv2d(out_channels, out_channels * BasicBlock.expansion, kernel_size=3, padding=1, bias=False),
nn.BatchNorm2d(out_channels * BasicBlock.expansion)
)

#shortcut
self.shortcut = nn.Sequential()

#the shortcut output dimension is not the same with residual function
#use 1*1 convolution to match the dimension
if stride != 1 or in_channels != BasicBlock.expansion * out_channels:
self.shortcut = nn.Sequential(
nn.Conv2d(in_channels, out_channels * BasicBlock.expansion, kernel_size=1, stride=stride, bias=False),
nn.BatchNorm2d(out_channels * BasicBlock.expansion)
)

def forward(self, x):
return nn.ReLU(inplace=True)(self.residual_function(x) + self.shortcut(x))

class BottleNeck(nn.Module):
"""Residual block for resnet over 50 layers

"""
expansion = 4
def __init__(self, in_channels, out_channels, stride=1):
super().__init__()
self.residual_function = nn.Sequential(
nn.Conv2d(in_channels, out_channels, kernel_size=1, bias=False),
nn.BatchNorm2d(out_channels),
nn.ReLU(inplace=True),
nn.Conv2d(out_channels, out_channels, stride=stride, kernel_size=3, padding=1, bias=False),
nn.BatchNorm2d(out_channels),
nn.ReLU(inplace=True),
nn.Conv2d(out_channels, out_channels * BottleNeck.expansion, kernel_size=1, bias=False),
nn.BatchNorm2d(out_channels * BottleNeck.expansion),
)

self.shortcut = nn.Sequential()

if stride != 1 or in_channels != out_channels * BottleNeck.expansion:
self.shortcut = nn.Sequential(
nn.Conv2d(in_channels, out_channels * BottleNeck.expansion, stride=stride, kernel_size=1, bias=False),
nn.BatchNorm2d(out_channels * BottleNeck.expansion)
)

def forward(self, x):
return nn.ReLU(inplace=True)(self.residual_function(x) + self.shortcut(x))

class ResNet(nn.Module):

def __init__(self, block, num_block, num_classes=100):
super().__init__()

self.in_channels = 64

self.conv1 = nn.Sequential(
nn.Conv2d(3, 64, kernel_size=3, padding=1, bias=False),
nn.BatchNorm2d(64),
nn.ReLU(inplace=True))
#we use a different inputsize than the original paper
#so conv2_x's stride is 1
self.conv2_x = self._make_layer(block, 64, num_block[0], 1)
self.conv3_x = self._make_layer(block, 128, num_block[1], 2)
self.conv4_x = self._make_layer(block, 256, num_block[2], 2)
self.conv5_x = self._make_layer(block, 512, num_block[3], 2)
self.avg_pool = nn.AdaptiveAvgPool2d((1, 1))
self.fc = nn.Linear(512 * block.expansion, num_classes)

def _make_layer(self, block, out_channels, num_blocks, stride):
"""make resnet layers(by layer i didnt mean this 'layer' was the
same as a neuron netowork layer, ex. conv layer), one layer may
contain more than one residual block

Args:
block: block type, basic block or bottle neck block
out_channels: output depth channel number of this layer
num_blocks: how many blocks per layer
stride: the stride of the first block of this layer

Return:
return a resnet layer
"""

# we have num_block blocks per layer, the first block
# could be 1 or 2, other blocks would always be 1
strides = [stride] + [1] * (num_blocks - 1)
layers = []
for stride in strides:
layers.append(block(self.in_channels, out_channels, stride))
self.in_channels = out_channels * block.expansion

return nn.Sequential(*layers)

def forward(self, x):
output = self.conv1(x)
output = self.conv2_x(output)
output = self.conv3_x(output)
output = self.conv4_x(output)
output = self.conv5_x(output)
output = self.avg_pool(output)
output = output.view(output.size(0), -1)
output = self.fc(output)

return output

def resnet18():
""" return a ResNet 18 object
"""
return ResNet(BasicBlock, [2, 2, 2, 2])

def resnet34():
""" return a ResNet 34 object
"""
return ResNet(BasicBlock, [3, 4, 6, 3])

def resnet50():
""" return a ResNet 50 object
"""
return ResNet(BottleNeck, [3, 4, 6, 3])

def resnet101():
""" return a ResNet 101 object
"""
return ResNet(BottleNeck, [3, 4, 23, 3])

def resnet152():
""" return a ResNet 152 object
"""
return ResNet(BottleNeck, [3, 8, 36, 3])


Aggregated Residual Transformations for Deep Neural Networks

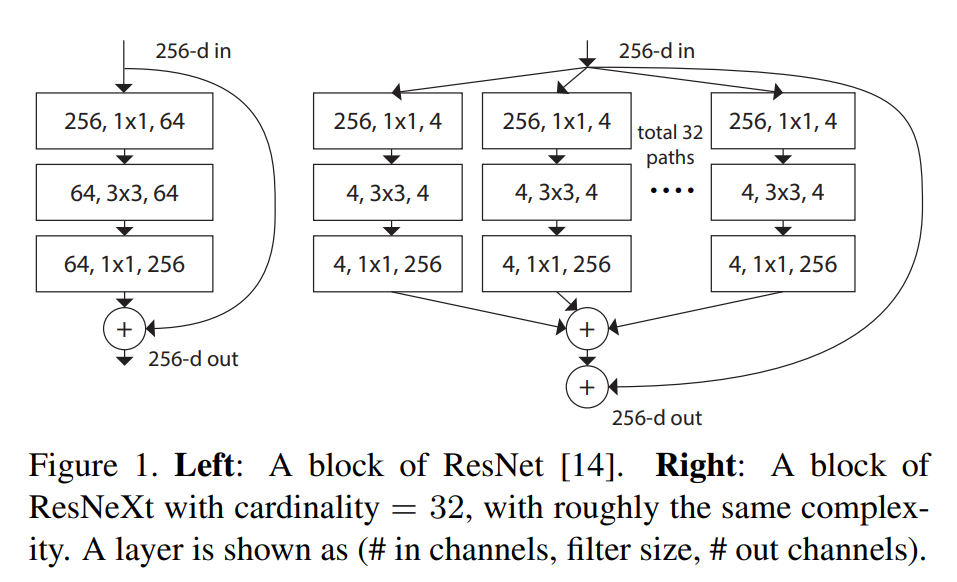
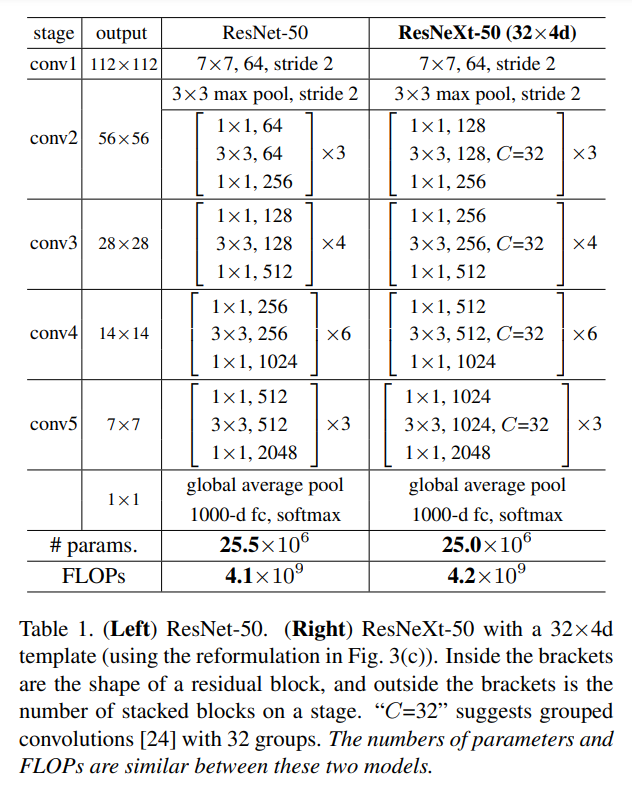
基于ResNet,另一个被广泛使用的backbone是ResNeXt,其原理图如下

ResNext基本是在ResNet的基础上在通道上进行划分,在代码上通过的group参数可以快速实现,其网络结构与ResNet同步

1
2
3
4
5
6
7
8
9
10
11
12
13
14
15
16
17
18
19
20
21
22
23
24
25
26
27
28
29
30
31
32
33
34
35
36
37
38
39
40
41
42
43
44
45
46
47
48
49
50
51
52
53
54
55
56
57
58
59
60
61
62
63
64
65
66
67
68
69
70
71
72
73
74
75
76
77
78
79
80
81
82
83
84
85
86
87
88
89
90
91
92
93
94
95
96
97
98
99
100
101
102
103
104
105
106
107
108
109
110
111
112
113
114
115
116
117
118
119
120
121
122
123
124
125
126
127
128
129
130
"""resnext in pytorch


[1] Saining Xie, Ross Girshick, Piotr Dollár, Zhuowen Tu, Kaiming He.

Aggregated Residual Transformations for Deep Neural Networks
https://arxiv.org/abs/1611.05431
"""

import math
import torch
import torch.nn as nn
import torch.nn.functional as F

#only implements ResNext bottleneck c


#"""This strategy exposes a new dimension, which we call “cardinality”
#(the size of the set of transformations), as an essential factor
#in addition to the dimensions of depth and width."""
CARDINALITY = 32
DEPTH = 4
BASEWIDTH = 64

#"""The grouped convolutional layer in Fig. 3(c) performs 32 groups
#of convolutions whose input and output channels are 4-dimensional.
#The grouped convolutional layer concatenates them as the outputs
#of the layer."""

class ResNextBottleNeckC(nn.Module):

def __init__(self, in_channels, out_channels, stride):
super().__init__()

C = CARDINALITY #How many groups a feature map was splitted into

#"""We note that the input/output width of the template is fixed as
#256-d (Fig. 3), We note that the input/output width of the template
#is fixed as 256-d (Fig. 3), and all widths are dou- bled each time
#when the feature map is subsampled (see Table 1)."""
D = int(DEPTH * out_channels / BASEWIDTH) #number of channels per group
self.split_transforms = nn.Sequential(
nn.Conv2d(in_channels, C * D, kernel_size=1, groups=C, bias=False),
nn.BatchNorm2d(C * D),
nn.ReLU(inplace=True),
nn.Conv2d(C * D, C * D, kernel_size=3, stride=stride, groups=C, padding=1, bias=False),
nn.BatchNorm2d(C * D),
nn.ReLU(inplace=True),
nn.Conv2d(C * D, out_channels * 4, kernel_size=1, bias=False),
nn.BatchNorm2d(out_channels * 4),
)

self.shortcut = nn.Sequential()

if stride != 1 or in_channels != out_channels * 4:
self.shortcut = nn.Sequential(
nn.Conv2d(in_channels, out_channels * 4, stride=stride, kernel_size=1, bias=False),
nn.BatchNorm2d(out_channels * 4)
)

def forward(self, x):
return F.relu(self.split_transforms(x) + self.shortcut(x))

class ResNext(nn.Module):

def __init__(self, block, num_blocks, class_names=100):
super().__init__()
self.in_channels = 64

self.conv1 = nn.Sequential(
nn.Conv2d(3, 64, 3, stride=1, padding=1, bias=False),
nn.BatchNorm2d(64),
nn.ReLU(inplace=True)
)

self.conv2 = self._make_layer(block, num_blocks[0], 64, 1)
self.conv3 = self._make_layer(block, num_blocks[1], 128, 2)
self.conv4 = self._make_layer(block, num_blocks[2], 256, 2)
self.conv5 = self._make_layer(block, num_blocks[3], 512, 2)
self.avg = nn.AdaptiveAvgPool2d((1, 1))
self.fc = nn.Linear(512 * 4, 100)

def forward(self, x):
x = self.conv1(x)
x = self.conv2(x)
x = self.conv3(x)
x = self.conv4(x)
x = self.conv5(x)
x = self.avg(x)
x = x.view(x.size(0), -1)
x = self.fc(x)
return x

def _make_layer(self, block, num_block, out_channels, stride):
"""Building resnext block
Args:
block: block type(default resnext bottleneck c)
num_block: number of blocks per layer
out_channels: output channels per block
stride: block stride

Returns:
a resnext layer
"""
strides = [stride] + [1] * (num_block - 1)
layers = []
for stride in strides:
layers.append(block(self.in_channels, out_channels, stride))
self.in_channels = out_channels * 4

return nn.Sequential(*layers)

def resnext50():
""" return a resnext50(c32x4d) network
"""
return ResNext(ResNextBottleNeckC, [3, 4, 6, 3])

def resnext101():
""" return a resnext101(c32x4d) network
"""
return ResNext(ResNextBottleNeckC, [3, 4, 23, 3])

def resnext152():
""" return a resnext101(c32x4d) network
"""
return ResNext(ResNextBottleNeckC, [3, 4, 36, 3])


downloader

一个简易的爬虫项目,用于下载网上的一些pdf资料。涉及到异步库,redis等知识。

asyncio

对asyncio只有一个基本认识,一个异步框架。主要包括Eventloop, Coroutine(协程), Future, Task四个基础概念。既然要做到异步,肯定涉及到事件循环调用,而Eventloop就相当与控制中心,负责循环调用注册在其中的协程。而coroutine(协程)是一种特殊的函数,特殊在于其可以交出调用权。Future是对Coroutine的再封装,而Task提供了一套接口方便开发者创建Future。协程可以通过yield实现交出调用权。
参考:
https://zhuanlan.zhihu.com/p/72887901
https://zhuanlan.zhihu.com/p/73568282
https://zhuanlan.zhihu.com/p/75193842

redis

redis是一个内存型数据库,为了业务需求提供了一些特定的数据结构,在一些业务场景使用广泛,这里主要是用redis的列表结构保存即将要访问的链接。在python中使用redis如下:

1
2
3
4
5
r = redis.StrictRedis(host='127.0.0.1', port=6379, db=2, decode_responses=True)
# 创建一名为url_list的列表,并添加item
r.lpush('url_list', item)
# pop 一项 item
r.rpop('url_list')

另外本文使用redis实现 bloom filter,参见:https://github.com/HatBoy/BloomFilter
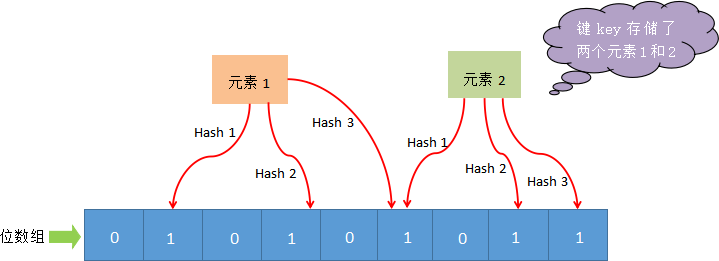
关于 bloom filter的原理,一张图就足够清晰了

由bloom filter的原理可知,错误率由数组的长度和 hash 函数数量决定,但在设定的时候这些东西很间接,没什么概率,但我们大概需要存多少数据,要控制在什么样的错误率下这些是直接的,于是根据这些直接的值计算出数组长度和hash函数个数。

1
2
3
4
5
6
7
8
9
10
11
12
13
14
15
16
17
18
19
20
21
22
23
24
25
26
27
28
29
30
31
32
33
34
35
36
37
38
39
40
41
42
43
44
45
46
47
48
49
50
51
52
53
54
55
56
57
58
59
60
61
62
63
64
65
66
67
68
69
70
71
72
73
74
75
76
77
78
#coding=UTF-8

import mmh3
import BitVector
import redis
import math
import time


class BloomFilter():
#内置100个随机种子
SEEDS = [543, 460, 171, 876, 796, 607, 650, 81, 837, 545, 591, 946, 846, 521, 913, 636, 878, 735, 414, 372,
344, 324, 223, 180, 327, 891, 798, 933, 493, 293, 836, 10, 6, 544, 924, 849, 438, 41, 862, 648, 338,
465, 562, 693, 979, 52, 763, 103, 387, 374, 349, 94, 384, 680, 574, 480, 307, 580, 71, 535, 300, 53,
481, 519, 644, 219, 686, 236, 424, 326, 244, 212, 909, 202, 951, 56, 812, 901, 926, 250, 507, 739, 371,
63, 584, 154, 7, 284, 617, 332, 472, 140, 605, 262, 355, 526, 647, 923, 199, 518]

#capacity是预先估计要去重的数量
#error_rate表示错误率
#conn表示redis的连接客户端
#key表示在redis中的键的名字前缀
def __init__(self, capacity=1000000000, error_rate=0.00000001, conn=None, key='BloomFilter'):
self.m = math.ceil(capacity*math.log2(math.e)*math.log2(1/error_rate)) #需要的总bit位数
self.k = math.ceil(math.log1p(2)*self.m/capacity) #需要最少的hash次数
self.mem = math.ceil(self.m/8/1024/1024) #需要的多少M内存
self.blocknum = math.ceil(self.mem/512) #需要多少个512M的内存块,value的第一个字符必须是ascii码,所有最多有256个内存块
self.seeds = self.SEEDS[0:self.k]
self.key = key
self.N = 2**31-1
self.redis = conn
if not self.redis:
#默认如果没有redis连接,在内存中使用512M的内存块去重
self.bitset = BitVector.BitVector(size=1<<32)
print(self.mem)
print(self.k)

def add(self, value):
name = self.key + "_" + str(ord(value[0])%self.blocknum)
hashs = self.get_hashs(value)
for hash in hashs:
if self.redis:
self.redis.setbit(name, hash, 1)
else:
self.bitset[hash] = 1

def is_exist(self, value):
name = self.key + "_" + str(ord(value[0])%self.blocknum)
hashs = self.get_hashs(value)
exist = True
for hash in hashs:
if self.redis:
exist = exist & self.redis.getbit(name, hash)
else:
exist = exist & self.bitset[hash]
return exist

def get_hashs(self, value):
hashs = list()
for seed in self.seeds:
hash = mmh3.hash(value, seed)
if hash >= 0:
hashs.append(hash)
else:
hashs.append(self.N - hash)
return hashs


pool = redis.ConnectionPool(host='127.0.0.1', port=6379, db=0)
conn = redis.StrictRedis(connection_pool=pool)

start = time.time()
bf = BloomFilter(conn=conn)
bf.add('test')
bf.add('fsest1')
print(bf.is_exist('qest'))
print(bf.is_exist('testdsad'))
end = time.time()
print(end-start)

downloader

以下创建一个简易爬虫,给定初始网址后该爬虫自动提取网页中的其他网址,并不断往下访问。如果链接是以pdf结尾则进行下载(如果要下载图片或其他资源原理相同)。这个版本代码没有考虑网页中的相对路径地址,以后有时间再写第二个版本吧。

1
2
3
4
5
6
7
8
9
10
11
12
13
14
15
16
17
18
19
20
21
22
23
24
25
26
27
28
29
30
31
32
33
34
35
36
37
38
39
40
41
42
43
44
45
46
47
48
49
50
51
52
53
54
55
56
57
58
59
60
61
62
63
64
65
66
67
68
69
70
71
72
73
74
75
76
77
78
79
80
81
82
83
84
85
86
87
88
89
90
91
92
93
94
95
96
97
98
99
100
101
102
103
104
105
106
107
108
109
110
111
112
113
114
115
116
117
118
119
120
121
122
123
124
125
126
127
128
129
130
131
132
133
134
135
136
137
138
139
140
141
142
143
144
145
146
147
148
149
150
151
152
153
154
155
156
157
158
159
160
161
162
163
164
165
166
167
168
169
170
171
172
173
174
175
176
177
import random

import aiohttp
import asyncio
from bs4 import BeautifulSoup as bs
import re
from urllib import parse
import os
import time
import requests
import redis
from hashlib import md5
import mmh3
from bitarray import bitarray

import BitVector
import redis
import math
import time

proxies = {'http': 'http://127.0.0.1:7890', 'https': 'http://127.0.0.1:7890'}


class BloomFilter():
#内置100个随机种子
SEEDS = [543, 460, 171, 876, 796, 607, 650, 81, 837, 545, 591, 946, 846, 521, 913, 636, 878, 735, 414, 372,
344, 324, 223, 180, 327, 891, 798, 933, 493, 293, 836, 10, 6, 544, 924, 849, 438, 41, 862, 648, 338,
465, 562, 693, 979, 52, 763, 103, 387, 374, 349, 94, 384, 680, 574, 480, 307, 580, 71, 535, 300, 53,
481, 519, 644, 219, 686, 236, 424, 326, 244, 212, 909, 202, 951, 56, 812, 901, 926, 250, 507, 739, 371,
63, 584, 154, 7, 284, 617, 332, 472, 140, 605, 262, 355, 526, 647, 923, 199, 518]

#capacity是预先估计要去重的数量
#error_rate表示错误率
#conn表示redis的连接客户端
#key表示在redis中的键的名字前缀
def __init__(self, capacity=1000000000, error_rate=0.00000001, conn=None, key='BloomFilter'):
self.m = math.ceil(capacity*math.log2(math.e)*math.log2(1/error_rate)) #需要的总bit位数
self.k = math.ceil(math.log1p(2)*self.m/capacity) #需要最少的hash次数
self.mem = math.ceil(self.m/8/1024/1024) #需要的多少M内存
self.blocknum = math.ceil(self.mem/512) #需要多少个512M的内存块,value的第一个字符必须是ascii码,所有最多有256个内存块
self.seeds = self.SEEDS[0:self.k]
self.key = key
self.N = 2**31-1
self.redis = conn
if not self.redis:
#默认如果没有redis连接,在内存中使用512M的内存块去重
self.bitset = BitVector.BitVector(size=1<<32)

def add(self, value):
name = self.key + "_" + str(ord(value[0])%self.blocknum)
hashs = self.get_hashs(value)
for hash in hashs:
if self.redis:
self.redis.setbit(name, hash, 1)
else:
self.bitset[hash] = 1

def is_exist(self, value):
name = self.key + "_" + str(ord(value[0])%self.blocknum)
hashs = self.get_hashs(value)
exist = True
for hash in hashs:
if self.redis:
exist = exist & self.redis.getbit(name, hash)
else:
exist = exist & self.bitset[hash]
return exist

def get_hashs(self, value):
hashs = list()
for seed in self.seeds:
hash = mmh3.hash(value, seed)
if hash >= 0:
hashs.append(hash)
else:
hashs.append(self.N - hash)
return hashs


class Downloader():
def __init__(self, start_url_list):
self.headers = {'User-Agent': 'Mozilla/5.0 (Windows NT 10.0; WOW64) AppleWebKit/537.36 (KHTML, like Gecko) Chrome/61.0.3163.100 Safari/537.36'}
self.r = redis.StrictRedis(host='127.0.0.1', port=6379, db=2, decode_responses=True)
self.bf = BloomFilter(conn=self.r)
for item in start_url_list:
self.r.lpush('url_list', item)

# 根据url请求网址并返回html
async def get_html(self, url, header=None):
sem = asyncio.Semaphore(100) # 并发数量限制
try:
async with sem:
async with aiohttp.ClientSession(headers=header, cookies='') as session:
async with session.get(url, proxy='http://127.0.0.1:7890') as resp:
if resp.status in [200, 201]:
data = await resp.text()
return data
else:
return None
except:
return None

# 获取网页中的pdf链接
def getPDF(self, content, base_url):
pdf = r"href.*\.pdf\""
pdflist = re.findall(pdf, content)
fianl_url_list = []
# 进行相对路径--> 绝对路径转换
for item in pdflist:
item_url = item[6:-1]
new_full_url = parse.urljoin(base_url, item_url)
fianl_url_list.append(new_full_url)
return fianl_url_list

# 根据pdf链接下载
def downloadPDF(self, item):
filename = os.path.basename(parse.unquote(item))
cop = re.compile("[^\u4e00-\u9fa5^a-z^A-Z^0-9^\.]") # 匹配不是中文、大小写、数字的其他字符
filename = cop.sub('', filename) # 将string1中匹配到的字符替换成空字符
salt = ''.join(["{}".format(random.randint(0, 9)) for num in range(0, 5)])
filename = salt + filename
try:
responsepdf = requests.get(item, proxies=proxies)
if responsepdf.status_code == 200:
with open(r"E:/pdf/%s" % filename, "wb") as code:
code.write(responsepdf.content)
time.sleep(1) # 防止访问速度过快,可以灵活的调整时间
except:
return

# 获取网页中的链接
def getAllhref(self, html, base_url):
# 使用BeautifulSoup函数解析传入的html
soup = bs(html, features="lxml")
allnode_of_a = soup.find_all("a")
result = [_.get("href").strip() for _ in allnode_of_a if _ is not None and _.get("href") is not None]
# 有些是相对路径,需要转换为绝对路径
filterResult = []
for item in result:
if len(item) > 0:
if item.startswith("http"):
filterResult.append(item)
else:
new_full_url = parse.urljoin(base_url, item)
filterResult.append(new_full_url)
return filterResult

# 传入一个 redis list,开始从里面取出一个url并请求数据
async def start_spider(self):
while True:
cur_url = self.r.rpop('url_list')
if cur_url is None:
break
if self.bf.is_exist(cur_url):
continue
response = await self.get_html(url=cur_url, header=self.headers)
# 将访问过的url加入到bloom filter
self.bf.add(cur_url)
if response is not None:
pdflist = self.getPDF(response, cur_url)
for item in pdflist:
self.downloadPDF(item)
nextList = self.getAllhref(response, cur_url)
for url in nextList:
self.r.lpush('url_list', url)


async def main():
start_url_list = ["https://github.com/Kensuke-Hinata/statistic/tree/master/os/books"]
downloader = Downloader(start_url_list)
await downloader.start_spider()


if __name__ == '__main__':
loop = asyncio.get_event_loop()
loop.run_until_complete(main())

python计算机视觉

python计算机视觉涉及到图形图像,线性代数,概率论,python语言等知识。

形态学图像处理

形态学图像处理有两个关键概念:结构元与形态学操作,基础的形态学操作有腐蚀,膨胀,衍生的形态学操作有开运算,闭运算,顶帽运算,底帽运算,形态学梯度(获取轮廓),常见的应用有边界提取,孔洞填充,计算连通分量,计算凸包,骨架,水平垂直线提取,灰度图的阴影矫正,灰度图图像平滑,纹理分割等。有关形态学的教材一般从集合的形式阐述各种形态学操作,个人认为直接上手操作更直观,参考博客:https://blog.csdn.net/youcans/category_11459626.html
结构元的构建可以使用以下两种方式,两者等价

1
2
3
4
5
kSize = (3, 3)  # 卷积核的尺寸
kernel = np.ones(kSize, dtype=np.uint8) # 生成盒式卷积核

# 等价于
element = cv2.getStructuringElement(cv2.MORPH_RECT, (3, 3))

基本的形态学操作记录如下,方便以后查阅

1
2
3
4
5
6
7
8
9
10
11
12
13
14
15
16
17
18
19
20
21
# 腐蚀
imgErode = cv2.erode(imgBin, kernel=kernel) # 图像腐蚀
# 膨胀
imgDilate = cv2.dilate(imgBin, kernel=kernel) # 图像膨胀
# 开运算
imgOpen = cv2.morphologyEx(imgGray, cv2.MORPH_OPEN, kernel)
# 闭运算
imgClose = cv2.morphologyEx(imgBin, cv2.MORPH_CLOSE, kernel)
# 顶帽运算
imgThat = cv2.morphologyEx(imgBin, cv2.MORPH_TOPHAT, kernel) # 顶帽运算
# 底帽运算
imgBhat = cv2.morphologyEx(imgBin, cv2.MORPH_BLACKHAT, kernel) # 底帽运算
# 形态学梯度
imgGrad = cv2.morphologyEx(imgBin, cv2.MORPH_GRADIENT, kernel) # 形态学梯度
# 击中与不击中操作在实现上相对复杂一些,涉及到两个结构元
kernB1 = np.array([[0, 0, 0],[0, -1, 1],[0, 0, 0]], dtype=np.int32) # B1
kernB2 = np.array([[0, 0, 0],[1, -1, 0],[0, 0, 0]], dtype=np.int32) # B2
imgH1 = cv2.morphologyEx(img, cv2.MORPH_HITMISS, kernB1)
imgH2 = cv2.morphologyEx(img, cv2.MORPH_HITMISS, kernB2)
imgHMT = cv2.add(imgH1, imgH2) # 击中击不中

video_captioning_baseline

本文讲解video captioning中一个简单但效果不错的baseline,GitHub仓库为:https://github.com/ramakanth-pasunuru/video_captioning_rl
该baseline基于pytorch框架,主要包括数据预处理,数据加载,网络搭建,模型优化几个模块,虽然代码用的是LSTM网络,但换成现在主流的Transformer网络整体pipeline是相同的

数据预处理

该阶段包括视频特征的提取及词库的创建,其中视频特征一般提取两种特征,每帧的appearance feature及motion feature,当然也可以提取每帧的object feature,该baseline使用预训练的ResNet-152提取appearance feature,ResNeXt-101提取motion feature,如果有需要,你可以自己使用检测网络提取object feature,特征下载参见GitHub仓库。而对于文本的处理为统计预料库中单词出现的次数并进行筛选,比如过滤掉频次小于2的单词,添加 start, end, token 标签分别代表句子的开头,结尾及未知词。
特别需要形成的一个意识是一个单词对应一个数字, 比如 单词 love 对应 数字5,词库是100,则单词编码是0-99,最后生成的是一个100维矢量,希望经过softmax后第6维(因为从0开始计数)的数值最大。具体查看one-hot相关知识。
以下为构建单词与数字对应关系的代码结构。

1
2
3
4
5
6
7
8
9
10
11
12
13
14
15
16
17
18
19
20
21
22
23
24
25
26
27
28
29
30
31
32
class Vocab(object):
def __init__(self,vocab_file,max_size):
"""Creates a vocab of up to max_size words, reading from the vocab_file. If max_size is 0, reads the entire vocab file.
Args:
vocab_file: path to the vocab file, which is assumed to contain "<word> <frequency>" on each line, sorted with most frequent word first.
This code doesn't actually use the frequencies, though.
max_size: integer. The maximum size of the resulting Vocabulary.

"""
self._word_to_id = {}
self._id_to_word = {}
self._count = 0 # keeps track of total number of words in the Vocab

# [PAD], [START], [STOP] and [UNK] get the ids 0,1,2,3.
for w in [PAD_TOKEN, START_DECODING, STOP_DECODING, UNKNOWN_TOKEN]:
self._word_to_id[w] = self._count
self._id_to_word[self._count] = w
self._count += 1
# 读取词库,构建单词与数字对应关系

def word2id(self, word):
"""Returns the id (integer) of a word (string). Returns [UNK] id if word is OOV."""
if word not in self._word_to_id:
return self._word_to_id[UNKNOWN_TOKEN]
return self._word_to_id[word]

def id2word(self, word_id):
"""Returns the word (string) corresponding to an id (integer)."""
if word_id not in self._id_to_word:
raise ValueError('Id not found in vocab: %d' % word_id)
return self._id_to_word[word_id]

数据加载

考虑一个业务场景,怎样把硬盘中的超大文件加载到内存? 这时就需要一个函数能够读取文件的一部分到内存,同时记录读取到哪个地方了,而生成器恰好实现了这样的功能。

1
2
3
4
5
6
7
8
def file_reader(fp, block_size=1024 * 8):
"""生成器函数:分块读取文件内容
"""
while True:
chunk = fp.read(block_size)
if not chunk:
break
yield chunk

而在网络结构的训练中,数据是以批 batch 的形式喂到网络结构中的,因此在数据加载部分涉及到迭代器及生成器相关知识。
常用的数据加载相关代码如下

1
2
3
4
5
6
7
8
9
10
11
12
13
14
15
16
17
18
19
20
21
22
23
24
25
26
# 先定义自己的 MyDataset类,继承自 Dataset
# 在自己的Dataset类中一般需要实现 初始化函数 __init__, 获取元素 __getitem__ 及返回整个数据长度 __len__
class MyDataset(Dataset):
def __init__(self, path):
pass
def __getitem__(self, item):
pass
def __len__(self):
pass

# 将实例化的Dataset对象输入到Dataloader中便可以以生成器的方式迭代获取数据
dataset = MyDataset()
dataloader = Dataloader(dataset, ...)

# 迭代获取 batch 数据 训练网络
for data in dataloader:
# training...

# 等价与
iterr = iter(dataloader)
while True:
try:
next(iterr)
# training...
except StopIteration:
break

Dataloader的源码相对复杂,我觉得也没有研究的必要,了解其过程就行,这里关于怎样从Dataloader加载数据的步骤引自 https://zhuanlan.zhihu.com/p/30934236

  1. 调用了dataloader 的__iter__() 方法, 产生了一个DataLoaderIter
  2. 反复调用DataLoaderIter 的__next__()来得到batch, 具体操作就是, 多次调用dataset的__getitem__()方法 (如果num_worker>0就多线程调用), 然后用collate_fn来把它们打包成batch. 中间还会涉及到shuffle , 以及sample 的方法等, 这里就不多说了.
  3. 当数据读完后, next()抛出一个StopIteration异常, for循环结束, dataloader 失效.

dataloader也可以自己写,比如 MSRVTTBatcher 的 get_batcher 通过关键字yield构建了生成器,就可以next的方式迭代获取数据

1
2
3
4
5
6
7
8
9
10
11
12
13
14
15
16
17
18
19
20
21
22
23
24
25
26
27
class MSRVTTBatcher(object):

def __init__(self,hps,mode,vocab):
# 初始化一些词库路径,视觉特征路径等信息

def _process_data(self):
"""this module extracts data from videos and caption files and creates batches"""
# load json data which contains all the information
# 用于构建 video 与 caption 的关联字典
if self._mode == 'train':
np.random.shuffle(data)
else:
data,_ = zip(*data) # consider only video ids for evaluation
data = sorted(set(data),key=data.index)

return data,data_dict

def sort_based_on_caption_lengths(self, video_batch, video_len_batch, video_id, caption_batch, caption_len_batch, original_caption:
# 根据captioning的长度排序,主要是为了 后续 nn.utils.rnn.pack_padded_sequence 的需要

def get_batcher(self):
"""
This module process data and creates batches for train/val/test
Also acts as generator
"""
# 构建生成器,以 批 迭代的方式获取数据
yield batch

网络搭建

神经网络说到底还是矩阵运算,论文中的每个公式与相应的代码一一对应。一般的网络结构定义及调用如下,值得注意的地方是调用网络的时候似乎没有显性调用forward函数,这是因为在执行model(data)的时候,实际执行的是model.call(data), 而其继承自nn.Module,所以会调用父类的魔术函数__call__, 在该函数中会调用forward函数及很多其他钩子函数。

1
2
3
4
5
6
7
8
9
10
11
12
13
14
15
16
17
# 网络结构的定义,继承自 nn.Module
class Model(nn.Module):
# 初始化网络模块
def __init__(self):
super(Model, self).__init__()
self.conv1 = nn.Conv2d(1, 20, 5)
self.conv2 = nn.Conv2d(20, 20, 5)
# 搭建网络结构
def forward(self, x):
x = F.relu(self.conv1(x))
return F.relu(self.conv2(x))

# 实例化网络
model = Model()
# 前向传播
# 实际执行的是model.__call__(data)
model(data)

而对于captioning任务,理论部分提到过一般分为encoder和decoder,所以在代码上也是对应的,一般会使用一个类来总管encoder和decoder。

1
2
3
4
5
6
7
8
9
10
11
12
13
14
15
16
17
18
19
class Seq2seqAttention(nn.Module):
def __init__(self, args):
super(Seq2seqAttention, self).__init__()
self.args = args
self.enable_cuda = args.cuda
self.vid_dim = args.vid_dim
self.embed_size = args.embed
self.hidden_dim = args.hid
self.vocab_size = args.max_vocab_size
self.num_layers = args.num_layers
self.birnn = args.birnn
self.encoder = EncoderFrames(self.args)
self.decoder = DecoderRNN(self.args)

def forward(self, frames, flengths, captions, lengths):
video_features = self.encoder(frames, flengths)
outputs = self.decoder(video_features, flengths, captions, lengths)

return outputs

值得特别注意的是该代码在encoder部分使用了pack_padded_sequence,算是一个减小padding噪音的trick

1
2
3
4
5
6
7
8
9
10
11
12
13
14
15
16
17
18
19
20
21
22
23
24
25
26
27
28
29
30
31
32
33
34
35
36
37
38
39
40
41
42
43
44
45
46
47
48
49
50
51
52
53
54
55
56
57
58
59
60
61
62
63
64
65
66
67
68
69
70
71
72
73
74
75
76
77
# Based on tutorials/08 - Language Model
# RNN Based Language Model
class EncoderFrames(nn.Module):
def __init__(self, args):
super(EncoderFrames, self).__init__()
# self.use_abs = use_abs
self.vid_dim = args.vid_dim
self.embed_size = args.embed
self.hidden_dim = args.hid
self.enable_cuda = args.cuda
self.num_layers = args.num_layers
self.args = args
if args.birnn:
self.birnn = 2
else:
self.birnn = 1
# projection layer
self.linear = nn.Linear(self.vid_dim, self.embed_size, bias=False)
# video embedding
self.rnn = nn.LSTM(self.embed_size, self.hidden_dim, self.num_layers, batch_first=True, bidirectional=self.args.birnn, dropout=args.dropout)
self.dropout = nn.Dropout(args.dropout)
self.init_weights()

def init_weights(self):
self.rnn.weight_hh_l0.data.uniform_(-0.08, 0.08)
self.rnn.weight_ih_l0.data.uniform_(-0.08, 0.08)
self.rnn.bias_ih_l0.data.fill_(0)
self.rnn.bias_hh_l0.data.fill_(0)
self.linear.weight.data.uniform_(-0.08, 0.08)
#self.linear.bias.data.fill_(0)

def init_hidden(self, batch_size):
if self.birnn:
return (Variable(torch.zeros(self.birnn*self.num_layers, batch_size, self.hidden_dim)),
Variable(torch.zeros(self.birnn*self.num_layers, batch_size, self.hidden_dim)))


def forward(self, frames, flengths):
"""Handles variable size frames
frame_embed: video features
flengths: frame lengths
"""
batch_size = flengths.shape[0]
#frames = self.linear(frames)
#frames = self.dropout(frames) # adding dropout layer
self.init_rnn = self.init_hidden(batch_size)
if self.enable_cuda:
self.init_rnn = self.init_rnn[0].cuda(), self.init_rnn[1].cuda()

if batch_size > 1:
# Sort by length (keep idx)
flengths, idx_sort = np.sort(flengths)[::-1], np.argsort(-flengths)
if self.enable_cuda:
frames = frames.index_select(0, Variable(torch.cuda.LongTensor(idx_sort)))
else:
frames = frames.index_select(0, Variable(torch.LongTensor(idx_sort)))


frames = self.linear(frames)
# 值得特别注意,一个小trick
frame_packed = nn.utils.rnn.pack_padded_sequence(frames, flengths, batch_first=True)
outputs, (ht, ct) = self.rnn(frame_packed, self.init_rnn)
outputs,_ = pad_packed_sequence(outputs,batch_first=True)

if batch_size > 1:
# Un-sort by length
idx_unsort = np.argsort(idx_sort)
if self.enable_cuda:
outputs = outputs.index_select(0, Variable(torch.cuda.LongTensor(idx_unsort)))
else:
outputs = outputs.index_select(0, Variable(torch.LongTensor(idx_unsort)))

# print 'Encoder Outputs:',outputs.size()

return outputs

特别提醒一下该词库有关beam search及强化学习的代码也是非常清晰,对于原理学习及后续改进都十分有利

模型优化

这个地方代码差不多,注意训练的时候调用model.train(),测试的时候调用model.eval(), 还有注意交叉熵损失函数的输入就行。

1
2
3
4
5
6
7
8
9
10
11
12
13
14
15
16
17
18
19
20
21
22
23
24
25
26
27
28
29
30
31
32
33
34
def train_model(self):
total_loss = 0
model = self.model
model.train()

batcher = self.train_data.get_batcher()

for step in range(0,self.train_data.num_steps):
batch = next(batcher)
# 获取数据
video_features = batch.get('video_batch')
flengths = batch.get('video_len_batch')
captions = batch.get('caption_batch')
clengths = batch.get('caption_len_batch')
video_features = to_var(self.args, video_features)
captions = to_var(self.args, captions)
# 求损失函数
outputs = self.model(video_features, flengths, captions, clengths)
targets = pack_padded_sequence(captions, clengths, batch_first=True)[0]
loss = self.ce(outputs, targets)

# update
self.optim.zero_grad()
loss.backward()

t.nn.utils.clip_grad_norm(
model.parameters(), self.args.grad_clip)
self.optim.step()

total_loss += loss.data
pbar.set_description(f"train_model| loss: {loss.data[0]:5.3f}")
step += 1
self.step += 1

video captioning

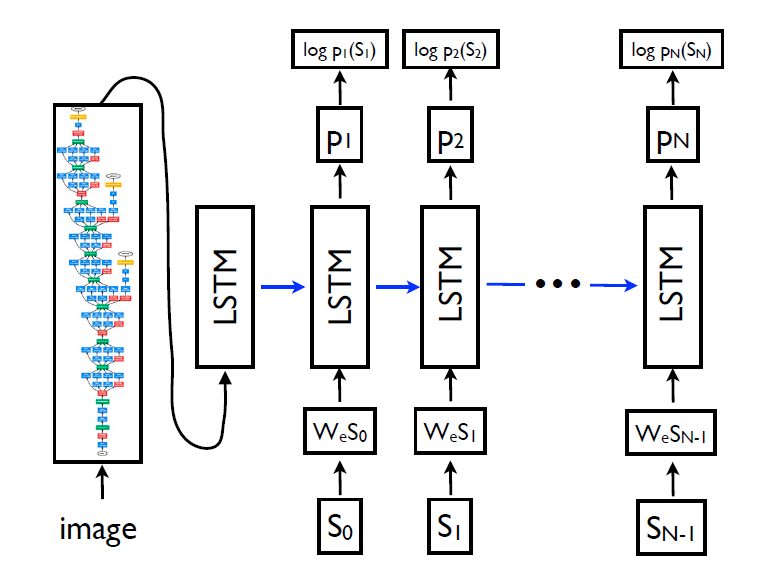
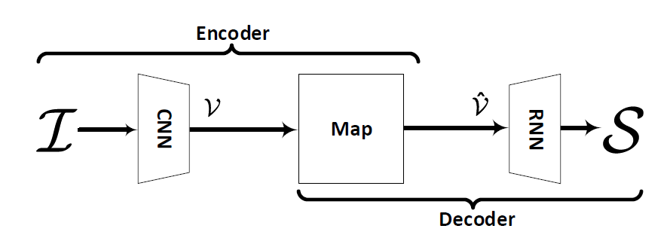
video captioning 是一项跨模态任务,输入视频,输出自然语言来描述视频内容。video captioning的pipeline如图所示。首先使用预训练的模型(如resnet)提取视觉特征,然后通过编码器对视觉特征进一步融合,最后使用解码器生成句子。

以下结合论文阐述video captioning上一些重要的工作,image captioning 与 video captioning 有着高度相似,因此以下会参杂着一些image captioning的文章。

Show and Tell: A Neural Image Caption Generator[2015]

image captioning方向的早期工作,使用预训练的VGG模型提取图像特征,输入到LSTM中生成句子

Sequence to Sequence – Video to Text[2015]

video captioning方向的早期工作,同样是使用预训练模型提取图像特征后输入到LSTM中生成句子,与 image captioning 不同的是使用了双层LSTM来融合不同视频帧的特征

Show, Attend and Tell: Neural Image Caption Generation with Visual Attention [2016]

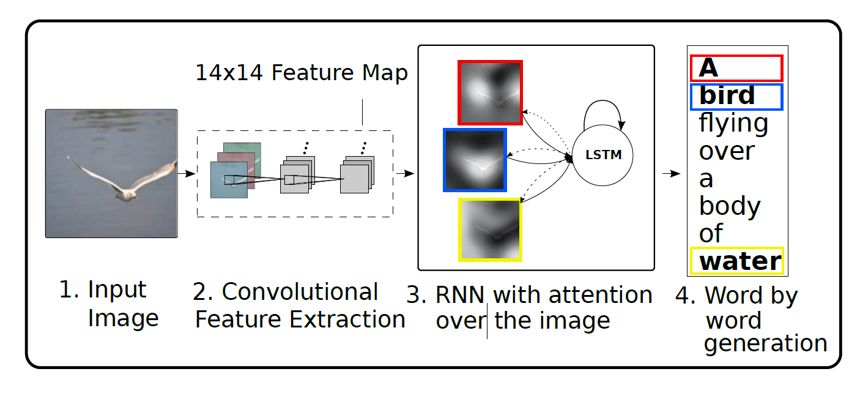
将注意力机制引入到image captioning,其出发点是生成每个词的时候提取最相关的视觉特征。注意力机制是一个重要的研究点,结合任务产生了各种不同的注意力机制。

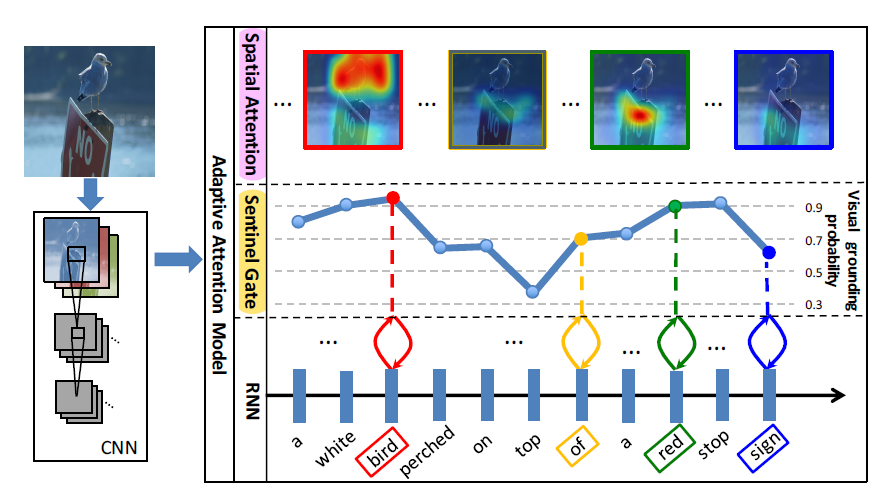
Knowing When to Look: Adaptive Attention via A Visual Sentinel for Image Captioning [2017]

注意力机制的改进之一,出发点在于句子中的连接词是与视觉特征无关的,更多取决于句子中的语法结构,其动机图如下

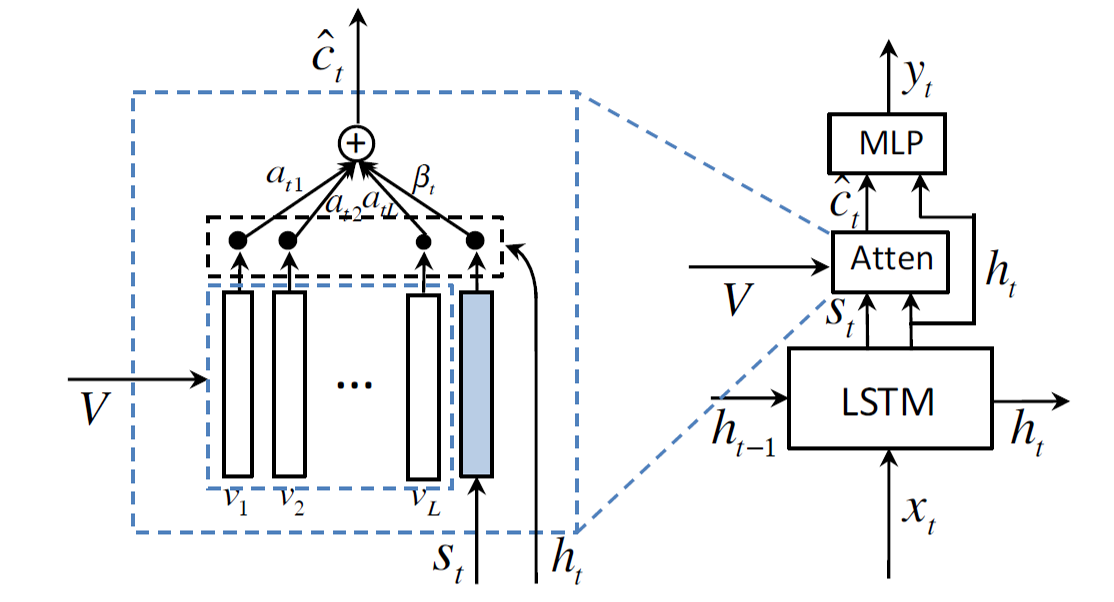
其实现方式也值得借鉴,直接增加一个表示句子内容的特征矢量

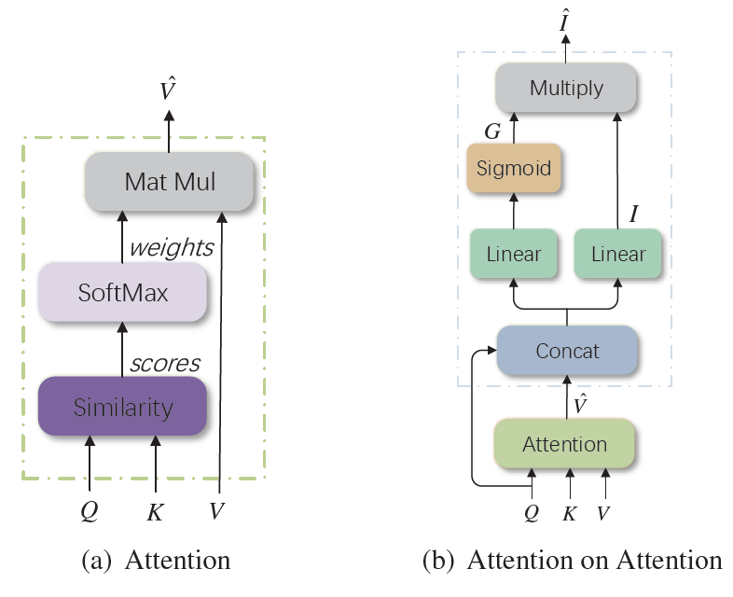
Attention on Attention for Image Captioning [2019]

同样是对注意力机制的改进,并且效果还行,被后续挺多文章引入到框架中

关于动机,直接引用原文的措辞:to measure the relevance between the attention result and the query
另外还有很多其他关于注意力机制的改进,如X-Linear Attention Networks for Image Captioning [2020],Motion Guided Spatial Attention for Video Captioning [2019],More Grounded Image Captioning by Distilling Image-Text Matching Model [2020]等,本文不作一一阐述。

Reconstruction Network for Video Captioning [2018]

在结构上面,该文在编码器解码器后添加了重构器形成了闭环,即通过生成的文字特征重构视觉特征。

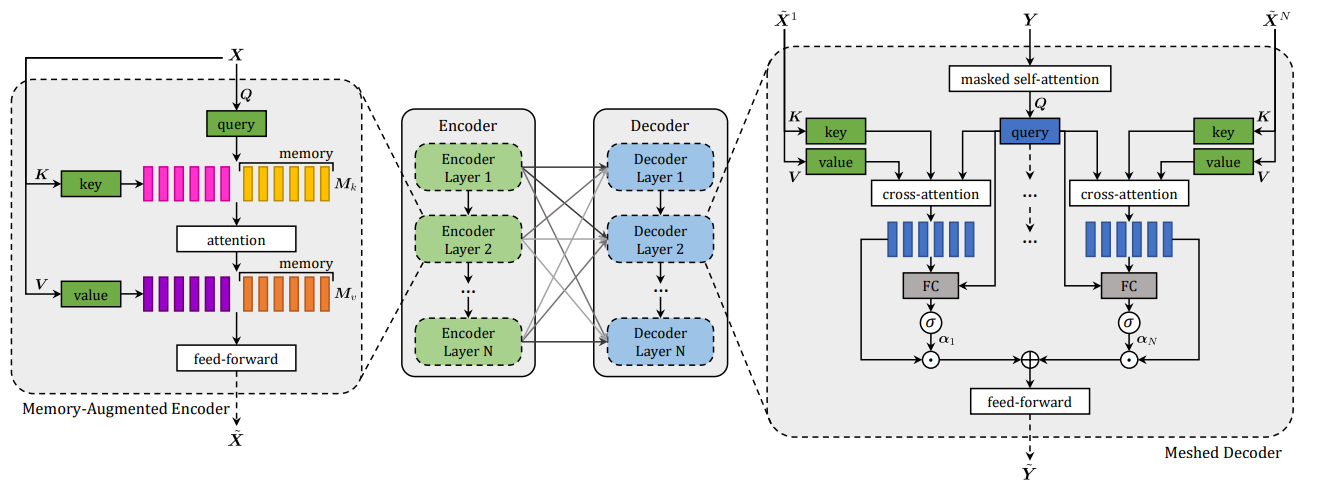
Meshed-Memory Transformer for Image Captioning [2020]

随着transformer在自然语言方向的应用,近年transformer也成为了image captioning和video captioning的主流框架。

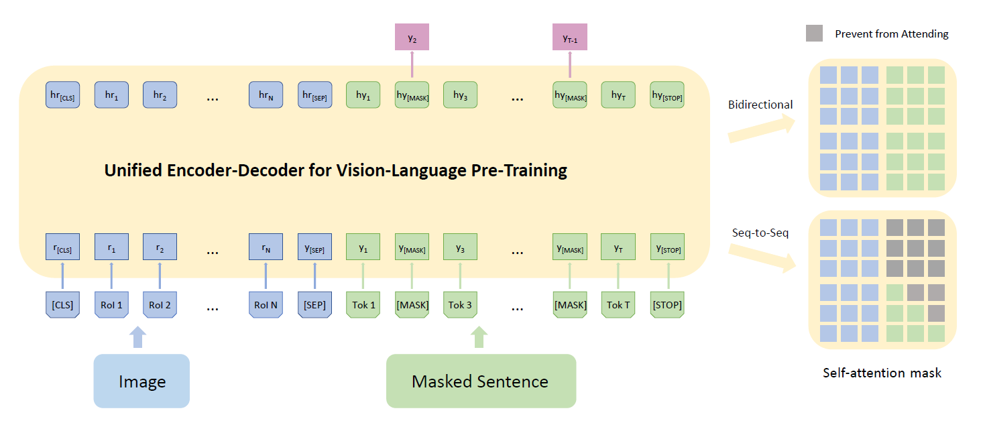
Unified Vision-Language Pre-Training for Image Captioning and VQA [2019]

统一框架也是研究热点,如将captioning和VQA融合到一个框架中,关于统一框架建议先看 Unified Language Model Pre-training for Natural Language Understanding and Generation [2019]

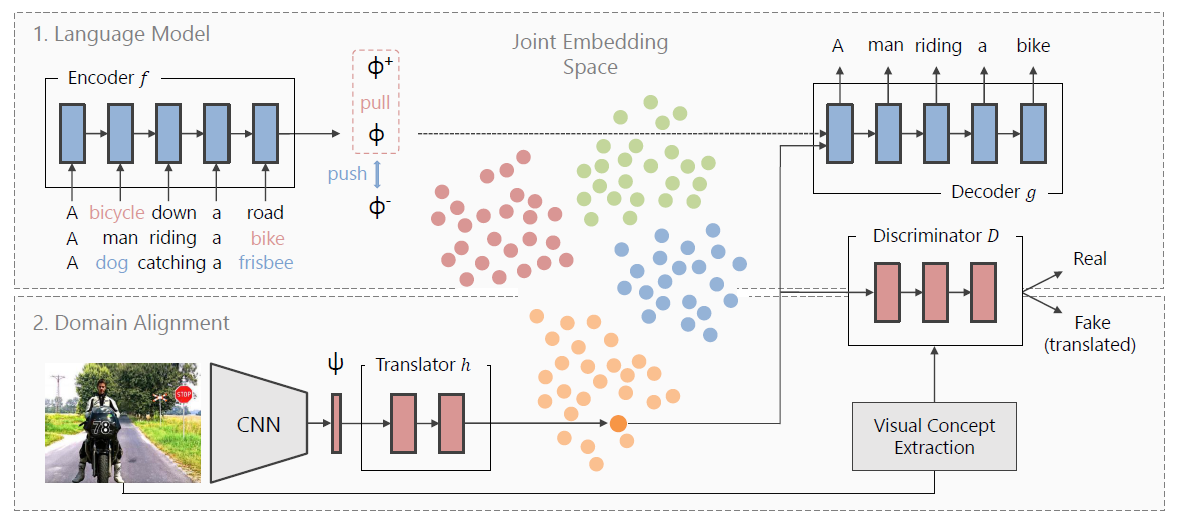
Towards Unsupervised Image Captioning with Shared Multimodal Embeddings [2019]

除了使用监督学习的方式,无监督学习框架在captioning也有应用,可以参考 unpaired Image-to-Image Translation using Cycle-Consistent Adversarial Networks[2017]

Bottom-Up and Top-Down Attention for Image Captioning and Visual Question Answering [2018]

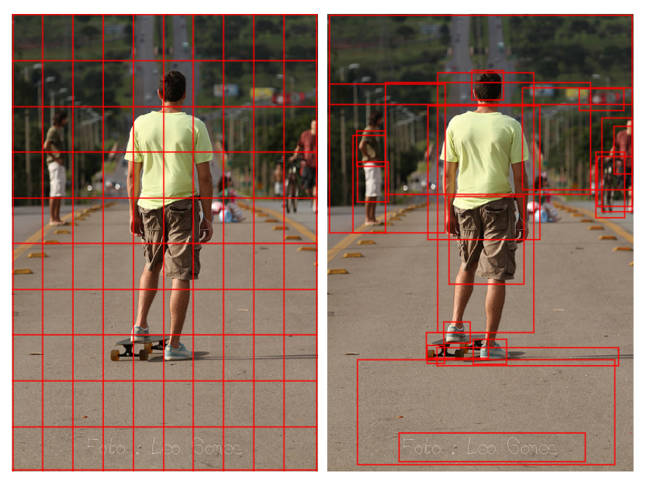
captioning作为一个图像到文本的跨模态任务,更有效的图像提取特征方式能够提高其指标,该文使用了目标检测网络提取图像特征。

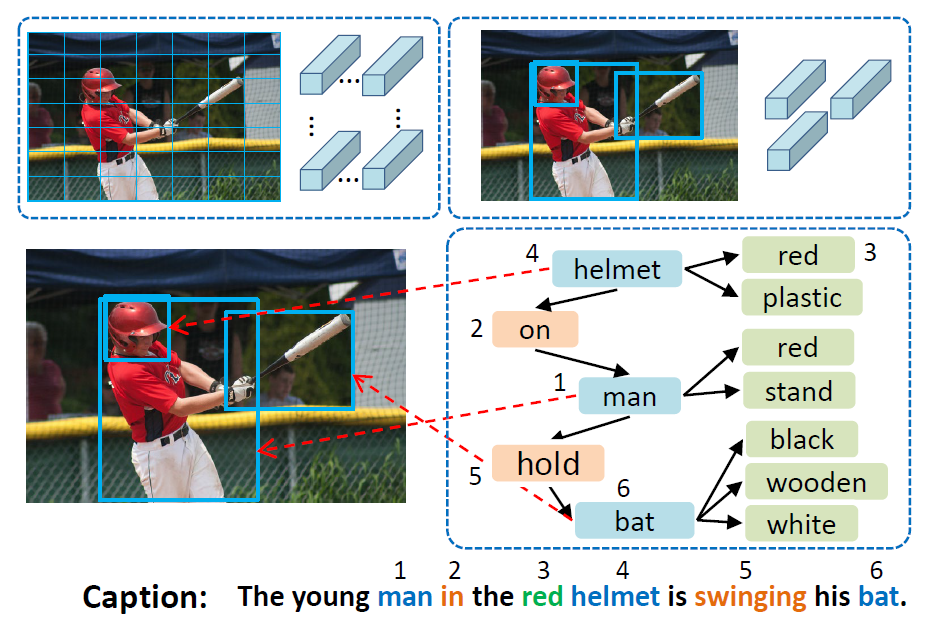
Aligning Linguistic Words and Visual Semantic Units for Image Captioning [2019]

该文在视觉特征提取上更进一步,除了提取object feature,还提取了object之间的关系特征,关于这个关系特征如何提取参考:Neural Motifs: Scene Graph Parsing with Global Context [2017]

最后其网络框架如图

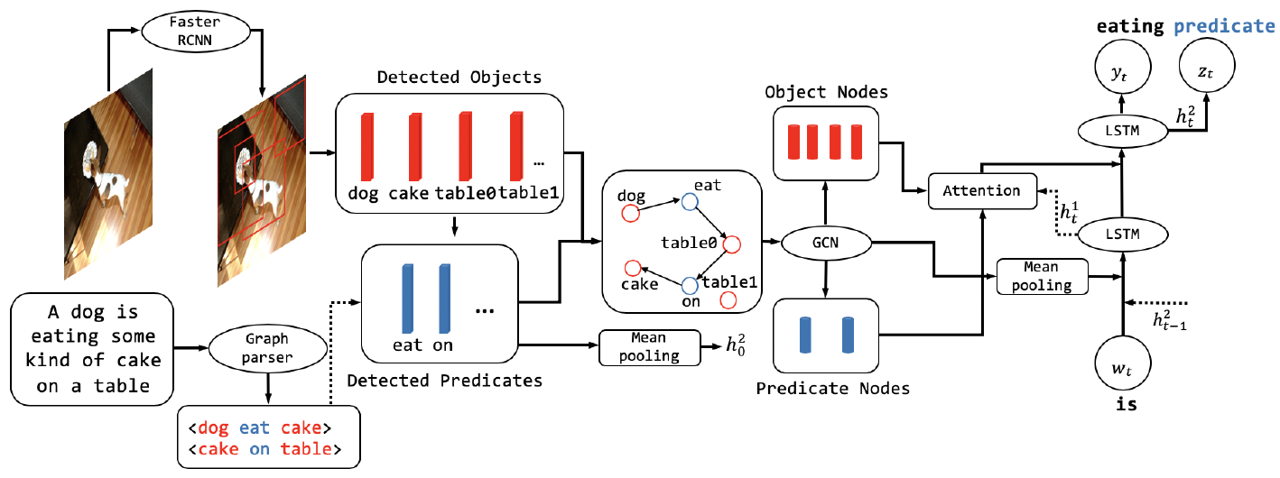
Improving Image Captioning with Better Use of Captions [2020]

在视觉object关系特征提取上,上文用的是Motifs以监督的方式生成的,该文提出从captioning端也构建一个场景图来指导视觉场景图的生成

视觉关系应用到基础的检测网络框架也有相关尝试,参见:Visual Commonsense R-CNN [2020]

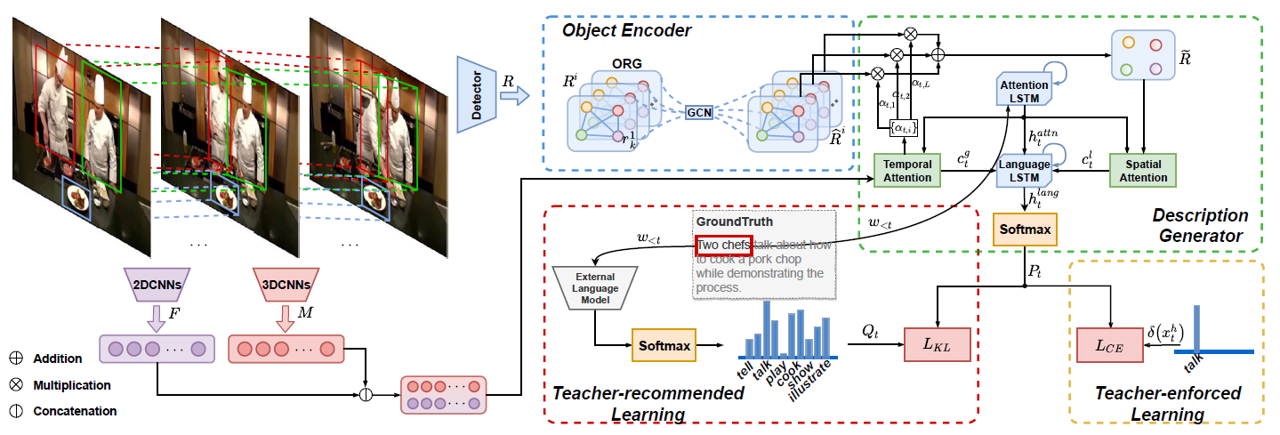
在image captioning方向可以使用有监督的方式来生成场景图信息,从而利用其中的关系特征,但是在video captioning就难以生成相应的时间和空间关系特征了,该文直接将其包含在网络结构中让其自动学习object之间的关系特征,非常巧妙

M3: Multimodal Memory Modelling for Video Captioning [2018]

captioning任务作为一个文本生成任务,很多machine translation任务存在的问题及解决方法对captioning任务同样有效,如使用记忆网络来解决长时序依赖问题,对应在machine translation的文章为Neural Turing Machines [2014]

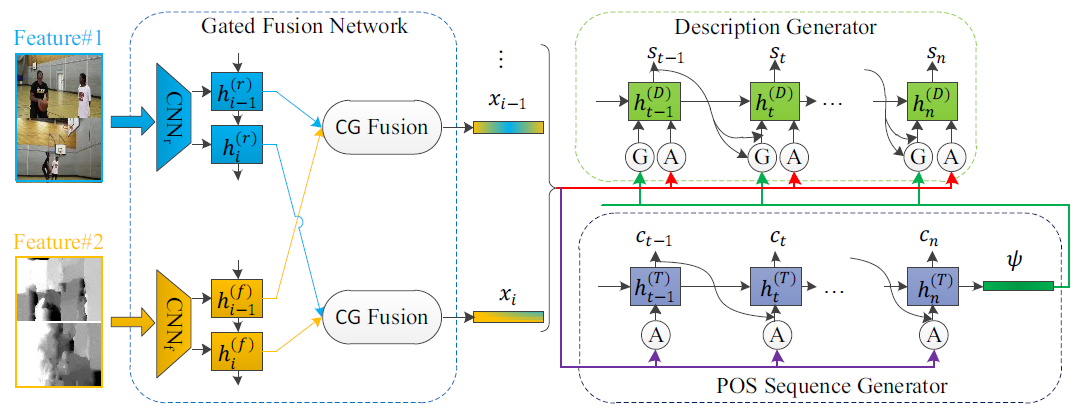
Controllable Video Captioning with POS Sequence Guidance Based on Gated Fusion Network [2019]

或者是使用POS信息来从语法上约束生成的句子

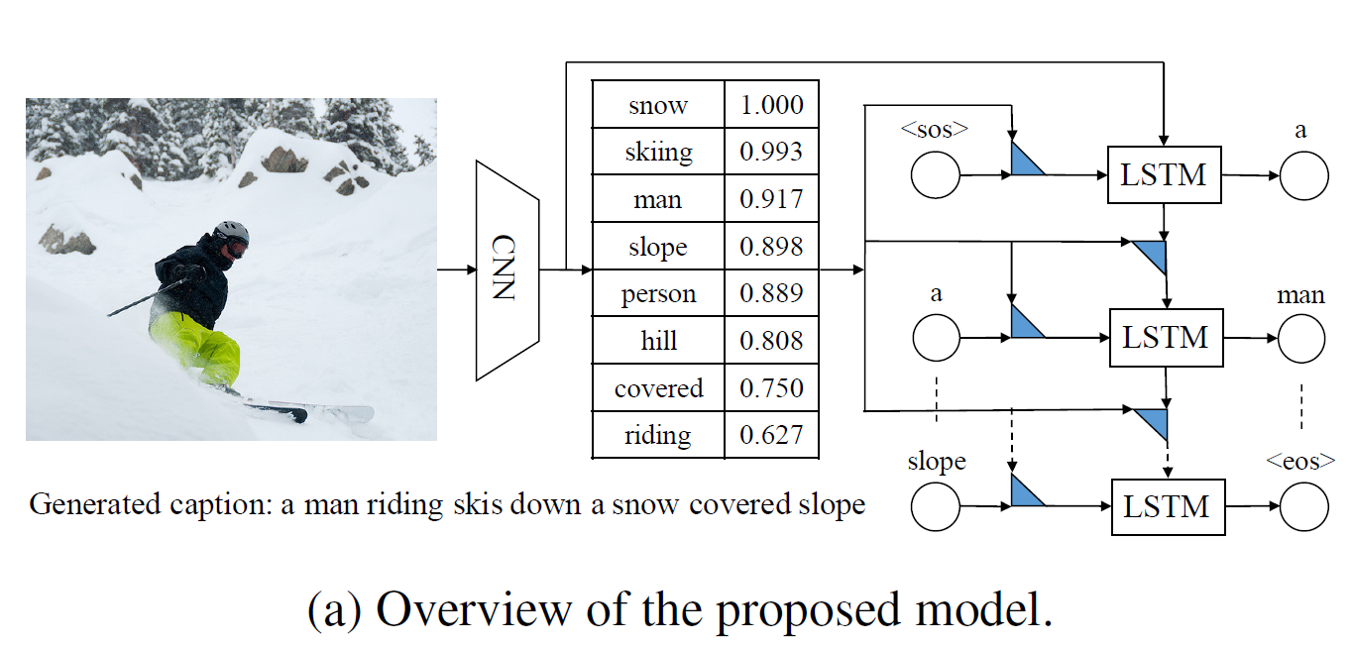
针对语料库的长尾效应,使用预训练模型对其进行修正

Semantic Compositional Networks for Visual Captioning [2017]

从图像信息中提取出属性信息,指导句子的生成

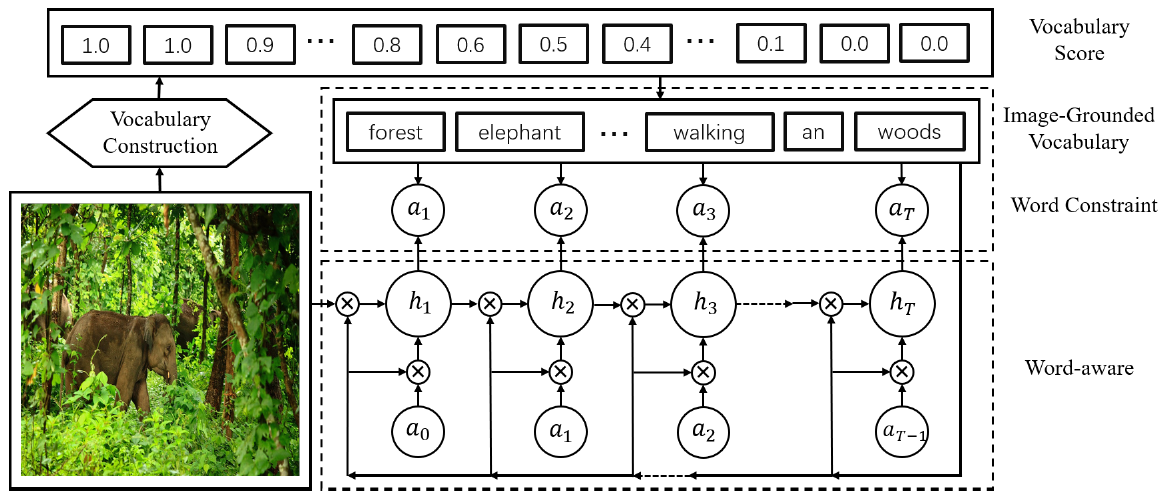
Bridging byWord: Image-Grounded Vocabulary Construction for Visual Captioning [2019]

这篇文章和从图像提取属性信息辅助句子生成类似,不过该文是通过图像来缩小生成句子的词空间,很巧妙。

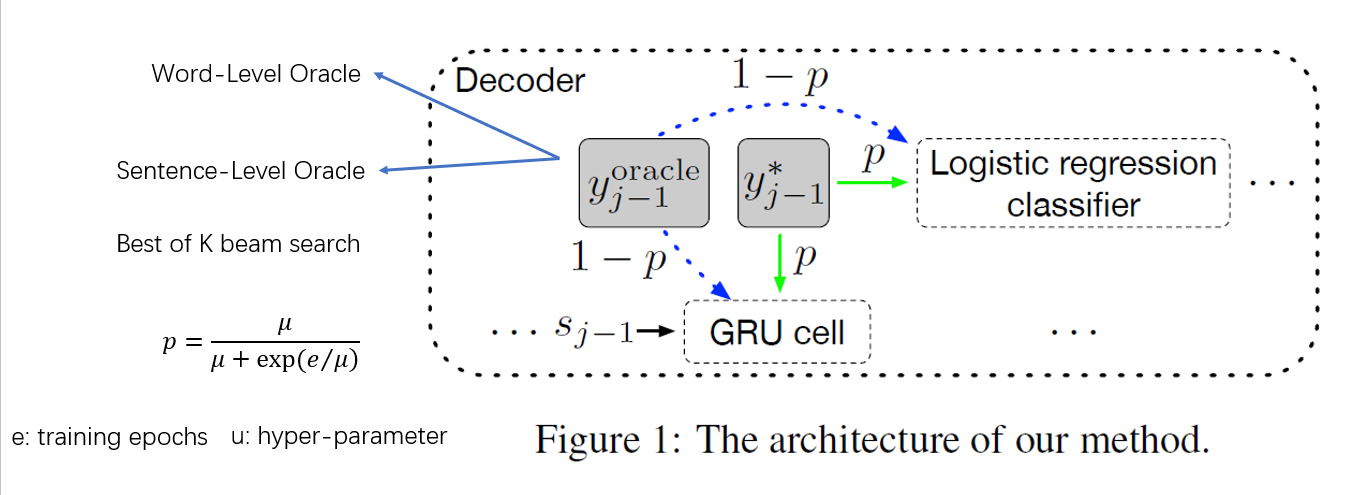
Bridging the Gap between Training and Inference for Neural Machine Translation [2019]

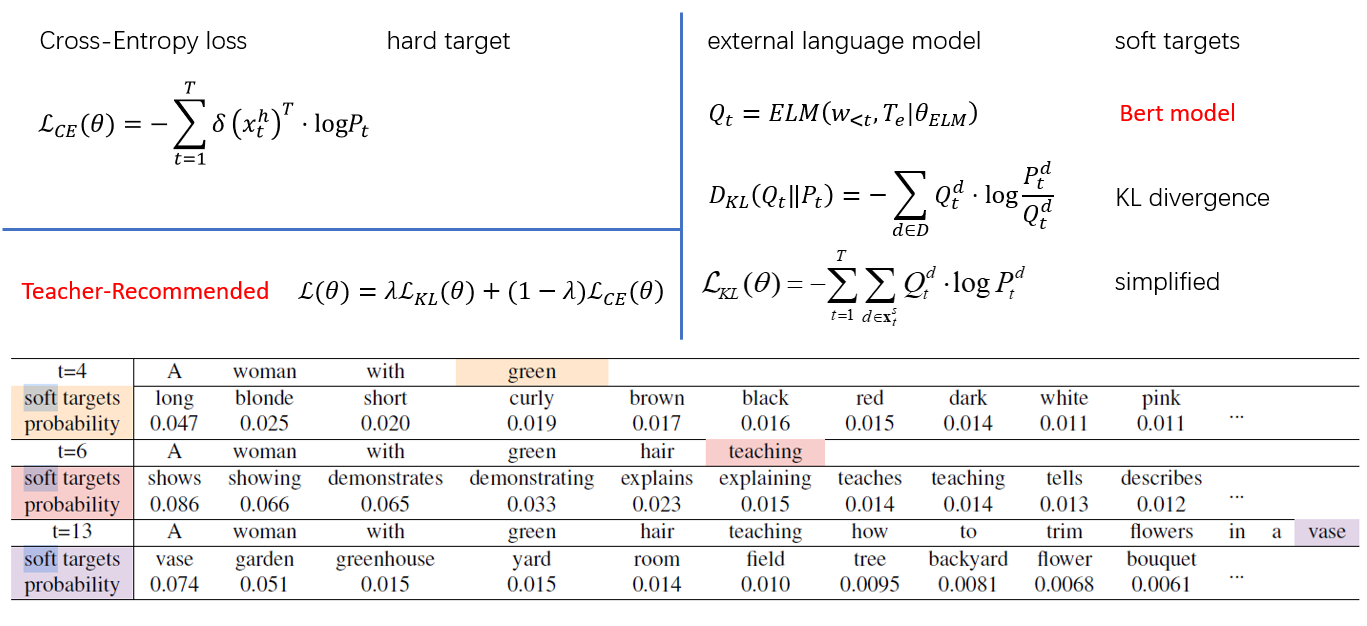
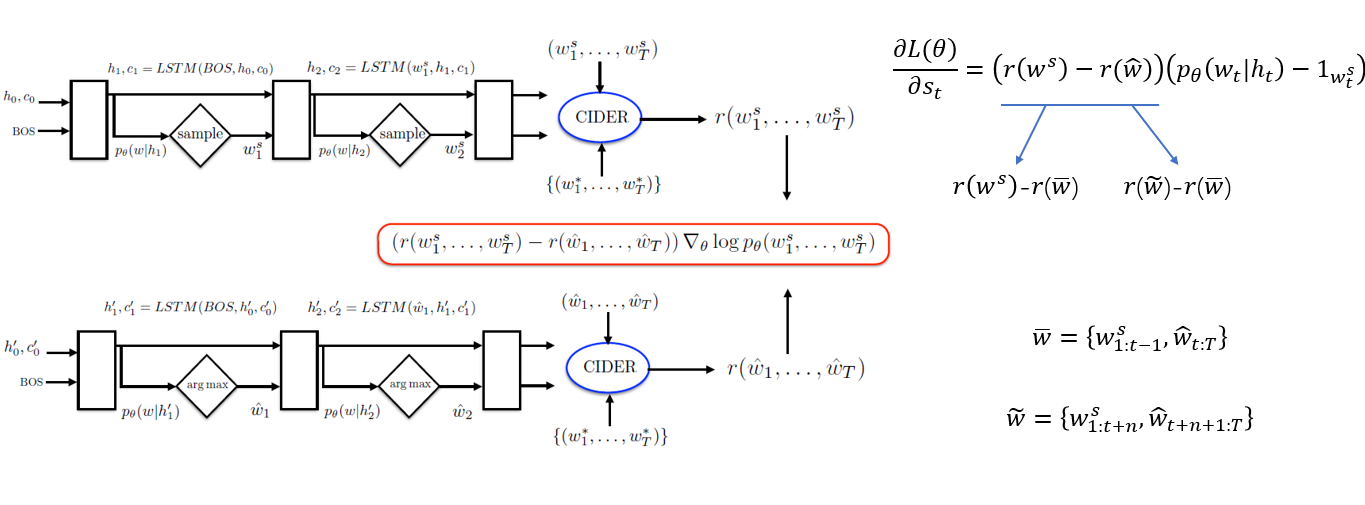
既然是序列生成任务自然存在exposure bias问题,该文在训练与测试的差异及训练难度上取了一个折中(关于训练阶段为什么不直接使用上个一个时间步生成的单词输入到当前时间步,因为这样很难训练好,误差积累太大,难收敛)

Self-critical Sequence Training for Image Captioning [2017]

其实解决exposure bias问题更有效的方式是使用强化学习,当然一般会先用交叉熵训练好模型,然后交叉熵+强化学习的方式继续训练模型

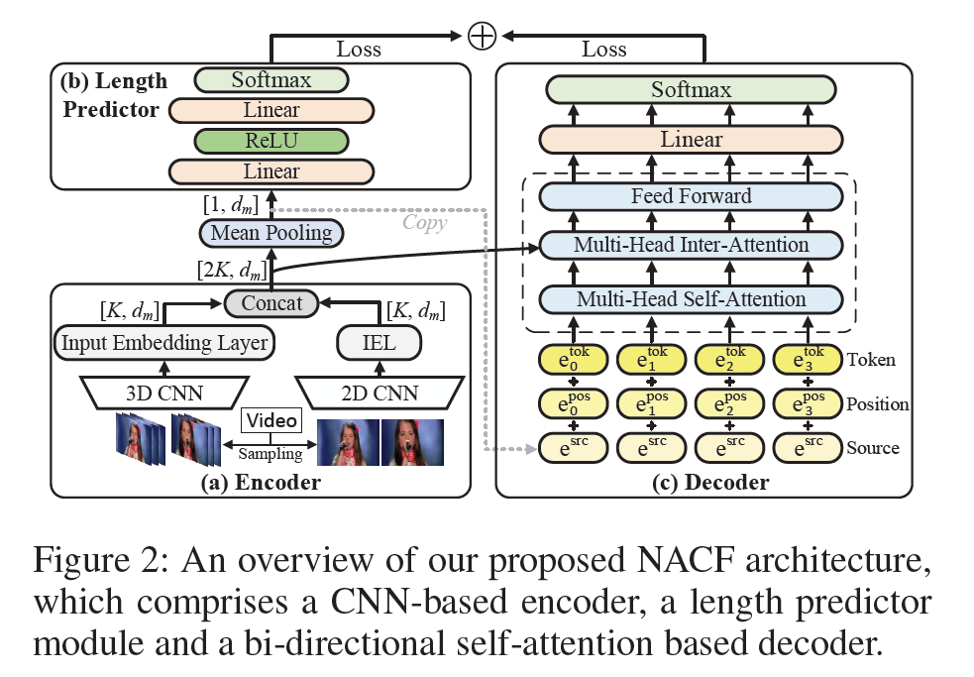
Non-Autoregressive Coarse-to-Fine Video Captioning [2021]

另外也有非自回归这种方式用于生成句子,这种方式自然不存在exposure bias问题,而且生成速度更快,但由于没有直接建模生成单词之间的依赖关系,一般效果不如自回归生成模型,更多需要参考自然语言方向对其的改进。

CLIP Meets Video Captioning: Concept-Aware Representation Learning Does Matter[2022]

前文提到了captioning的整个pipeline的第一步是用预训练模型提取图像特征,一般使用的预训练模型都是基于图像分类的,而本文将其换成了CLIP并取得了不错的效果。
CLIP模型来自论文Learning Transferable Visual Models From Natural Language Supervision[2021], 其框架图和主要流程如下

1
2
3
4
5
6
7
8
9
10
11
12
13
14
15
16
17
18
19
20
# image_encoder - ResNet or Vision Transformer
# text_encoder - CBOW or Text Transformer
# I[n, h, w, c] - minibatch of aligned images
# T[n, l] - minibatch of aligned texts
# W_i[d_i, d_e] - learned proj of image to embed
# W_t[d_t, d_e] - learned proj of text to embed
# t - learned temperature parameter
# extract feature representations of each modality
I_f = image_encoder(I) #[n, d_i]
T_f = text_encoder(T) #[n, d_t]
# joint multimodal embedding [n, d_e]
I_e = l2_normalize(np.dot(I_f, W_i), axis=1)
T_e = l2_normalize(np.dot(T_f, W_t), axis=1)
# scaled pairwise cosine similarities [n, n]
logits = np.dot(I_e, T_e.T) * np.exp(t)
# symmetric loss function
labels = np.arange(n)
loss_i = cross_entropy_loss(logits, labels, axis=0)
loss_t = cross_entropy_loss(logits, labels, axis=1)
loss = (loss_i + loss_t)/2

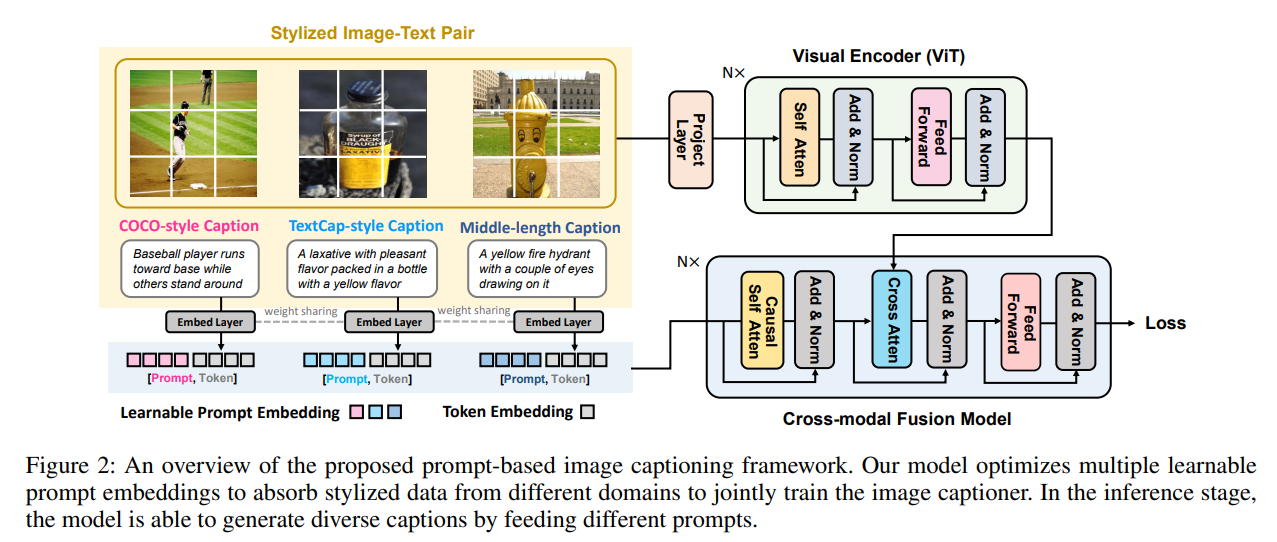
Controllable Image Captioning via Prompting[2022]

该文将Prompt应用到image captioning上, controllable也一直是研究热点,关于prompt知识可以查阅 Pre-train prompt and predict A systematic survey of prompting methods in natural language processing,不过不得不说这些超大规模的预训练模型一般玩不起。